
Android DatePicker dialog allows the user to select a date in year, month and day in a standardized format. To create this, you can use Android.app.DatePickerDialog Class. Android provides a DatePickerDialog class which creates a floating dialog. In this tutorial we would be discussing how to create DatePickerDialog in android and how to deal with it. DatePickerDialog class is inherited from the AlertDialog class. It has some additional features along with the features of an AlertDialog class. The DatePickerDialog when invoked allows the user to pick a date from the DatePicker widget.
The datePickerDialog will disable the Active Activity until the user selects the date and click “set” button of the dialog.
OnDateSetListener is the interface that has to be implemented with onDateSet callback to indicate the user is done filling in the date.
Let us now look at a simple example on how to create a DatePickerDialog in android. In this example we would be creating a DatePicker Dilaog on click of a button.
Required layouts
- main.xml
Required activities
- DatePickerDialog.java
Follow the below steps to create a DatePickerDialog
Step 1: Set up the android development environment
If you are not familiar with setting up an android environment, please refer to one of our previous posts Android Environment. Note: This example is build using android 2.2
Step 2: Create an android Project
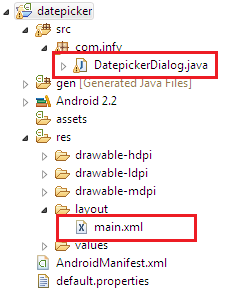
Create an android project named datepicker with the launcher activity DatepickerDialog.java. Please refer the post Create a sample app to know more on how to create a new android project. Now your project has an activity “DatePickerDialog.java” and a layout xml file “main.xml”. The complete project structure is as below.
Step 3: Create a layout xml file
In this example we would be using main.xml layout file, which gets created when you create an android project. The main.xml layout file has the below Views,
- TextView- Which has the text “DatePicker Demo”.
- EditText- Which displays the current date when you run your project and then it displays the date that you set using datePickerDialog.
- Button named “Change”- on click of this button, a DatePickerDialog appears which allows the user to change the date displayed in the edittext.
Open the main.xml file and paste the below code.
<RelativeLayout android:id="@+id/RelativeLayout01"
android:layout_width="fill_parent" android:layout_height="fill_parent"
xmlns:android="<a href="http://schemas.android.com/apk/res/android">
http://schemas.android.com/apk/res/android</a>">
<TextView android:id="@+id/TextView01" android:layout_width="wrap_content"
android:layout_height="wrap_content" android:text="DatePicker Demo"
android:layout_marginTop="30dip" android:layout_centerHorizontal="true"
android:textStyle="bold" android:textSize="20sp"></TextView>
<EditText android:text="@+id/EditText01" android:id="@+id/EditText01"
android:layout_below="@id/TextView01" android:layout_height="50dip"
android:layout_width="150dip" android:layout_marginTop="15dip"></EditText>
<Button android:id="@+id/Button01" android:layout_width="wrap_content"
android:layout_height="wrap_content" android:layout_below="@+id/TextView01"
android:layout_toRightOf="@+id/EditText01" android:text="Change"
android:layout_marginTop="15dip"></Button>
</RelativeLayout>
Step 4: Create the required activities
In this Example, the launcher activity “DatePickerDialog.java” is used. Open the activity and paste the below code.
package com.infy;
import java.util.Calendar;
import android.app.Activity;
import android.app.DatePickerDialog;
import android.app.Dialog;
import android.app.DatePickerDialog.OnDateSetListener;
import android.os.Bundle;
import android.view.View;
import android.view.View.OnClickListener;
import android.widget.Button;
import android.widget.DatePicker;
import android.widget.EditText;

public class DatepickerDialog extends Activity{
/** Called when the activity is first created. */
EditText etDate;
Button change_date;
final int Date_Dialog_ID=0;
int cDay,cMonth,cYear; // this is the instances of the current date
Calendar cDate;
int sDay,sMonth,sYear; // this is the instances of the entered date
@Override
public void onCreate(Bundle savedInstanceState) {
super.onCreate(savedInstanceState);
setContentView(R.layout.main);
etDate=(EditText)findViewById(R.id.EditText01);
change_date=(Button)findViewById(R.id.Button01);
change_date.setOnClickListener(new OnClickListener() {

@Override
public void onClick(View v) {
// TODO Auto-generated method stub
//triggers the DatePickerDialog
showDialog(Date_Dialog_ID);
}
});
//getting current date
cDate=Calendar.getInstance();
cDay=cDate.get(Calendar.DAY_OF_MONTH);
cMonth=cDate.get(Calendar.MONTH);
cYear=cDate.get(Calendar.YEAR);
//assigning the edittext with the current date in the beginning
sDay=cDay;
sMonth=cMonth;
sYear=cYear;
updateDateDisplay(sYear,sMonth,sDay);
}
@Override
protected Dialog onCreateDialog(int id) {

switch (id) {
case Date_Dialog_ID:
return new DatePickerDialog(this, onDateSet, cYear, cMonth,
cDay);
}
return null;
}

private void updateDateDisplay(int year,int month,int date) {
// TODO Auto-generated method stub
etDate.setText(date+"-"+(month+1)+"-"+year);
}
private OnDateSetListener onDateSet=new OnDateSetListener() {
@Override
public void onDateSet(DatePicker view, int year, int monthOfYear,
int dayOfMonth) {
// TODO Auto-generated method stub
System.out.println("2");
sYear=year;
sMonth=monthOfYear;
sDay=dayOfMonth;
updateDateDisplay(sYear,sMonth,sDay);
}
};
}
As you can see in the above code, The DatePickerDialog is created as below
- a DatePickerDialog is defined using a member variable “Date_Dialog_ID”. This should be unique.
- updateDateDisplay is called to set the Edittext with the date that we pass as parametes to this method.
- The DatePickerDialog is created using the method “onCreateDialog(int id)”. you must provide a case for your dialog if you are using more than one Dailog. When showDialog(Date_Dialog_ID) method is called, it triggers onCreateDialog method which returns an appropriate Dialog instance.
- In onCreateDialog method, we create an instance of DatePickerDialog.
- OnDateSetListener interface has to be implemented with onDateSet callback, which is called when you select a date from the Dialog.
Step 5: Declare the activity in AndroidManifest.xml file
Our launcher activity “DatePickerdialog.java” is declared automatically when we create our project. If you want to know more about Manifest file, please refer to the post Manifest.
Our Androidmanifest.xml file has the below code.
<?xml version="1.0" encoding="utf-8"?>
<manifest xmlns:android="<a href="http://schemas.android.com/apk/res/android">http://schemas.android.com/apk/res/android</a>"
package="com.infy"
android:versionCode="1"
android:versionName="1.0">
<application android:icon="@drawable/icon" android:label="@string/app_name">
<activity android:name=".DatepickerDialog"
android:label="@string/app_name">
<intent-filter>
<action android:name="android.intent.action.MAIN" />
<category android:name="android.intent.category.LAUNCHER" />
</intent-filter>
</activity>

</application>
<uses-sdk android:minSdkVersion="8" />
</manifest>
Step 6: Run your application
Select the project->right click->Run As->Android Application
Now your activity “DatePickeDialog.java” opens up as below.
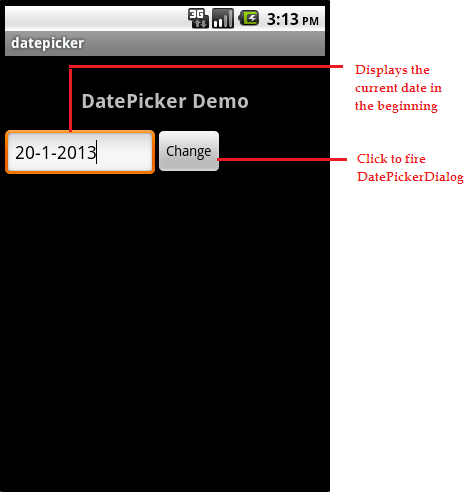
As you can see in the above screen, The Edittext has the current date in the beginning. Click on the button “Change” to fire a DatePickerDialog, which takes you to the below screen.
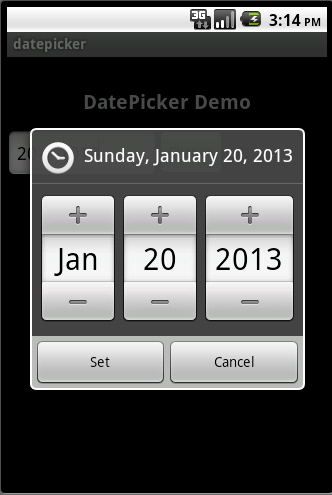
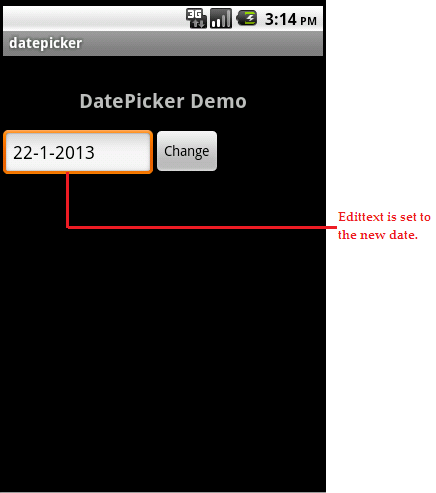
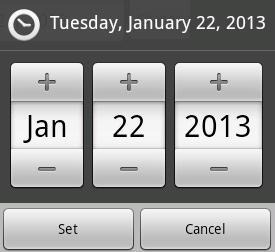
You can now see the displayed DatePickerDialog. Change the current date to new date of your choice. For example I would change the Date to 22 jan 2013. Click on Set button to set the new date to Edittext. Cancel button simply closes your Dialog without changing the Edittext contents. On click of “Set” button, the EditText contents changes as below.
Try clicking the “Change” button once again(second time), It displays the DatePickerDialog which shows the DatePicker Widget with the date chosen previous time (ie. 22 jan 2013) as below.
If you want to reuse the Dialog that you have created, you want to reset it to the current date each time the dialog is shown. To do this, use onPrepareDialog method of the Activity. Add the below onPrepareDialog method to your activity, to make your DatePicker display the current date each time it is shown.
@Override
protected void onPrepareDialog(int id, Dialog dialog) {
// TODO Auto-generated method stub
switch (id) {
case Date_Dialog_ID:
((DatePickerDialog)dialog).updateDate(cYear,cMonth,cDay);
break;

}
}
This is how you can allow user to choose date using android DatePickerDialog. You can always add a DatePicker component to your layout that displays a DatePicker widget to the user. We would be discussing about DatePicker Widget in our upcomming Posts. If you have any doubts, please post it in the comment section.