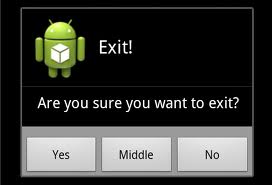
This tutorial explains you how to create a simple AlertDialog box and how to deal with those dialogs. Dialog is a small window which takes a small part in your screen. It is majorly used to react to user driven events. Dialogs are always part of your activity. It gets the focus unless the user closes it. Android dialogs are used for many purposes such as,
- to inform the user about a problem that has occurred.
- to give message to the user about an ongoing process.
- to confirm before deleting/saving data.
 Dialog class is the base class for all dialog types. The subclasses of Dialog class are,
- AlertDialog
- Progress Dialog
- DatePickerDialog
- TimePickerDialog
We should create the instance of one of the above subclasses to create a dialog.
Structure of a Dialog
A simple android dialog box has the following components.
- Title
- This component is optional. You can omit it if your content area has a simple message that needs to be shown to the user as below.If your content area is designed to ask user confirmation or if it needs any user input then it is a good practice to add a title.
- Content area
- This component can contain,
- A message
- A list
- Custom layout
- This component can contain,
- Action buttons
- This component is used to collect user response(Example “OK”, “Cancel” etc buttons). There can be maximum three action buttons.
Let us now see how we can create a simple AlertDialog box in android:
Step 1: Set up the android environment
Please go through the article on Environment to know how to set up an android working environment.
Step 2 : Create an android project
Create a project named “My_Dialog” with the activity “Dialog”. If you are not familiar with the creation of android project, please refer the post simple android app.
Step 3: Create a layout
When you create your project, the layout main.xml gets created automatically. Here in this example we are going to use this main.xml to create an alertDialog box.
Open main.xml and paste the below code.
<?xml version="1.0" encoding="utf-8"?>
<RelativeLayout android:id="@+id/RelativeLayout01"
android:layout_width="fill_parent" android:layout_height="fill_parent"
xmlns:android="<a href="http://schemas.android.com/apk/res/android">http://schemas.android.com/apk/res/android</a>">
<EditText android:id="@+id/EditText01" android:text="AlertDialog Demo"
android:layout_height="50dip" android:layout_width="180dip"></EditText>
<Button android:id="@+id/Button01" android:layout_width="wrap_content"
android:layout_height="wrap_content" android:layout_below="@+id/EditText01"
android:text="Clear Data"></Button>
</RelativeLayout>
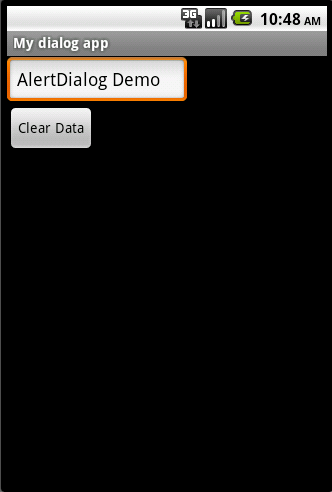
Our main.xml contains a relative layout which in turn contains an Edittext which has a default text “AlertDialod Demo” and a button named “Clear data”.
Step 4: Create the Activities
Here in this sample I am using only the launcher activity Dialog.java. If you are not familiar with creating new activities, please refer our earlier article on Activity. Open the Dialog.java and paste the below code.
package my.app;
import android.app.Activity;
import android.app.AlertDialog;
import android.content.DialogInterface;
import android.content.Intent;
import android.os.Bundle;
import android.view.View;
import android.view.View.OnClickListener;
import android.widget.Button;
import android.widget.EditText;
import android.widget.TextView;
import android.widget.Toast;

public class Dialog extends Activity {
Button Clear;
EditText edit_data;
/** Called when the activity is first created. */
@Override
public void onCreate(Bundle savedInstanceState) {
super.onCreate(savedInstanceState);
setContentView(R.layout.main);

Clear=(Button)findViewById(R.id.Button01);
edit_data=(EditText)findViewById(R.id.EditText01);

Clear.setOnClickListener(new OnClickListener() {
@Override
public void onClick(View v) {
// TODO Auto-generated method stub
AlertDialog.Builder builder=new AlertDialog.Builder(Dialog.this);
//Set a title
builder.setTitle("Confirm");
//Set a message
builder.setMessage("Do you want to Clear?");

builder.setPositiveButton("OK",new DialogInterface.OnClickListener() {

@Override
public void onClick(DialogInterface dialog, int which) {
// TODO Auto-generated method stub

//clearing the contents of edittext on click of OK button
edit_data.setText("");
//Displaying a toast message
Toast.makeText(getApplicationContext(), "Your text has been cleared", Toast.LENGTH_LONG).show();

}
});
builder.setNegativeButton("Cancel",new DialogInterface.OnClickListener() {

@Override
public void onClick(DialogInterface dialog, int which) {
// TODO Auto-generated method stub
dialog.cancel();
}
});

//Create the dialog
AlertDialog alertdialog=builder.create();

//show the alertdialog
alertdialog.show();

}
});
}
}
As you can see in the above code the dialog is created using following steps:
- AlertDialog.Builder is used to override the defalut layout(setting the message,title etc.)
- Set the title and message to the AlertDialog box.
- Set up the action Buttons and their respective functionalities.
- Create the dialog box by calling builder.create().
- Displaying the dialog box using show() method.
Step 5: Declare the Activities in AndroidManifest.xml
Your launcher Activity is automatically registered. If you want to know more information about AndroidMannifest.xml, please refer our earlier article on manifest. The code of the AndroidManifest.xml is as below.
<?xml version="1.0" encoding="utf-8"?>
<manifest xmlns:android="<a href="http://schemas.android.com/apk/res/android">http://schemas.android.com/apk/res/android</a>"
package="my.app"
android:versionCode="1"
android:versionName="1.0">
<application android:icon="@drawable/icon" android:label="@string/app_name">
<activity android:name=".Android_Toast"
android:label="@string/app_name">
<intent-filter>
<action android:name="android.intent.action.MAIN" />
<category android:name="android.intent.category.LAUNCHER" />
</intent-filter>
</activity>
</application>
<uses-sdk android:minSdkVersion="8" />
</manifest>
Step 6: Run your Application
Select the project “My_Dialog”-> Run As-> Android Application. Now your activity “Dialog” fires up like below.
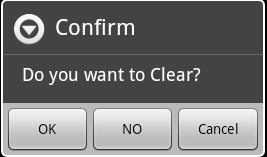
Click on the Button “Clear Data” which opens up an alertdialog box like below.
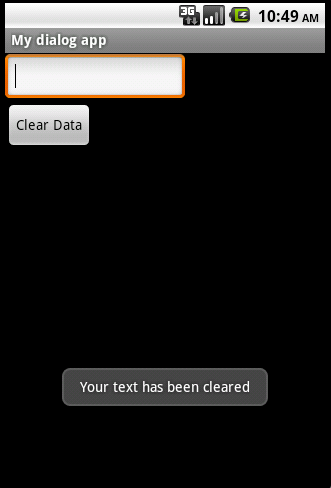
As you can see in the above image the AlertDialog box is asking the confirmation whether to clear the text in the Edittext or not. Clicking “OK” button clears your EditText data. Cancel action button simply closes AlertDialog box without clearing the text. I have set a toast message when the user clicks on “OK” saying that the data is cleared(Whereas creating a toast for this App is optional). For more information about Toast message, please refer the post toast. The Edittext data is cleared and a toast is displayed as below.
As we said earlier an alertdialog box can be created without the title, without the action buttons and without the icon. The following are the variants of an alertdialog box.
Alertdialog box without title
To create an AlertDialog box without title comment or delete the below line in your Dialog.java file.
builder.setTitle("Confirm");
The output without title is as below.
Till now we have seen AlertDialog box with two buttons. We can also create dialogs having 3 buttons or Dialogs with one buttons.
AlertDialog with one buttons
Comment or delete the below code snippet from your Dialog.java file. and run your application.
builder.setNegativeButton("Cancel",new DialogInterface.OnClickListener()
{
@Override
public void onClick(DialogInterface dialog, int which)
{
// TODO Auto-generated method stub
dialog.cancel();
}
});
The alertdialog with one button looks like below.
AlertDilaog with three buttons
Add the below code snippet to your Dialog.java file to create a third Action button.
builder.setNeutralButton("NO",new DialogInterface.OnClickListener()
{
@Override
public void onClick(DialogInterface dialog, int which)
{
// TODO Auto-generated method stub
//Do something
}
});
The AlertDialog with three buttons looks like below:
AlertDialog with custom icon
An AlertDialog box’s icon can be changed by adding the below code snippet.
builder.setIcon(R.drawable.alert);
The AlertBox with custom icon looks as below.
This is how you can create an AlertDialog box in android. If you have any queries, please post it in comment section. I hope this article would have been more useful for you to understand the various alert dialog boxes using android programming.


