The button is used for creating button control which defines clickable action. The buttons are integral part of HTML which selects the elements that are of type button. The Bootstrap provides different types of buttons to specify different states of button. The following are available button classes to style a button in the Bootstrap:
- Default: It is default button.
- Primary: It defines visual weight and primary action in the set of buttons.
- Success: It defines successful message when action completes successfully.
- Info: It is used to define informational alert messages.
- Warning:It indicates warning the user about risks with use of the associated item on the web page.
- Danger: It indicates caution when there is a negative action on the web page.
Following example demonstrates how to customize default buttons:
also read:
<!DOCTYPE html>
<head>
<title>Bootstrap Example</title>
   <link rel="stylesheet" type="text/css" href="myclass.css">
   <link rel="stylesheet" href="http://netdna.bootstrapcdn.com/bootstrap/3.1.1/css/bootstrap.min.css">
   <link rel="stylesheet" href="http://netdna.bootstrapcdn.com/bootstrap/3.1.1/css/bootstrap-theme.min.css">
   <script src="http://netdna.bootstrapcdn.com/bootstrap/3.1.1/js/bootstrap.min.js"></script>
</head>
<body>
<div class="container">
<h2>Default Buttons Example</h2>
<button type="button" class="btn btn-default">Default Button</button>
<button type="button" class="btn btn-primary">Primary Button</button>
<button type="button" class="btn btn-success">Success Button</button>
<button type="button" class="btn btn-info">Informational Button</button>
<button type="button" class="btn btn-warning">Warning Button</button>
<button type="button" class="btn btn-danger">Danger Button</button>
</div>
</body>
</html>
The above script specifies different types of buttons available in the Bootstrap which defines different styles for the buttons.

Changing Sizes of Buttons
The Bootstrap provides facility of changing sizes of buttons by using additional classes .btn-lg, .btn-sm and .btn-xs. The following example demonstrates how to define different sizes of buttons on the web page:
<!DOCTYPE html>
<head>
<title>Bootstrap Example</title>
   <link rel="stylesheet" type="text/css" href="myclass.css">
   <link rel="stylesheet" href="http://netdna.bootstrapcdn.com/bootstrap/3.1.1/css/bootstrap.min.css">
   <link rel="stylesheet" href="http://netdna.bootstrapcdn.com/bootstrap/3.1.1/css/bootstrap-theme.min.css">
   <script src="http://netdna.bootstrapcdn.com/bootstrap/3.1.1/js/bootstrap.min.js"></script>
</head>
<body>
<div class="container">
<h2>Large Buttons</h2>
	<button type="button" class="btn btn-default btn-lg">Default Button</button>
	<button type="button" class="btn btn-primary btn-lg">Primary Button</button>
	<button type="button" class="btn btn-success btn-lg">Success Button</button>
	<button type="button" class="btn btn-info btn-lg">Informational Button</button>
	<button type="button" class="btn btn-warning btn-lg">Warning Button</button>
	<button type="button" class="btn btn-danger btn-lg">Danger Button</button>
<hr>
<h2>Small Buttons</h2>
	<button type="button" class="btn btn-default btn-sm">Default Button</button>
	<button type="button" class="btn btn-primary btn-sm">Primary Button</button>
	<button type="button" class="btn btn-success btn-sm">Success Button</button>
	<button type="button" class="btn btn-info btn-sm">Informational Button</button>
	<button type="button" class="btn btn-warning btn-sm">Warning Button</button>
	<button type="button" class="btn btn-danger btn-sm">Danger Button</button>
<hr>
<h2>Extra Small Buttons</h2>
	<button type="button" class="btn btn-default btn-xs">Default Button</button>
	<button type="button" class="btn btn-primary btn-xs">Primary Button</button>
	<button type="button" class="btn btn-success btn-xs">Success Button</button>
	<button type="button" class="btn btn-info btn-xs">Informational Button</button>
	<button type="button" class="btn btn-warning btn-xs">Warning Button</button>
	<button type="button" class="btn btn-danger btn-xs">Danger Button</button>
</div>
</body>
</html>
The above code uses .btn-lg, .btn-sm and .btn-xs classes to define different sizes of buttons. The .btn-lg class is used to create large size of buttons, the .btn-sm class is used to create small size of buttons and the .btn-xs class is used to create extra small size of buttons on the web page.


Block level Buttons
We can use block level buttons to use full width of container within which the button is residing by using the class .btn-block. The following is an example:
<!DOCTYPE html>
<head>
<title>Bootstrap Example</title>
   <link rel="stylesheet" type="text/css" href="myclass.css">
   <link rel="stylesheet" href="http://netdna.bootstrapcdn.com/bootstrap/3.1.1/css/bootstrap.min.css">
   <link rel="stylesheet" href="http://netdna.bootstrapcdn.com/bootstrap/3.1.1/css/bootstrap-theme.min.css">
   <script src="http://netdna.bootstrapcdn.com/bootstrap/3.1.1/js/bootstrap.min.js"></script>
</head>
<body>
<div class="container">
<h2>Block Level Buttons</h2>
<button type="button" class="btn btn-default btn-lg btn-block">Default Button</button>
<button type="button" class="btn btn-primary btn-lg btn-block">Primary Button</button><hr>
<button type="button" class="btn btn-success btn-sm btn-block">Success Button</button>
<button type="button" class="btn btn-info btn-sm btn-block">Informational Button</button><hr>
<button type="button" class="btn btn-warning btn-xs btn-block">Warning Button</button>
<button type="button" class="btn btn-danger btn-xs btn-block">Danger Button</button>
</div>
</body>
</html>

Active State
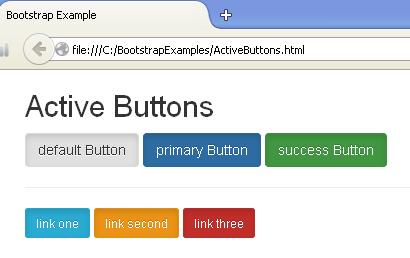
The buttons will be active when they will appear as pressed with darker border and inset shadow. This can be done by using .active on button. We could also use anchor element to show that it is activated. The following is an example:
]
<!DOCTYPE html>
<head>
<title>Bootstrap Example</title>
  <link rel="stylesheet" type="text/css" href="myclass.css">
  <link rel="stylesheet" href="http://netdna.bootstrapcdn.com/bootstrap/3.1.1/css/bootstrap.min.css">
  <link rel="stylesheet" href="http://netdna.bootstrapcdn.com/bootstrap/3.1.1/css/bootstrap-theme.min.css">
  <script src="http://netdna.bootstrapcdn.com/bootstrap/3.1.1/js/bootstrap.min.js"></script>
</head>
<body>
<div class="container">
<h2>Active Buttons</h2>
	<button type="button" class="btn btn-default active">default Button</button>
	<button type="button" class="btn btn-primary active">primary Button</button>
	<button type="button" class="btn btn-success active">success Button</button><hr>
	<a href="#" class="btn btn-info btn-sm active ">link one</button></a>
	<a href="#" class="btn btn-warning btn-sm active">link second</button></a>
	<a href="#" class="btn btn-danger btn-sm active">link three</button></a>
</div>
</body>
</html>

Disabled State
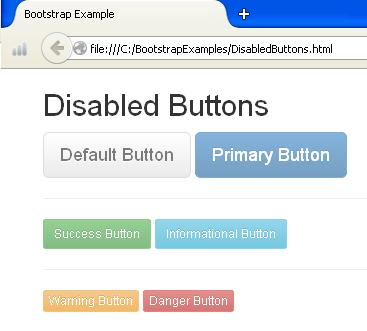
We can disable the button by using disabled attribute to buttons. When a button is disabled, it appears dimmed and does not respond to user input. To disable button, we write as disabled=”disabled” within the button element. We cannot enter any value in that field. The following is an example:
 <!DOCTYPE html>
<head>
<title>Bootstrap Example</title>
   <link rel="stylesheet" type="text/css" href="myclass.css">
   <link rel="stylesheet" href="http://netdna.bootstrapcdn.com/bootstrap/3.1.1/css/bootstrap.min.css">
   <link rel="stylesheet" href="http://netdna.bootstrapcdn.com/bootstrap/3.1.1/css/bootstrap-theme.min.css">
   <script src="http://netdna.bootstrapcdn.com/bootstrap/3.1.1/js/bootstrap.min.js"></script>
</head>
<body>
<div class="container">
<h2>Disabled Buttons</h2>
	<button type="button" class="btn btn-default btn-lg" disabled="disabled">Default Button</button>
	<button type="button" class="btn btn-primary btn-lg" disabled="disabled">Primary Button</button><hr>
	<button type="button" class="btn btn-success btn-sm" disabled="disabled">Success Button</button>
	<button type="button" class="btn btn-info btn-sm" disabled="disabled">Informational Button</button><hr>
	<button type="button" class="btn btn-warning btn-xs" disabled="disabled">Warning Button</button>
	<button type="button" class="btn btn-danger btn-xs" disabled="disabled">Danger Button</button>
</div>
</body>
</html>

Button Tags
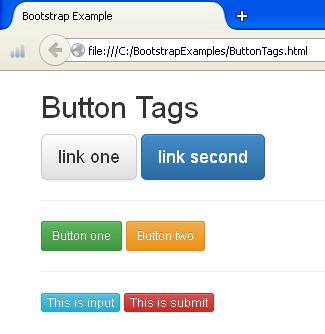
We can also use button classes with <a>,<button> or <input> elements to use buttons as tags. It is recommended that use it only with <button> element to ensure cross browser rendering. The following is an example:
<!DOCTYPE html>
<head>
<title>Bootstrap Example</title>
   <link rel="stylesheet" type="text/css" href="myclass.css">
   <link rel="stylesheet" href="http://netdna.bootstrapcdn.com/bootstrap/3.1.1/css/bootstrap.min.css">
   <link rel="stylesheet" href="http://netdna.bootstrapcdn.com/bootstrap/3.1.1/css/bootstrap-theme.min.css">
   <script src="http://netdna.bootstrapcdn.com/bootstrap/3.1.1/js/bootstrap.min.js"></script>
</head>
<body>
<div class="container">
<h2>Button Tags</h2>
	<a href="#" class="btn btn-default btn-lg">link one</button></a>
	<a href="#" class="btn btn-primary btn-lg">link second</button></a><hr>
	<button class="btn btn-success btn-sm" type="submit">Button one</button>
	<button class="btn btn-warning btn-sm" type="submit">Button two</button><hr>
	<input class="btn btn-info btn-xs" type="button" value="This is input">
	<input class="btn btn-danger btn-xs" type="submit" value="This is submit">
</div>
</body>
</html>


 Read Only / Write Only Operations using Spring Data Repository Services