This tutorial explains how to add text or buttons before, after or on both side of any text based input. The Bootstrap provides the class .input-group with an .input-group-addon class to prepend or append text in a .form-control. To insert before or after elements to a form-control, we just use the class input-group within the div element and place the content inside a <span> tag by using the class input-group-addon within the same div element.
also read:
The following is an example implementing the button groups:
Bootstrap Input Groups
<!DOCTYPE html>
<head>
<title>Bootstrap Example</title>
<link rel="stylesheet" href="http://netdna.bootstrapcdn.com/bootstrap/3.1.1/css/bootstrap.min.css">
<script src="https://ajax.googleapis.com/ajax/libs/jquery/1.11.0/jquery.min.js"></script>
<script src="http://netdna.bootstrapcdn.com/bootstrap/3.1.1/js/bootstrap.min.js"></script>
</head>
<body>
<div class="container">
<h2>Basic Input Group</h2>
<div class="input-group">
   <span class="input-group-addon">#</span>
   <input type="text" class="form-control" placeholder="Number">
</div><br>
<div class="input-group">
   <input type="text" class="form-control" placeholder="Number">
   <span class="input-group-addon">#</span>
</div><br>
<div class="input-group">
   <span class="input-group-addon">#</span>
   <input type="text" class="form-control">
   <span class="input-group-addon">$</span>
</div>
</div>
</body>
</html>
As shown in the script, we are using the classes .input-group and .input-group-addon within the div element to prepend or append elements to a form-control. We can add any types of elements to the user’s input. In above script, we have used # for number or anything else can be used as per user wish for the application.

Bootstrap Sizing of Input Group
We can make input groups with different sizes like larger size, smaller size or extra smaller size by using .input-group-lg, .input-group-sm and .input-group-xs classes. The following is an example:
<!DOCTYPE html>
<head>
<title>Bootstrap Example</title>
<link rel="stylesheet" href="http://netdna.bootstrapcdn.com/bootstrap/3.1.1/css/bootstrap.min.css">
<script src="https://ajax.googleapis.com/ajax/libs/jquery/1.11.0/jquery.min.js"></script>
<script src="http://netdna.bootstrapcdn.com/bootstrap/3.1.1/js/bootstrap.min.js"></script>
</head>
<body>
<div class="container">
<h2>Sizing Input Group</h2>
<div class="input-group input-group-lg">
   <span class="input-group-addon">#</span>
   <input type="text" class="form-control" placeholder="Number">
</div><br>
<div class="input-group input-group-xs">
   <span class="input-group-addon">#</span>
   <input type="text" class="form-control" placeholder="Number">
</div><br>
<div class="input-group input-group-sm">
   <span class="input-group-addon">#</span>
   <input type="text" class="form-control" placeholder="Number">
</div>
</div>
</body>
</html>

Bootstrap Checkboxes and Radio Addons
We can place checkbox and radio button in the input group’s addon. We can place before or after checkbox or radio buttons instead of text as shown in the following example:
<!DOCTYPE html>
<head>
<title>Bootstrap Example</title>
<link rel="stylesheet" href="http://netdna.bootstrapcdn.com/bootstrap/3.1.1/css/bootstrap.min.css">
<script src="https://ajax.googleapis.com/ajax/libs/jquery/1.11.0/jquery.min.js"></script>
<script src="http://netdna.bootstrapcdn.com/bootstrap/3.1.1/js/bootstrap.min.js"></script>
</head>
<body>
<div class="container">
<h2>Checkboxes and Radio Addons</h2>
<div class="input-group">
   <span class="input-group-addon">
   <input type="checkbox"></span>
   <input type="text" class="form-control" placeholder="This is Checkbox">
</div><br>
<div class="input-group">
   <span class="input-group-addon">
   <input type="radio"></span>
   <input type="text" class="form-control" placeholder="This is Radio Button">
</div>
</div>
</body>
</html>
As shown in the above script, we have used checkbox and radio types within span element which is wrapped with div class .input-group.

Bootstrap Button Addons
Like checkbox and radio addons, it’s also possible to place button addons in input groups. To create button addons, we just need to use .input-group-btn instead of using .input-group-addon. The following is an example:
<!DOCTYPE html>
<head>
<title>Bootstrap Example</title>
<link rel="stylesheet" href="http://netdna.bootstrapcdn.com/bootstrap/3.1.1/css/bootstrap.min.css">
<script src="https://ajax.googleapis.com/ajax/libs/jquery/1.11.0/jquery.min.js"></script>
<script src="http://netdna.bootstrapcdn.com/bootstrap/3.1.1/js/bootstrap.min.js"></script>
<style>
div{
max-width:800px;
margin:0 auto;
}
</style>
</head>
<body>
<div class="container">
<h2>Checkboxes and Radio Addons</h2>
<div class="input-group">
   <span class="input-group-btn">
   <button class="btn btn-success" type="button">MyButton</button></span>
   <input type="text" class="form-control" placeholder="This is Button">
</div><br>
<div class="input-group">
   <input type="text" class="form-control" placeholder="This is Button">
   <span class="input-group-btn">
   <button class="btn btn-warning" type="button">MyButton</button></span>
</div>
</div>
</body>
</html>
As shown in the script, we have just wrapped the input group button by using the class .input-group-btn within div element which uses the class called .input-group.

Bootstrap Buttons with Dropdowns
It is also possible to create dropdown menu in input groups by just using the dropdown menu within the class .input-group-btn. The following is an example:
<!DOCTYPE html>
<head>
<title>Bootstrap Example</title>
<link rel="stylesheet" href="http://netdna.bootstrapcdn.com/bootstrap/3.1.1/css/bootstrap.min.css">
<script src="https://ajax.googleapis.com/ajax/libs/jquery/1.11.0/jquery.min.js"></script>
<script src="http://netdna.bootstrapcdn.com/bootstrap/3.1.1/js/bootstrap.min.js"></script>
<style>
div{
max-width:800px;
margin:0 auto;
}
</style>
</head>
<body>
<div class="container">
<h2>Buttons with Dropdowns</h2>
<div class="input-group">
<div class="input-group-btn">
     <button class="btn btn-success dropdown-toggle" type="button" data-toggle="dropdown">Country List<span class="caret"></span></button>
   <ul class="dropdown-menu">
      <li><a href="#">India</a></li>
      <li><a href="#">Australia</a></li>
      <li><a href="#">Srilanka</a></li>
      <li><a href="#">South Africa</a></li>
      <li><a href="#">New Zealand</a></li>
   </ul>
</div>
   <input type="text" class="form-control" placeholder="This is Dropdown Menu">
</div><br>

<div class="input-group">
<input type="text" class="form-control" placeholder="This is Dropdown Menu">
<div class="input-group-btn">
   <button class="btn btn-success dropdown-toggle" type="button" data-toggle="dropdown">Country List<span class="caret"></span></button>
   <ul class="dropdown-menu">
      <li><a href="#">India</a></li>
      <li><a href="#">Australia</a></li>
      <li><a href="#">Srilanka</a></li>
      <li><a href="#">South Africa</a></li>
       <li><a href="#">New Zealand</a></li>
   </ul>
</div>
</div>
</div>
</body>
</html>
As shown in the above script, the dropdown menu in the first input group will get display at left side by default and the second dropdown menu will get display to the right side by using the class .pull-right which is wrapped with ul class defined under div element.

Bootstrap Segmented Buttons
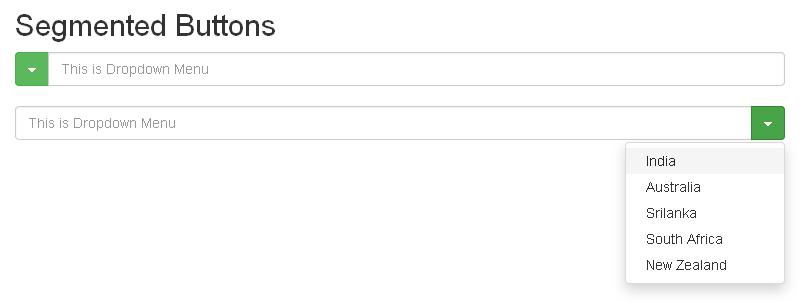
We can segment button dropdowns use the same way as used in the button dropdowns but can be used with one small change with dropdown can be shown in the following example:
<!DOCTYPE html>
<head>
<title>Bootstrap Example</title>
<link rel="stylesheet" href="http://netdna.bootstrapcdn.com/bootstrap/3.1.1/css/bootstrap.min.css">
<script src="https://ajax.googleapis.com/ajax/libs/jquery/1.11.0/jquery.min.js"></script>
<script src="http://netdna.bootstrapcdn.com/bootstrap/3.1.1/js/bootstrap.min.js"></script>
<style>
div{
max-width:800px;
margin:0 auto;
}
</style>
</head>
<body>
<div class="container">
<h2>Segmented Buttons</h2>
<div class="input-group">
<div class="input-group-btn">

   <button class="btn btn-success dropdown-toggle" type="button" data-toggle="dropdown" tabindex="-1"><span class="caret"></span></button>
   <span class="sr-only">Country List</span>
   <ul class="dropdown-menu">
      <li><a href="#">India</a></li>
      <li><a href="#">Australia</a></li>
      <li><a href="#">Srilanka</a></li>
      <li><a href="#">South Africa</a></li>
      <li><a href="#">New Zealand</a></li>
   </ul>
</div>
   <input type="text" class="form-control" placeholder="This is Dropdown Menu">
</div><br>

<div class="input-group">
<input type="text" class="form-control" placeholder="This is Dropdown Menu">
<div class="input-group-btn">
   <button class="btn btn-success dropdown-toggle" type="button" data-toggle="dropdown" tabindex="-1"><span class="caret"></span></button>
   <span class="sr-only">Country List</span>
   <ul class="dropdown-menu pull-right">
       <li><a href="#">India</a></li>
       <li><a href="#">Australia</a></li>
       <li><a href="#">Srilanka</a></li>
       <li><a href="#">South Africa</a></li>
       <li><a href="#">New Zealand</a></li>
    </ul>
</div>
</div>
</div>
</body>
</html>
Above script defines the dropdown menu as shown in the button dropdowns section, we have used with one small change with dropdown as mentioned above. The sr-only class hides information to the screen readers. After executing the script, we will get dropdown menu with down arrow without name of the dropdown menu.


 Create Custom Formatter for Logger Handler