Introduction
Services in Android are components which run in the background. They do not have any user interface. One application can start a service and the service can run in the background even if this application is switched with a new application by the user. There are two types of services namely Unbound Service and Bound Service Unbound Service is a kind of service which runs in the background indefinitely, even if the activity which started this service ends. Bound Service is a kind of service which runs till the lifespan of the activity which started this service. In this article we are going to see step by step procedure to how to create an unbound service.
also read:
- How to set up android development environment?
- How to write AndroidManifest.xml?
- How to create a new activity in Android?
Android Development Tools
The software tools required for this example are as below:
- 1. Java Development kit (JDK 5 or higher)
- 2. Android Software Developer’s Kit(SDK)
- 3. Eclipse IDE Eclipse version 3.4 or higher preferably galileo
- 4. Android Developer Tool (ADT)
How to create a Android service class?
Step 1:
Create an Android Application in Eclipse as below:
Go to File->New-> Other->Android->Android Project
Provide a Project Name, Select a build target. Provide Application name, package name, Activity name, min sdk version and click finish.
Step 2:
Create a folder named raw inside the res folder of your Android Application. Copy a mp3 file to this folder and rename it without any extension with all the letters in lowercase. Check whether a resource id is generated for the same in R.java file in your Android application.
Step 3:
Right click on the Android Project created->New->Class
Provide a Class Name. Click on Browse button near the superclass option, type Service in the search box. Select the Service class from the package android.app and click finish.
Now a class which extends from the Service class will be generated in your Android application.
Step 4:
Edit the class and modify the code similar to the one below
import android.app.Service;
import android.content.Intent;
import android.media.MediaPlayer;
import android.os.IBinder;
import android.util.Log;
import android.widget.Toast;
public class MyService extends Service {
	private static final String TAG = "MyService";
	MediaPlayer player;
@Override
	public IBinder onBind(Intent intent) {
		return null;
		}
	@Override
	public void onCreate() {
		Toast.makeText(this, "My Service Created", Toast.LENGTH_LONG).show();
		Log.d(TAG, "onCreate");
		player = MediaPlayer.create(this, R.raw.sound_file_1);
		player.setLooping(false); // Set looping
		}
	@Override
	public void onDestroy() {
		Toast.makeText(this, "My Service Stopped", Toast.LENGTH_LONG).show();
		Log.d(TAG, "onDestroy");
		player.stop();
		}
	@Override
	public void onStart(Intent intent, int startid) {
		Toast.makeText(this, "My Service Started", Toast.LENGTH_LONG).show();
		Log.d(TAG, "onStart");
		player.start();
		}

}
}
In the above code, onCreate method is overridden to initialize the Mediaplayer with the file you have pasted in the raw folder.onDestroy method is overridden to stop the player.onStart method is overridden to start the player.
Creating Layout
Step 1:
Go to res folder of your project->layout. Here you can see an xml file, edit the file. Otherwise right click on the folder and create a new layout file(Go to New->other->Android XML File->select Layout and give a name)
Step 2:
In the Layout file add two buttons, name it as start and stop and set a background image for the screen
The Layout code is as below:
<?xml version="1.0" encoding="utf-8"?>
<LinearLayout xmlns:android="http://schemas.android.com/apk/res/android"
    android:orientation="vertical"
    android:layout_width="fill_parent"
    android:layout_height="fill_parent" android:background="@drawable/newyear1">
<TextView
    android:layout_width="fill_parent"
    android:layout_height="wrap_content"
    android:text="Services Demo"
/>
<Button android:layout_width="wrap_content" android:layout_height="wrap_content" android:id="@+id/buttonStart" android:text="Start"></Button>
<Button android:layout_width="wrap_content" android:layout_height="wrap_content" android:text="Stop" android:id="@+id/buttonStop"></Button>
</LinearLayout>
Updating the Activity Class
Step 1 :
Update the Activity class as below:
import android.app.Activity;
import android.content.Intent;
import android.os.Bundle;
import android.util.Log;
import android.view.View;
import android.view.View.OnClickListener;
import android.widget.Button;
public class ServicesDemo extends Activity implements OnClickListener {
	private static final String TAG = "ServicesDemo";
	Button buttonStart, buttonStop;
	@Override  public void onCreate(Bundle savedInstanceState) {
		super.onCreate(savedInstanceState);
		setContentView(R.layout.main);
		buttonStart = (Button) findViewById(R.id.buttonStart);
		buttonStop = (Button) findViewById(R.id.buttonStop);
		buttonStart.setOnClickListener(this);
		buttonStop.setOnClickListener(this);  }
	public void onClick(View src) {
		switch (src.getId()) {
		case R.id.buttonStart:      Log.d(TAG, "onClick: starting srvice");
									startService(new Intent(this, MyService.class));
									break;
		case R.id.buttonStop:      Log.d(TAG, "onClick: stopping srvice");
								   stopService(new Intent(this, MyService.class));
								   break;
		}
		}
	}
In the activity class above the onCreate method is overriden in which, the layout you have created is set as the main screen and the event listener for the button is set and the onClick method is defined to start the service and stop the service based on the input event.
startService method is used to start the service in unbound mode, i.e; the service will continuously run without regard for the activity which initiated it.
stopService method is used to stop the service from the current activity, even if the current activity is restarted.
Output of the Application
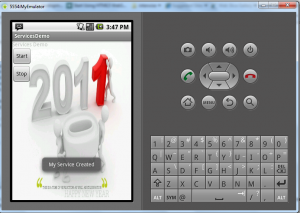
Given below is the output for the service application in the emulator:
 This output shows that your mediaplayer started in the background and it starts playing. You can move to other activities, still you can hear the music is keep on playing in the background.
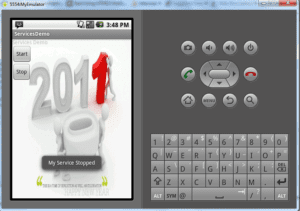
To stop the servie either navigate back to your service activity and click the stop button. You will get the output as below. Your service will be stopped. Another way is leave the service as such till the time the song ends, your service will use stopSelf method to stop itself after the timeout period
Conclusion
Service is a basic building block of Android. Services can be bound or unbound based on the coding methodology followed. The unbound service can be used to have a separate process which should be executed apart from the activity.
also read:


