
In this article we shall see how the z-index property of CSS (Cascading Style Sheet) works and learn to work with the Z axis of the Cartesian plane on the web. When we think of positioning elements on web pages, the first thing that comes in our mind are the axis X and Y that is the horizontal and vertical axis, respectively. Every element that we try to position on the website we usually use these two moving axis and hence manage to put it at a position we want.
The property z-index works with an axis that is not widely known and not used by most developers, the axis Z. The Z axis is the axis responsible for calculating the depth and positioning of an element, that is, one that will determine whether the element is closer or farther from the screen. If you are interested in receiving the future articles, please subscribe here. follow us on @twitter and @facebook.

CSS Z-Index example
Basically, the X, Y and Z work like this, imagine the scenario of a building:
- X = Volume meter from the front of the building
- Z = Number of meters from the front door to the back of the building;
- Y = height of the building;
Now lets put this theory into practice. Take an example below index.html.
Contents of page index.html are:
<!DOCTYPE html>
<html>
   <head>
	 <title>
	 	 Understanding the z-index property
	 </title>
<style type="text/css">
#position1 {
background-color:#F00;
width: 50px;
height: 50px;
position: absolute;
}
#position2 {
background-color:#0F0;
width: 50px;
height: 50px;
position: absolute;
}
#position3{
background-color: #00F;
width: 50px;
height: 50px;
position: absolute;
}
</style></head>
<body>
 <div id="Posiciona1"> </div>
 <div id="Posiciona2"> </div>
 <div id="Posiciona3"> </div>
</body>
</html>
The result of the above code can be seen as below:
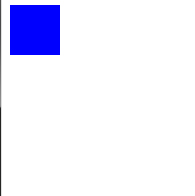
As we can see only one box is being displayed, which is the last (third split). This is because the elements will automatically be receiving values of z-index = 1, z-index = 2, and so on. In this case as the last box is with the greatest z-index, it is this who appears in front.
To better understand, change your css code as below:
<html>
   <head>
	 <title>
	 	 Understanding the z-index property
	 </title>
<style type="text/css">
#position1  {
background-color: #F00;
width: 50px;
height: 50px;
position: absolute;
top: 0;
}

#position2  {
background-color: #0F0;
width: 50px;
height: 50px;
position: absolute;
top: 25px;
}

#position3  {
background-color: #00F;
width: 50px;
height: 50px;
position: absolute;
top: 50px;
}
</style>

</head>
<body>

<div id="position1" > </ div>
<div id="position2" > </ div>
<div id="position3" > </ div>
</body>
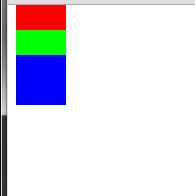
Use the above code and you will see the change in the positioning of the elements. Now we can see all of them, regardless of the value of z-index as seen in the screen shot below:
Now let’s see how to force the green box in front of all the others, using the z-index. Change your css code to the following:
<html>
   <head>
	 <title>
	 	 Understanding the z-index property
	 </title>
<style type="text/css">

#position1  {
background-color: #F00;
width: 50px;
height: 50px;
position: absolute;
top: 40px;

}

#position2  {
background-color: #0F0;
width: 50px;
height: 50px;
position: absolute;
top: 65px;
z-index: 4;
}

#position3  {
background-color: #00F;
width: 50px;
height: 50px;
position: absolute;
top: 100px;
}

</style>

</head>
<body>

<div id = "position1" > </div>
<div id = "position2" > </div>
<div id = "position3" > </div>
</body>
</html>
With this code, our green box will override all other because it takes the value of z-index = 4 which is greater than the z-index = 3 of the last element as seen in the screen shot below:
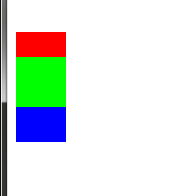
If you want the first box (red) in front that it is the opposite, simply apply a higher z-index it, and so on to any element on the page.
Now we will place a demo text in div’s to see text is hidden as below:
<html>
   <head>
	 <title>
	 	 Understanding the z-index property
	 </title>
<style type="text/css">

#position1 {
background-color: #F00;
width: 300px;
height: auto;
position: absolute;
top: 40px;
z-index: 5;
}

#position2 {
background-color: #0F0;
width: 300px;
height: auto;
position: absolute;
top: 65px;
z-index: 4;

}
#position3 {
background-color: #00F;
width: 300px;
height: auto;
position: absolute;
top: 100px;
}

</style>
</head>
<body>
<div id = "position1" >
    Last couple of years, JavaBeat has published more than 80 articles on the spring framework. We have a very good collection of basics and advanced articles and tutorials on the spring framework. Javabeat is one of the good source for learning the spring technology. This post collects all the articles published earlier into a single
</ div>
<div id = "position2" >
   Last couple of years, JavaBeat has published more than 80 articles on the spring framework. We have a very good collection of basics and advanced articles and tutorials on the spring framework. Javabeat is one of the good source for learning the spring technology. This post collects all the articles published earlier into a single
</div>
<div id = "position3" >
    Last couple of years, JavaBeat has published more than 80 articles on the spring framework. We have a very good collection of basics and advanced articles and tutorials on the spring framework. Javabeat is one of the good source for learning the spring technology. This post collects all the articles published earlier into a single
</div>
</body>
</html>
As a result we can see:
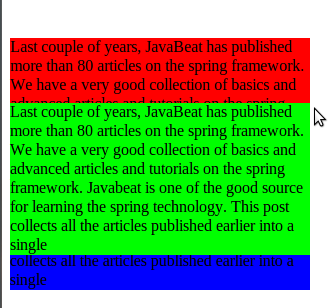
Here we see that the text is hidden in the red box and blue box.
Summary
We saw how the z-index property works and we also understood how to use the Z-axis of the Cartesian plane.I hope you enjoyed article. If you are interested in receiving the future articles, please subscribe here. follow us on @twitter and @facebook