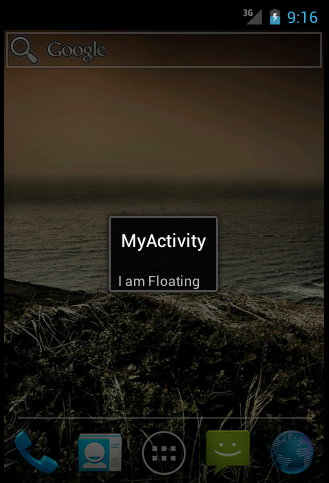
A dialog is a small window which prompts the user to enter additional information. We have discussed about how to create a dialog in one of our articles Dialog. In this tutorial we would be learning how to create an activity dialog in android. As shown in the below figure, an Activity Dialog is like an Activity floating over another Activity(parent activity).

You can’t access the parent activity until the dialog activity is destroyed. When the dialog activity closes, the parent activity gets its focus.
To create a floating activity, you need to apply dialog Theme while defining the activity entry in the AndroidManifest.xml file. Follow the below code to know about how to add the Theme to the Manifest file,
<activity
android:label="@string/app_name"
android:name=".DialogActivityDemoActivity"
android:theme="@android:style/Theme.Dialog" >
..........
</activity>
If you use ‘Theme.Dialog’ for your activity, it would be shown as a floating Dialog. You can create buttons like “OK”, “CANCEL” etc for this dialog through the activity’s layout.
Step 1: Set up Android working environment
We have already discussed about how to set up android working environment in one of our articles, please go through the post Environment. if you are not familiar with the android environment.
Step 2: Create an Android application
To know how to develop a simple android application, please refer to the post Create a simple app.
Step 3: Create the required layouts
Here I would be using main.xml. I would just add a simple button to this layout to launch our floating Activity. The code of the main.xml is as below,
<?xml version="1.0" encoding="utf-8"?>
<RelativeLayout xmlns:android="http://schemas.android.com/apk/res/android"
android:id="@+id/RelativeLayout1"
android:layout_width="fill_parent"
android:layout_height="fill_parent"
android:background="#d8dff2"
android:orientation="vertical" >

<Button
android:id="@+id/button1"
android:layout_width="wrap_content"
android:layout_height="wrap_content"
android:layout_centerHorizontal="true"
android:layout_centerVertical="true"
android:layout_marginTop="183dp"
android:background="#3790e8"
android:text="Start a floating Activity" />

</RelativeLayout>
The layout xml for the dialog activity is “floatingactivity.xml”. This layout file just has a textview that displays a text when the activity is started. The code of the floatingactivity.xml is as below,
<?xml version="1.0" encoding="utf-8"?>
<LinearLayout xmlns:android="http://schemas.android.com/apk/res/android"
android:layout_width="150dip"
android:layout_height="100dip"
android:orientation="vertical" >

<TextView
android:layout_width="wrap_content"
android:layout_height="wrap_content"
android:layout_marginLeft="7dip"
android:layout_marginTop="40dip"
android:text="I am a floating Activity" />

</LinearLayout>
Step 3: Create the required activities
Here I would be using the launcher activity DialogActivityDemoActivity which is created automatically when you create your sample application, as a parent activity to launch our floating activity (DialogActivity.java). Our floating Activity is launched when a button named “Start a floating activity” in the parent activity is clicked. The code of the parent activity DialogActivityDemoActivity.java is as below,
package my.app;

import android.app.Activity;
import android.content.Intent;
import android.os.Bundle;
import android.view.View;
import android.view.View.OnClickListener;
import android.widget.Button;

public class DialogParentActivity extends Activity {
Button btnsecond_activity;
/** Called when the activity is first created. */
@Override
public void onCreate(Bundle savedInstanceState) {
super.onCreate(savedInstanceState);
setContentView(R.layout.main);

btnsecond_activity=(Button)findViewById(R.id.button1);
btnsecond_activity.setOnClickListener(new OnClickListener() {

@Override
public void onClick(View v) {
// TODO Auto-generated method stub
Intent intent=new Intent(getApplicationContext(), DialogActivity.class);
startActivity(intent);
}
});
}
}
As you can see in the above code, we are launching a new dialog activity on click of a button in the parent activity. The DialogActivity.java has the below code,
package my.app;

import android.app.Activity;
import android.os.Bundle;
import android.view.Window;

public class DialogActivity extends Activity{
@Override
protected void onCreate(Bundle savedInstanceState) {
// TODO Auto-generated method stub
super.onCreate(savedInstanceState);
requestWindowFeature(Window.FEATURE_NO_TITLE);
setContentView(R.layout.floatingactivity);
}

}
I have made the dialog activity with no Title.
Step 4: Define the activities in AndroidManifest.xml
Your launcher activity is declared automatically by the android system. To know more about AndroidManifest.xml, please refer the post Manifest. The content of your manifest file is as below,
<?xml version="1.0" encoding="utf-8"?>
<manifest xmlns:android="http://schemas.android.com/apk/res/android"
package="my.app"
android:versionCode="1"
android:versionName="1.0" >

<uses-sdk android:minSdkVersion="14" />

<application
android:icon="@drawable/ic_launcher"
android:label="@string/app_name" >
<activity
android:label="@string/app_name"
android:name=".DialogParentActivity" >
<intent-filter >
<action android:name="android.intent.action.MAIN" />

<category android:name="android.intent.category.LAUNCHER" />
</intent-filter>
</activity>
<activity
android:name="DialogActivity"
android:theme="@android:style/Theme.Dialog" >
</activity>
</application>

</manifest>
You can notice the Theme.Dialog is being applied to the activity “DialogActivity”.
Step 5: Run your application
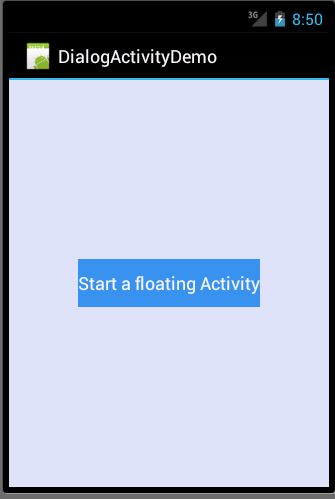
The parent Activity fires up as below,

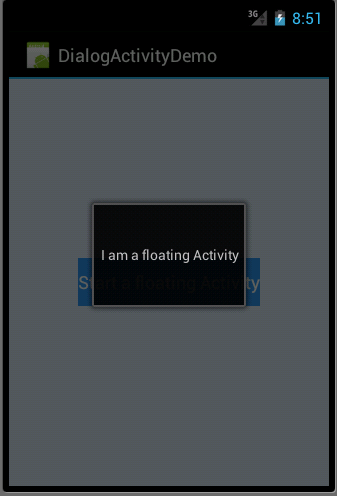
Click on the button “Start a floating Activity”. The dialog activity opens up as below,

Even though this is an Activity for all the purposes, it can behave as a dialog inside your UI, partially covering the parent activity. Click the window outside the Floating Dialog, the dialog would be closed and the parent activity gets focus. If you want to dismiss the dialog activity on click of a button, then you need to add a button to the dialog activities layout and you can add listeners for its click events. If you don’t want the dialog activity to be closed when you click the surface outside the dialog, add the below line to your dialog activities code,
this.setFinishOnTouchOutside(false);
If you add the above line , you can handle the click events of the dismiss buttons in case if you add them to your layouts.
This is how you can create an Activity as a dialog in Android. “Theme.Dialog” can be used to create the look and feel of the dialogs, with all the features of a full-blown Activity. Hope this helped you. If you have any queries, please post it in comments section.
