Apache Wicket CookbookApache Wicket is one of the most famous Java web application frameworks. Wicket simplifies web development and makes it fun. Are you bored of going through countless pages of theory to find out how to get your web development done? With this book in hand, you don’t need to go through hundreds of pages to figure out how you will actually build a web application. You will get practical solutions to your common everyday development tasks to pace up your development activities.
also read:
- Java Tutorials
- Java EE Tutorials
- Design Patterns Tutorials
- Java File IO Tutorials
Apache Wicket Cookbook provides you with information that gets your problems solved quickly without beating around the bush. This book is perfect for you if you are ready to take the next step from tutorials and step into the practical world. It will take you beyond the basics of using Apache Wicket and show you how to leverage Wicket‘s advanced features to create simpler and more maintainable solutions to what at first may seem complex problems.
You will learn how to integrate with client-side technologies such as JavaScript libraries or Flash components, which will help you to build your application faster. You will discover how to use Wicket paradigms to factor out commonly used code into custom Components, which will reduce the maintenance cost of your application, and how to leverage the existing Wicket Components to make your own code simpler.
A straightforward Cookbook with over 70 highly focused practical recipes to make your web application development easier with the Wicket web framework.
What This Book Covers
Chapter 1, Validating and Converting User Input: This chapter is all about form
validation and input conversion. Learn how to enforce constraints on the inputs and how to convert string inputs into other types so the rest of your code can be type-safe.
Chapter 2, Getting Down and Dirty with Forms and Form Components: In this chapter, we will examine some of the in-depth form patterns such as preventing double submits and refactoring form components to make them more reusable.
Chapter 3, Making Forms Presentable: This chapter is all about making your forms look good. Here we will see how to change presentation of form components and labels to give the user better feedback and how to package that code in a reusable manner.
Chapter 4, Taking your Application Abroad: This chapter is about internationalization. Here you will learn how to take advantage of the many features Wicket offers to make your application a good international citizen.
Chapter 5, Displaying Data Using DataTable: No web application is complete without a page that has a table of data. In this chapter we will learn how to make great use of Wicket‘s DataTable components to make displaying awesome tables a snap.
Chapter 6, Enhancing your UI with Tabs and Borders: In this chapter we will take a look at some of the more advanced use cases of using TabbedPanel and Border components.
Chapter 7, Deeper into Ajax: Are you ready to take your Ajax knowledge past the basics? This chapter will show you how.
Chapter 8, Visualizing Data with Charts: Build an awesome Wicket component that can display charts using OpenFlashCharts; and as a bonus, learn how to integrate Wicket with client-side components built with Flash or JavaScript.
Chapter 9, Building Dynamic and Rich UI: In this chapter, we will learn how to take
advantage of Wicket‘s dynamic component hierarchy to easily manipulate the user
interface of our applications.
Chapter 10, Securing your Application: Ever wish you had a read recipe to follow for
how to integrate services such as OpenID into your application? Have you spent nights thinking of ways to assign roles and permissions to individual Wicket components easily? This chapter covers all that and more.
Chapter 11, Integrating Wicket with Middleware: Wicket tries to do one thing, but do it very well – allow you to build awesome user interfaces. But, web applications are made up of more than just interfaces. In this chapter, we will learn how to integrate Wicket with middleware such as Spring, CDI, and JPA.
Chapter 12, General Wicket Patterns: This chapter is like a small encyclopedia of recipes for common but non-trivial use cases that make you scratch your head.
Chapter 12, General Wicket Patterns is not present in the book
but is available as a free download from the following link:
http://www.packtpub.com/sites/default/files/downl
oads/1605_Chapter12.pd
Displaying Data Using DataTableIn this chapter, we will cover:
- Sorting
- Filtering
- Making cells clickable
- Making rows selectable with checkboxes
- Exporting data to CSV
Introduction
It is hard to fi nd a web application that does not have a single table that presents the user with some data. Building these DataTables, although not very diffi cult, can be a daunting task because each of these tables must often support paging, sorting, fi ltering, and so on. Wicket ships with a very powerful component called the DataTable that makes implementing all these features simple and elegant. Because Wicket is component-oriented, once implemented, these features can be easily reused across multiple DataTable deployments. In this chapter, we will see how to implement the features mentioned previously using the DataTable and the infrastructure it provides.
Sorting
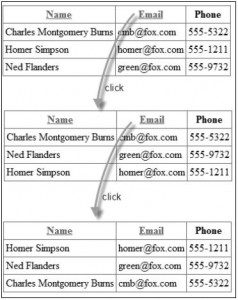
A common requirement, when displaying tabular data, is to allow users to sort it by clicking the table headers. Click a header once and the data is sorted on that column in ascending order; click it again, and the data is sorted in the descending order.
In this recipe, we will see how to implement such a behavior when displaying data using a DataTable component. We will build a simple table that will look much like a phone book and will allow the sorting of data on the name and e-mail columns:
Getting ready
Begin by creating a page that will list contacts using the DataTable, but without sorting:
- Create Contact bean:
Contact.java public class Contact implements Serializable { public String name, email, phone; // getters, setters, constructors2. - Create the page that will list the contacts:
HomePage.html


	HomePage.java
	public class HomePage extends WebPage {
		private static List contacts = Arrays.asList(
		  new Contact("Homer Simpson", "[email protected]", "555-1211"),
 		  new Contact("Charles Burns", "[email protected]", "555-5322"),
		  new Contact("Ned Flanders", "[email protected]", "555-9732"));
		  public HomePage(final PageParameters parameters) {
			// sample code adds a DataTable and a data providert hat
			uses the contacts list created above
		  }
	}
How to do it…
- Enable sorting by letting DataTable columns know they can be sorted by using a constructor that takes the sort data parameter:
HomePage.java List<IColumn> columns = new ArrayList<IColumn>(); columns.add(new PropertyColumn(Model.of("Name"), "name","name")); columns.add(new PropertyColumn(Model.of("Email"), "email", "email")); columns.add(new PropertyColumn(Model.of("Phone"), "phone")); - Implement sorting by modifying the data provider:
private static class ContactsProvider
	extends SortableDataProvider {
		public ContactsProvider() {
			setSort("name", true);
		}
		public Iterator<? extends Contact>
		iterator(int first, int count) {
			List data = new ArrayList(contacts);
			Collections.sort(data, new Comparator() {
				public int compare(Contact o1, Contact o2) {
					int dir = getSort().isAscending() ? 1 : -1;
					if ("name".equals(getSort().getProperty())) {
						return dir * (o1.name.compareTo(o2.name));
					} else {
						return dir * (o1.email.compareTo(o2.email));
					}
				}
			});
			return data.subList(first,
			Math.min(first + count, data.size())).iterator();
		}
		public int size() {
			return contacts.size();
		}
		public IModel model(Contact object) {
			return Model.of(object);
		}
	}
How it works…
DataTable supports sorting out of the box. Any column with the IColumn#getSortProperty() method that returns a non-null value is treated as a sortable column and Wicket makes its header clickable. When a header of a sortable column is clicked Wicket will pass the value of IColumn#getSortProperty to the data provider which should use this value to sort the data. In order to know about the sorting information the data provider must implement the ISortableDataProvider interface; Wicket provides the default SortableDataProvider implementation which is commonly used to implement sort-capable data providers. DataTable will take care of details such as multiple clicks to the same column resulting in change of sorting direction, so on.
Let’s examine how to implement sorting in practice. In step 1 and 2, we have implemented a basic DataTable that cannot yet sort data. Even though the data provider we have implemented already extends a SortableDataProvider, it does not yet take advantage of any sort information that may be passed to it.
We start building support for sorting by enabling it on the columns, in our case the name and the email columns:
List<IColumn> columns = new ArrayList<IColumn>();
	columns.add(new PropertyColumn(Model.of("Name"), "name",
	"name"));
	columns.add(new PropertyColumn(Model.of("Email"), "email",
	"email"));
	columns.add(new PropertyColumn(Model.of("Phone"), "phone"));
We enable sorting on the columns by using the three-argument constructor of the
PropertyColumn, with the second argument being the “sort data”. Whenever a DataTable column with sorting enabled is clicked, the data provider will be given the value of the “sort data”. In the example, only the name and e-mail columns have sorting enabled with the sort data defi ned as a string with values “name” and “e-mail” respectively.
Now, let’s implement sorting by making our data provider implementation sort-aware. Since our data provider already extends a provider that implements ISortableDataProvider we only need to take advantage of the sort information:
public Iterator<? extends Contact> iterator(int first, int count) {
		List data = new ArrayList(contacts);
		Collections.sort(data, new Comparator() {
			public int compare(Contact o1, Contact o2) {
				int dir = getSort().isAscending() ? 1 : -1;
				if ("name".equals(getSort().getProperty())) {
					return dir * (o1.name.compareTo(o2.name));
				} else {
					return dir * (o1.email.compareTo(o2.email));
				}
			}
		});
		return data.subList(first,
		Math.min(first + count, data.size())).iterator();
	}
First we copy the data into a new list which we can sort as needed and then we sort based on the sort data and direction provided. The value returned by getSort().getProperty() is the same sort data values we have defi ned previously when creating columns.
The only remaining task is to defi ne a default sort which will be used when the table is rendered before the user clicks any header of a sortable column. We do this in the constructor of our data provider:
public ContactsProvider() {
		setSort("name", true);
	}
There’s more…
DataTable gives us a lot out of the box; in this section we see how to add some
usability enhancements.
Adding sort direction indicators via CSS
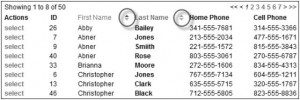
DataTable is nice enough to decorate sortable <th> elements with sort-related CSS classes out of the box. This makes it trivial to implement sort direction indicators as shown in the following screenshot:
A possible CSS style definition can look like this:
table tr th { background-position: right; background-repeat:no-repeat;
	}
	table tr th.wicket_orderDown {
		background-image: url(images/arrow_down.png); }
	table tr th.wicket_orderUp {
		background-image: url(images/arrow_up.png); }
	table tr th.wicket_orderNone {
		background-image: url(images/arrow_off.png);
Filtering
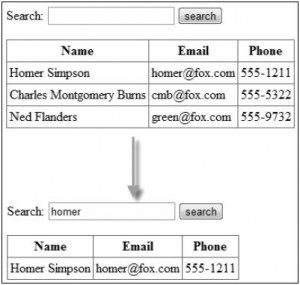
One of the more common use cases for using the DataTable component is to display a large data set which often needs to be paged. But, navigating large data sets can be cumbersome even with the best of paging interfaces. Most users prefer to search rather than page to fi nd the information. In this recipe, we will see how to make a DataTable searchable . We will implement a simple quick-search type form which will filter records in the DataTable, shown as follows:
Getting ready
We begin by creating the page without filtering.
Create the contact bean. Refer to Contact.java in the code bundle.
Create the page to list contacts:
HomePage.java
	// for markup refer to HomePage.html in the code bundle
	public class HomePage extends WebPage {
		private String filter;
		public HomePage(final PageParameters parameters) {
			// sample code adds DataTable just like the first recipe
			Form<?> form = new Form("form");
			add(form);
			form.add(new TextField("filter", new
			PropertyModel(
				this, "filter")));
		}
	}
How to do it…
Modify the data provider to fi lter data:
HomePage.java
	private class ContactsProvider
	extends SortableDataProvider {
		private transient List filtered;
		private List getFiltered() {
			if (filtered == null) {
				filtered = filter();
			}
			return filtered;
		}
		private List filter() {
			List filtered=new ArrayList(contacts);
			if (filter != null) {
				String upper = filter.toUpperCase();
				Iterator it = filtered.iterator();
				while (it.hasNext()) {
					Contact contact = it.next();
					if (contact.name.toUpperCase().indexOf(upper) < 0
						&& contact.email.toUpperCase().indexOf(upper) < 0) {
						it.remove();
					}
				}
			}
			return filtered;
		}
		@Override
		public void detach() {
			filtered = null;
			super.detach();
		}
		public Iterator<? extends Contact> iterator(int first, int count) {
			return getFiltered()
			.subList(
			first,
			Math.min(first + count, getFiltered().size()))
			.iterator();
		}
		public int size() {
			return getFiltered().size();
		}
		public IModel model(Contact object) {
			return Model.of(object);
		}
	}
How it works…
In step 1 and 2, we have implemented both the DataTable to display contacts as well as the form used to fi lter them. In order to enable fi ltering, we must connect our form to the data provider.
As we are working with an in-memory list of contacts, let’s implement a method in data provider which will return a list of contacts that matches the fi lter selected in the form. The form will store the fi lter in the HomePage’s filter fi eld, courtesy of the following property model:
form.add(new TextField("filter",
		new PropertyModel(this, "filter")));
We can use this field to fi lter the contact list:
private class ContactsProvider extends SortableDataProvider {
		private List filter() {
			List filtered=new ArrayList(contacts);
			if (filter != null) {
				String upper = filter.toUpperCase();
				Iterator it = filtered.iterator();
				while (it.hasNext()) {
					Contact contact = it.next();
					if (contact.name.toUpperCase().indexOf(upper) < 0
						&& contact.email.toUpperCase().indexOf(upper) < 0)
					{
						it.remove();
					}
				}
			}
			return filtered;
		}
	}
The fi lter method itself needs no explanation. As both IDataProvider#iterator() and IDataProvider#size() need to access the fi ltered list, lets cache it for the duration of the request so we are not calculating it needlessly:
private class ContactsProvider extends SortableDataProvider {
		private transient List filtered;
		private List getFiltered() {
			if (filtered == null) {
				filtered = filter();
			}
			return filtered;
		}
		public void detach() {
			filtered = null;
			super.detach();
		}
	}
In the preceding code, we cache the result of the ContactsProvider#filter() method until the IDataProvider#detach() method is called. This method, like Imodel#detach() and Component#detach() will be called at the end of the request,
at which point we no longer need the cached value.
Notice that we declared the ContactsProvider#filtered field as
transient. This is because this field serves only as a cache and we do not
need to serialize it. Although not strictly necessary, as it is cleared in the
detach() method, this is a nice safeguard in case we forget to clear the
cache in some scenario. It also helps clarify the intent of the field by making it
obvious that the value of this fi eld is not persisted across requests.
Now that we have an effi cient method of accessing the fi ltered list we use it to implement the rest of the data provider:
private class ContactsProvider extends SortableDataProvider {
		public Iterator<? extends Contact> iterator(int first, int count) {
			return getFiltered().subList(first,
			Math.min(first + count, getFiltered().size())).iterator();
		}
		public int size() {
			return getFiltered().size();
		}
	}
There’s more…
Unlike our example, which stores its data in a memory list, most real world applications access data stored in a database. In the next section, we will see how to support sorting of such data.
Sorting database data
Below is a sample implementation of the data provider that fi lters data coming from a database:
private class DatabaseContactsProvider extends
		SortableDataProvider {
		public Iterator<? extends Contact> iterator(int first, int
		count) {
			return getApplication().getDatabase().query(first, count,
			getSort().getProperty(), getSort().isAscending());
		}
		public int size() {
			return getApplication().getDatabase().count(getSort().
			getProperty(), getSort().isAscending());
		}
		public IModel model(Contact object) {
			return new EntityModel(object);
		}
	}
As we can see from the highlighted lines, the data provider delegates the fi ltering and sorting to the database by passing in all necessary parameters for the database to be able to build a proper query.
Making cells clickable
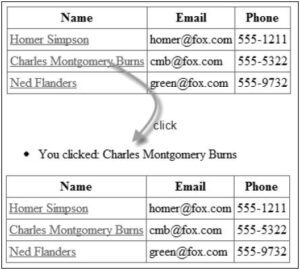
A common requirement, when presenting tabular data, is to put links into the cells so that the user can interact with the rows in the table. In this recipe, we will create a column that, instead of simply displaying a property of the row object, will allow the user to click the property. When we are done, we will have a table where one column consists of links:
Getting ready
To get started see the Getting Ready section of the fi rst recipe in this chapter.
How to do it…
- Implement a column that will allow cells to be clicked:
ClickablePropertyColumn$LinkPanel.html ClickablePropertyColumn.java public abstract class ClickablePropertyColumn extends AbstractColumn { private final String property; public ClickablePropertyColumn(IModel displayModel, String property) { this(displayModel, property, null); } public ClickablePropertyColumn(IModel displayModel, String property, String sort) { super(displayModel, sort); this.property = property; } public void populateItem(Item<ICellPopulator> cellItem, String componentId, IModel rowModel) { cellItem.add(new LinkPanel(componentId, rowModel, new PropertyModel - Replace the standard name column with the clickable one:
HomePage.java
	List<IColumn> columns = new
	ArrayList<IColumn>();
		columns.add(new ClickablePropertyColumn(Model.
			of("Name"),
				"name") {
			@Override
			protected void onClick(IModel clicked) {
				info("You clicked: " + clicked.getObject().getName());
			}
		});
		columns.add(new PropertyColumn(Model.of("Email"),
			"email"));
		columns.add(new PropertyColumn(Model.of("Phone"),
			"phone"));
How it works…
What we want to do is to wrap the property string that is used to populate the cell with an anchor tag and react to the click on the anchor tag. We are going to achieve this by implementing a custom DataTable column. We begin by extending AbstractColumn, which is the base class for most column implementations:
public abstract class ClickablePropertyColumn extends
	AbstractColumn {
		private final String property;
		public ClickablePropertyColumn(IModel displayModel, String
		property) {
			super(displayModel, null);
			this.property=property;
		}
		public void populateItem(Item<ICellPopulator> cellItem,
		String componentId, IModel rowModel) {
		}
	}
Now it is time to populate each cell inside the populateItem() method. We want to populate the cell with markup that looks like this:
<a href="...">property value</a>
To accomplish this we will create a panel that contains the anchor and the span, and populate the cell with this panel. Because this panel will only really be useful inside our custom column we will create it as an inner class:
ClickablePropertyColumn$LinkPanel.html


	ClickablePropertyColumn.java
		public abstract class ClickablePropertyColumn extends
		AbstractColumn {
			protected abstract void onClick(IModel clicked);
			private class LinkPanel extends Panel {
				public LinkPanel(String id, IModel rowModel, IModel<?>
				labelModel) {
					super(id);
					Link link = new Link("link", rowModel) {
					@Override
					public void onClick() {
					}
				};
				add(link);
				link.add(new Label("label", labelModel));
			}
		}
The markup file for the panel is named: ClickablePropertyColumn$LinkPanel.html, this is because ClickablePropertyColumn$LinkPanel is the qualified name of the LinkPanel class. This can be observed by printing out the value of LinkPanel.class.getName().
The markup file for the panel is named: ClickablePropertyColumn$LinkPanel.html, this is because ClickablePropertyColumn$LinkPanel is the qualified name of the LinkPanel class. This can be observed by printing out the value of LinkPanel.class.getName()
Now that we have the panel, let’s populate the cell with it:
public abstract class ClickablePropertyColumn extends
	AbstractColumn {
		public void populateItem(Item<ICellPopulator> cellItem,
		String componentId, IModel rowModel) {
			cellItem.add(new LinkPanel(componentId, rowModel,
			new PropertyModel
Our custom column is almost functional. All that is left is to forward the click event from the Link component inside the LinkPanel to the column so we can react to it:
public abstract class ClickablePropertyColumn extends
	AbstractColumn {
		protected abstract void onClick(IModel clicked);
		private class LinkPanel extends Panel {
			public LinkPanel(String id, IModel rowModel, IModel<?>
			labelModel) {
				super(id);
				Link link = new Link("link", rowModel) {
					@Override
					public void onClick() {
						ClickablePropertyColumn.this.onClick(getModel());
					}
				};
			}
		}
Notice that we pass in the rowModel into the onClick() method of the column; this is so that the user knows which row was clicked.
Notice that we pass in the rowModel into the onClick() method of the column; this is so that the user knows which row was clicked.
With our custom column now fully functional let’s see how we can use it to display the name of the contact that was clicked:
List<IColumn> columns = new ArrayList<IColumn>();
		columns.add(new ClickablePropertyColumn(Model.
		of("Name"),
		"name") {
		@Override
		protected void onClick(IModel clicked) {
			info("You clicked: " + clicked.getObject().getName());
		}
	});
Making rows selectable with checkboxes
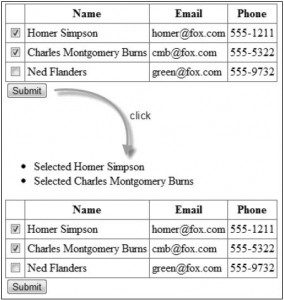
A common requirement, when working with tables, is to allow the user to select one or more rows by clicking on checkboxes located in a column. In this recipe, we will build such a column:
Getting ready
Let’s get started by creating the page that lists contacts without any selectable rows.
Create the Contact bean:
Contact.java
	public class Contact implements Serializable {
		public String name, email, phone;
		// getters, setters, constructors
	}
Create the page to display the list of contacts:
HomePage.java
	public class HomePage extends WebPage {
		private static List contacts = Arrays.asList(new Contact[]
	{
		new Contact("Homer Simpson", "[email protected]", "555-1211"),
		new Contact("Charles Montgomery Burns", "[email protected]", "555-
			5322"),
		new Contact("Ned Flanders", "[email protected]", "555-9732") });
		private Set selected = new HashSet();
		public HomePage(final PageParameters parameters) {
			add(new FeedbackPanel("feedback"));
			List<IColumn> columns = new
			ArrayList<IColumn>();
			columns.add(new PropertyColumn(Model.of("Name"),
				"name"));
			columns.add(new PropertyColumn<Contact, String>(Model.
				of("Email"), "email"));
			columns.add(new PropertyColumn(Model.of("Phone"),
				"phone"));
			DefaultDataTable table = new DefaultDataTable(
				"contacts", columns, new ContactsProvider(), 10);
			add(table);
		}
		private static class ContactsProvider extends
		SortableDataProvider {
			public Iterator<? extends Contact> iterator(int first, int
			count) {
				return contacts.subList(first,
				Math.min(first + count, contacts.size())).iterator();
			}
			public int size() {
				return contacts.size();
			}
			public IModel model(Contact object) {
				return Model.of(object);
			}
		}
	}
How to do it…
- Implement a custom column that will contain the checkboxes:
CheckBoxColumn$CheckPanel.html <input type="checkbox" /> CheckBoxColumn.java public abstract class CheckBoxColumn extends AbstractColumn { public CheckBoxColumn(IModel displayModel) { super(displayModel); } public void populateItem(Item<ICellPopulator> cellItem, String componentId, IModel rowModel) { cellItem.add(new CheckPanel(componentId, newCheckBoxModel(rowModel))); } protected CheckBox newCheckBox(String id, IModel checkModel) { return new CheckBox("check", checkModel); } protected abstract IModel newCheckBoxModel(IModel rowModel); private class CheckPanel extends Panel { public CheckPanel(String id, IModel checkModel) { super(id); add(newCheckBox("check", checkModel)); } } } - Add the custom column to the DataTable:
HomePage.java List<IColumn> columns = new ArrayList<IColumn>(); columns.add(new CheckBoxColumn(Model.of("")) { @Override protected IModel<Boolean> newCheckBoxModel( final IModel<Contact> rowModel) { return new AbstractCheckBoxModel() { @Override public void unselect() { selected.remove(rowModel.getObject()); } @Override public void select() { selected.add(rowModel.getObject()); } @Override public boolean isSelected() { return selected.contains(rowModel.getObject()); } @Override public void detach() { rowModel.detach(); } }; } }); columns.add(new PropertyColumn<Contact>(Model.of("Name"), "name")); - Put the DataTable into a form:
HomePage.html
<form>
			<input type="submit" value="Submit" />
		</form>


	HomePage.java
	Form<?> form = new Form("form") {
		@Override
		protected void onSubmit() {
			for (Contact contact : selected) {
				info("Selected " + contact.getName());
			}
		}
	};
	add(form);
	form.add(new DefaultDataTable("contacts", columns,
		new ContactsProvider(), 10));
How it works…
The first thing we have to do is to create a custom column for our table that will contain CheckBoxes. We start by subclassing AbstractColumn, which is a common base class for DataTable columns:
public abstract class CheckBoxColumn extends AbstractColumn {
		public CheckBoxColumn(IModel displayModel) {
			super(displayModel);
		}
		public void populateItem(Item<ICellPopulator> cellItem,
		String componentId, IModel rowModel) {
		}
	}
Next, we create a panel that will contain the CheckBox which will be inserted into the cell. We have to create a panel because whatever component we use to populate the cell will be a tached to a span tag, and we cannot attach a CheckBox directly to a span. So, we will put the CheckBox into a panel and attach that to the span instead, which is perfectly valid.
When allowing the user to populate predefi ned placeholders, it is common to use a <div> or a as the markup tag and allow the user to create a panel to populate the placeholder. Using a or a <div> allows the most flexibility, and the user may always remove it from generated markup by calling setRenderBodyOnly(true) on the instance of the panel they attach to the placeholder tag.
CheckBoxColumn$CheckColumn.html

		<input type="checkbox" />


	CheckBoxColumn.java
		public abstract class CheckBoxColumn extends AbstractColumn {
			protected abstract IModel newCheckBoxModel(IModel
			rowModel);
			protected CheckBox newCheckBox(String id, IModel
			checkModel) {
				return new CheckBox("check", checkModel);
			}
			private class CheckPanel extends Panel {
				public CheckPanel(String id, IModel checkModel) {
					super(id);
					add(newCheckBox("check", checkModel));
				}
			}
		}
Notice that we delegate the creation of the checkbox to the newCheckBox() method, and doing so will allow the user to override the creation of the CheckBox and either replace it with a custom instance or modify the instance created by the default implementation.
The CheckBox we create is set up with a model that the user will have to specify by
implementing the abstract newCheckBoxModel() method . This will allow us total control over how we keep track of which rows are selected.
Next, we wire in the panel into the cell:
public abstract class CheckBoxColumn extends AbstractColumn {
		public void populateItem(Item<ICellPopulator> cellItem,
		String componentId, IModel rowModel) {
			cellItem.add(new CheckPanel(componentId,
			newCheckBoxModel(rowModel)));
		}
	}
The CheckBox column is now complete. Let’s see how we can use it to keep track of the selected contacts. If we look at step 1 where we created the page we will notice a set field:
HomePage.java
		private Set selected = new HashSet();
We will use this set to keep track of the contacts that are selected. If we look at the
CheckBoxColumn’s newCheckBoxModel() method we will notice that it returns a model of type Boolean; this is because the CheckBox component only works with this model. When the model contains true, the check box is selected, and when it contains false the check box is unselected. In order to keep track of which contacts are selected we will somehow have to map a Boolean of each contact to our Set. Wicket provides a helper model that makes implementing this mapping easier called an AbstractCheckBoxModel , and this model requires us to implement three abstract methods:
public abstract class AbstractCheckBoxModel implements IModel
	{
		public abstract boolean isSelected();
		public abstract void select();
		public abstract void unselect();
	}
When the CheckBox renders it will call getObject() on the model, which will pass the call onto isSelected() . When the CheckBox is submitted, AbstractCheckBoxModel will either call select() or unselect() based on whether or not the CheckBox was selected.
Let’s see how we can use this to implement a column to track which contacts are selected:
HomePage.java
	columns.add(new CheckBoxColumn(Model.of("")) {
		@Override
		protected IModel newCheckBoxModel(
		final IModel rowModel) {
			return new AbstractCheckBoxModel() {
				@Override
				public boolean isSelected() {
					return selected.contains(rowModel.getObject());
				}
				@Override
				public void unselect() {
					selected.remove(rowModel.getObject());
				}
				@Override
				public void select() {
					selected.add(rowModel.getObject());
				}
				@Override
				public void detach() {
					rowModel.detach();
				}
			};
		}
	});
Notice that we chain the detach call on our anonymous implementation of AbstractCheckBoxModel to rowModel.detach() because we access it directly. This is an important practice when creating models that use other models because it ensures all models in the chain are detached at the end of the request.
Now, when the table is submitted, all selected contacts will be placed into the selected Set, but before we can submit the check boxes inside the table we need to make sure they are in a form. What we do is modify our page and put the DataTable inside a form we create:
HomePage.html
<form>
			<input type="submit" value="Submit" />
		</form>


	HomePage.java

	Form<?> form = new Form("form") {
		@Override
		protected void onSubmit() {
			for (Contact contact : selected) {
				info("Selected " + contact.getName());
			}
		}
	};
	add(form);
	form.add(new DefaultDataTable("contacts", columns,
		new ContactsProvider(), 10));
There’s more…
In the next section, we will see how to add more usability to our checkbox column.
Adding select/deselect all checkbox
Let’s take a look at how to modify CheckBoxColumn to implement select/deselect all
checkboxes in the header of the column. As this will be a client-side behavior we will use jQuery to implement the necessary JavaScript.
The complete code listing for the new CheckBoxColumn follows:
CheckBoxColumn.java

	public abstract class CheckBoxColumn extends AbstractColumn {
		private final String uuid = UUID.randomUUID().toString().
			replace("-", "");
		public CheckBoxColumn() {
			super(null);
		}
		public void populateItem(Item<ICellPopulator> cellItem,
			String componentId, IModel rowModel) {
			cellItem.add(new CheckPanel(componentId,
			newCheckBoxModel(rowModel)));
		}
		protected CheckBox newCheckBox(String id, IModel
			checkModel) {
			return new CheckBox("check", checkModel) {
				@Override
				protected void onComponentTag(ComponentTag tag) {
					super.onComponentTag(tag);
					tag.append("class", uuid, " ");
				}
			};
		}
		protected abstract IModel newCheckBoxModel(IModel
			rowModel);
		@Override
		public Component getHeader(String componentId) {
			CheckPanel panel = new CheckPanel(componentId, new
			Model());
			panel.get("check").add(new AbstractBehavior() {
				@Override
				public void onComponentTag(Component component, ComponentTag
				tag) {
					tag.put("onclick", "var val=$(this).attr('checked'); $('."
					+ uuid
					+ "').each(function() { $(this).attr('checked',
					val); });");
				}
			});
			return panel;
		}
		private class CheckPanel extends Panel {
			public CheckPanel(String id, IModel checkModel) {
				super(id);
				add(newCheckBox("check", checkModel));
			}
		}
	}
The first change we make is to add a uuid fi eld to the column:
private final String uuid = UUID.randomUUID().toString().replace("-",
	"");
We will need this field to uniquely identify check boxes generated by this column on the client side so we can select/deselect them all. We will do this by appending a unique CSS class to all of them:
protected CheckBox newCheckBox(String id, IModel checkModel)
	{
		return new CheckBox("check", checkModel) {
			@Override
			protected void onComponentTag(ComponentTag tag) {
				super.onComponentTag(tag);
				tag.append("class", uuid, " ");
			}
		};
	}
Lastly, we override the column’s header component and replace it with a checkbox which contains the onclick jQuery trigger that selects/deselects the checkboxes in the column:
private final String js="var val=$(this).attr('checked'); $('." + uuid
		+ "').each(function() { $(this).attr('checked', val); });";
		public Component getHeader(String componentId) {
			CheckPanel panel = new CheckPanel(componentId, new
			Model());
			panel.get("check").add(new AbstractBehavior() {
				public void onComponentTag(Component component, ComponentTag
				tag) {
				tag.put("onclick", js);
			}
		});
		return panel;
	}
Exporting data to CSV
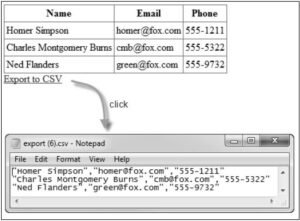
Even though web applications have come a long way, they are still not as good at quickly hacking and slashing tabular data as most desktop spreadsheet processors. But, in order to get the data into the desktop software we need to be able to export it from the web application. In this recipe we will build a reusable way to export data, in CSV format, from DataTable components:
Getting ready
To get started, see the Getting Ready section of the fi rst recipe in this chapter.
Create various utility classes:
Pager.java

	public class Pager {
		private final int p;
		private final int t;
		public Pager(int perPage, int total) {
			this.p = perPage;
			this.t = total;
		}
		public int pages() {
			return t / p + ((t % p > 0) ? 1 : 0);
		}
		public int offset(int page) {
			return p * page;
		}
		public int count(int page) {
			return Math.min(offset(page) + p, t);
		}
	}

	CsvWriter.java
	public class CsvWriter {
		private final PrintWriter out;
		private boolean first = true;
		public CsvWriter(OutputStream os) {
			out = new PrintWriter(os);
		}
		public CsvWriter write(Object value) {
			if (!first) {
				out.append(",");
			}
			out.append("\"");
			if (value != null) {
				out.append(value.toString().replace("\"", "\"\"")
					.replace("\n", " "));
			}
			out.append("\"");
			first = false;
			return this;
		}
		public CsvWriter endLine() {
			out.append("\r\n");
			first = true;
			return this;
		}
		public CsvWriter flush() {
			out.flush();
			return this;
		}
		public void close() {
			out.close();
		}
	}
How to do it…
- Create a IColumn mixin that will mark columns as exportable:
ExportableColumn.java public interface ExportableColumn extends IColumn { void exportCsv(T object, CsvWriter writer); } - Implement an exportable property column:
ExportablePropertyColumn.java public class ExportablePropertyColumn extends PropertyColumn implements ExportableColumn { public ExportablePropertyColumn(IModel displayModel, String propertyExpression) { super(displayModel, propertyExpression); } public void exportCsv(final T object, CsvWriter writer) { IModel<?> textModel = createLabelModel(new AbstractReadOnlyModel() { @Override public T getObject() { return object; } }); writer.write(textModel.getObject()); textModel.detach(); } } - Create a link that will perform the CSV export:
CsvExportLink.java public class CsvExportLink extends Link { private final DataTable table; public CsvExportLink(String id, DataTable table) { super(id); this.table = table; } @Override public void onClick() { WebResponse response = (WebResponse) getResponse(); response.setAttachmentHeader("export.csv"); response.setContentType("text/csv"); OutputStream out = getResponse().getOutputStream(); CsvWriter writer = new CsvWriter(out); List<ExportableColumn> exportable = getExportableColumns(); Pager pager = new Pager(100, table.getDataProvider(). size()); for (int i = 0; i < pager.pages(); i++) { Iterator<? extends T> it = table.getDataProvider(). iterator( pager.offset(i), pager.count(i)); while (it.hasNext()) { T object = it.next(); for (ExportableColumn col : exportable) { col.exportCsv(object, writer); } writer.endLine(); } } writer.close(); throw new AbortException(); } private List<ExportableColumn> getExportableColumns() { List<ExportableColumn> exportable = new ArrayList<ExportableColumn>( table.getColumns().length); for (IColumn<?> column : table.getColumns()) { if (column instanceof ExportableColumn<?>) { exportable.add((ExportableColumn) column); } } return exportable; } } - Change the table to use exportable columns:
List<IColumn> columns = new ArrayList<IColumn>(); columns.add(new ExportablePropertyColumn(Model. of("Name"), "name")); columns.add(new ExportablePropertyColumn(Model. of("Email"), "email")); columns.add(new ExportablePropertyColumn(Model. of("Phone"), "phone")); - Add the export link:
HomePage.html


		<a>Export to CSV</a>


	HomePage.java
	add(new CsvExportLink("csv", contacts));
How it works…
What we want to happen is that when the export link is clicked, the user is prompted to download a fi le that contains an export of all the rows in the DataTable in CSV format. As we want this to be reusable across DataTables and across various types of objects, the DataTable displays, ideally, the columns that we want to know how to export data. This way we can iterate the columns and build each CSV record. In order to do this, we fi rst defi ne a mixin interface that columns that know how to export their content into a CSV will implement:
public interface ExportableColumn extends IColumn {
 void exportCsv(T object, CsvWriter writer);
 }
The interface adds a single method that allows the column to contribute to the CSV record that represents an object in one of the rows of the DataTable.
Next, let’s build an actual implementation of an ExportableColumn we will use in our example. To keep things simple we will extend the columns we used in the Getting Started section:
public class ExportablePropertyColumn extends PropertyColumn
	implements
		ExportableColumn {
			public ExportablePropertyColumn(IModel displayModel,
			String propertyExpression) {
				super(displayModel, propertyExpression);
			}
			public void exportCsv(final T object, CsvWriter writer) {
				IModel<?> textModel = createLabelModel(new
				AbstractReadOnlyModel() {
					@Override
					public T getObject() {
						return object;
					}
				});
				writer.write(textModel.getObject());
				textModel.detach();
			}
		}
Our implementation piggy-backs on PropertyColumn’s createLabelModel() method to create a model that is used to populate the cells, and writes the value of that model into the SV writer.
With the basics out of the way, it is time to get down and dirty and create the link that will create the CSV export.
We begin by creating a subclass of Link and passing in the DataTable the link will create the export for:
public class CsvExportLink extends Link {
		private final DataTable table;
		public CsvExportLink(String id, DataTable table) {
			super(id);
			this.table = table;
		}
	}
As the export has to iterate only over columns that implement ExportableColumn interface, we create a helper method to retrieve only those columns:
public class CsvExportLink extends Link {
		private List<ExportableColumn> getExportableColumns() {
			List<ExportableColumn> exportable = new
			ArrayList<ExportableColumn>(
			table.getColumns().length);
			for (IColumn<?> column : table.getColumns()) {
				if (column instanceof ExportableColumn<?>) {
					exportable.add((ExportableColumn) column);
				}
			}
			return exportable;
		}
	}
Now we are ready to implement the export code which will be placed inside the onClick() method. We begin by setting the necessary headers on the response object:
WebResponse response = (WebResponse) getResponse();
	response.setAttachmentHeader("export.csv");
	response.setContentType("text/csv");
setAttachmentHeader() method will cause the browser to prompt the user to
download a file.
Next, we create the CsvWriter helper and connect it to the response’s output stream:
WebResponse response = (WebResponse) getResponse();
	OutputStream out = getResponse().getOutputStream();
	CsvWriter writer = new CsvWriter(out);
Finally, it’s the actual export loop, which we perform in chunks of 100 records at a time:
List<ExportableColumn> exportable = getExportableColumns();
	Pager pager = new Pager(100, table.getDataProvider().size());
	for (int i = 0; i < pager.pages(); i++) {
		Iterator<? extends T> it = table.getDataProvider().iterator(
		pager.offset(i), pager.count(i));
		while (it.hasNext()) {
			T object = it.next();
			for (ExportableColumn col : exportable) {
				col.exportCsv(object, writer);
			}
			writer.endLine();
		}
	}
After we have written the entire CSV content into the response we close the writer and abort any further Wicket-related processing:
writer.close();
	throw new AbortException();
There’s more…
DataTable comes with support for toolbars. Toolbars are specialized Panels that can be easily added to the top or the bottom of the table. In the next section, we will see how to create a reusable toolbar that contains various export options.
Moving data export to a toolbar
Toolbars make it convenient to customize DataTables. For example, the table headers are generated by the HeadersToolbar, while paging is generated by the NavigationToolbar.
Likewise, it makes sense to create an ExportToolbar that will contain all the export-related functionality and can be easily added to any DataTable.
Let’s create such a toolbar and put our CsvExportLink into it.
ExportToolbar.html

<a>Export to CSV</a>


	ExportToolbar.java
	public class ExportToolbar extends AbstractToolbar {
		public ExportToolbar(final DataTable table) {
			super(table);
			WebMarkupContainer span = new WebMarkupContainer("span") {
				@Override
				protected void onComponentTag(ComponentTag tag) {
					tag.put("colspan", table.getColumns().length);
				}
			};
			add(span);
			span.add(new CsvExportLink("csv", table));
		}
	}
With the toolbar complete we can add it to our DataTable:
HomePage.java
		contacts.addBottomToolbar(new ExportToolbar(contacts));

 Configure Spring Batch Retry on Error