
This article should teach you how can do you install and use the EclipseLink-JPA. The Integrated Development Environment that will be used in this installation guide is “Eclipse Java EE IDE for Web Developers- Kepler Service Release 1”.
Install Eclipse IDE
First of all you should install Eclipse IDE from Eclipse official site. Open the Eclipse after finishing the installation. This tutorial uses the Kepler version of Eclipse IDE. The view of the Eclipse IDE should be as shown in the figure 1-1.
Figure 1.1
Install EclipseLink JAR Files
- Download EclipseLink 2.5.1 Installer Zip from the eclipse organization site or follow this link https://www.eclipse.org/eclipselink/downloads/ link. That contains the implementation for all persistence services that EclipseLink provides.
- The JAR files that should be used for JPA persistence service are:
- eclipselink.jar
- javax.persistence.source_2.1.0.v201304241213.jar
- javax.persistence_2.1.0.v201304241213.jar
- Unzip the file into any directory you would use for completing the installation. Already we have Unzip the file into “C:/JavaBeat” folder.
Set JPA Facet in Eclipse IDE
Create an eclipse dynamic project and prepare it for adding JPA facet. Follow the steps:
- Open an Eclipse IDE.
- Create a Dynamic project.
- Right-click on the project created. Select properties.
- Click on the Project Facets.
- Make the JPA option selected, and choose JPA version 2.1. See the figure .1.2.
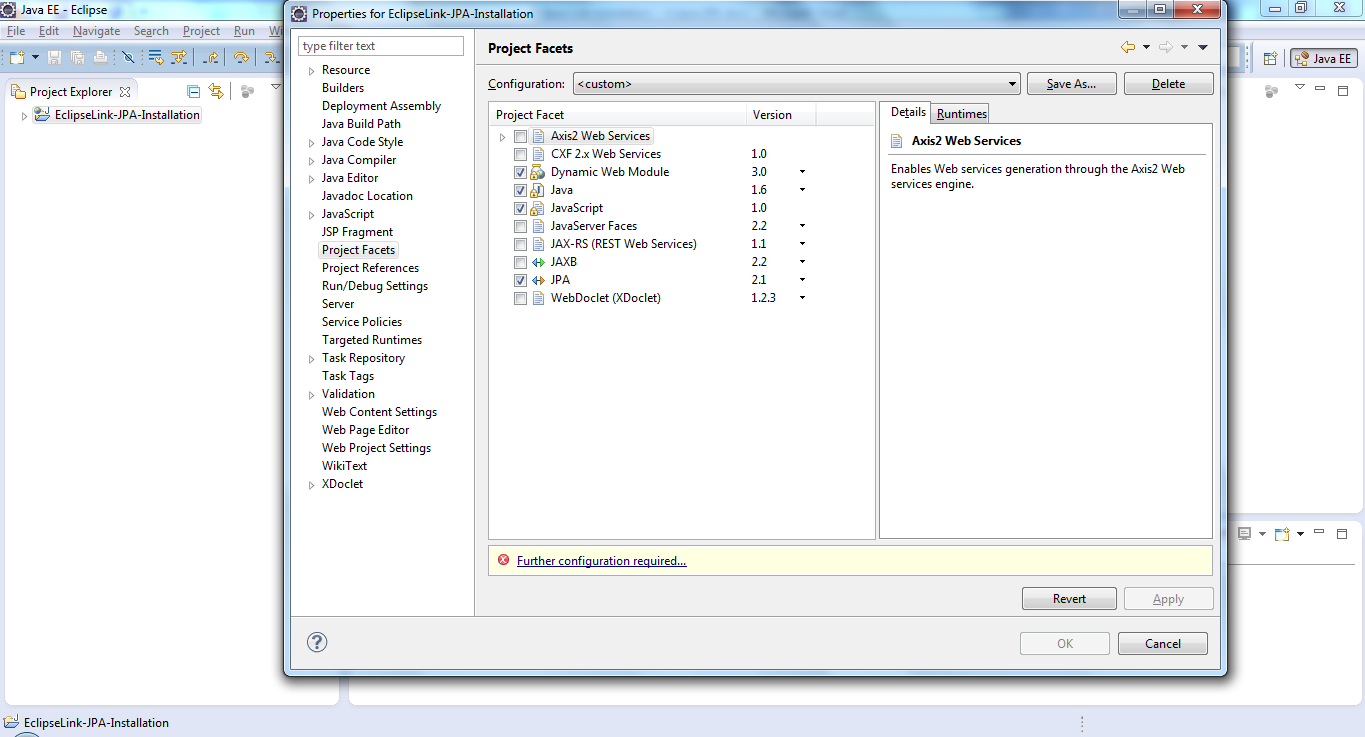
Figure 1.2
A further configuration is required, so proceed to complete it by pressing on “Further configuration required” error message that shown below. This action should open a new dialog for setting a JPA Facet.
Add JPA Facet
The JPA Fact dialog should be displayed as shown at Figure 1.3. This dialog allows the user to add the required libraries to implement the JPA.
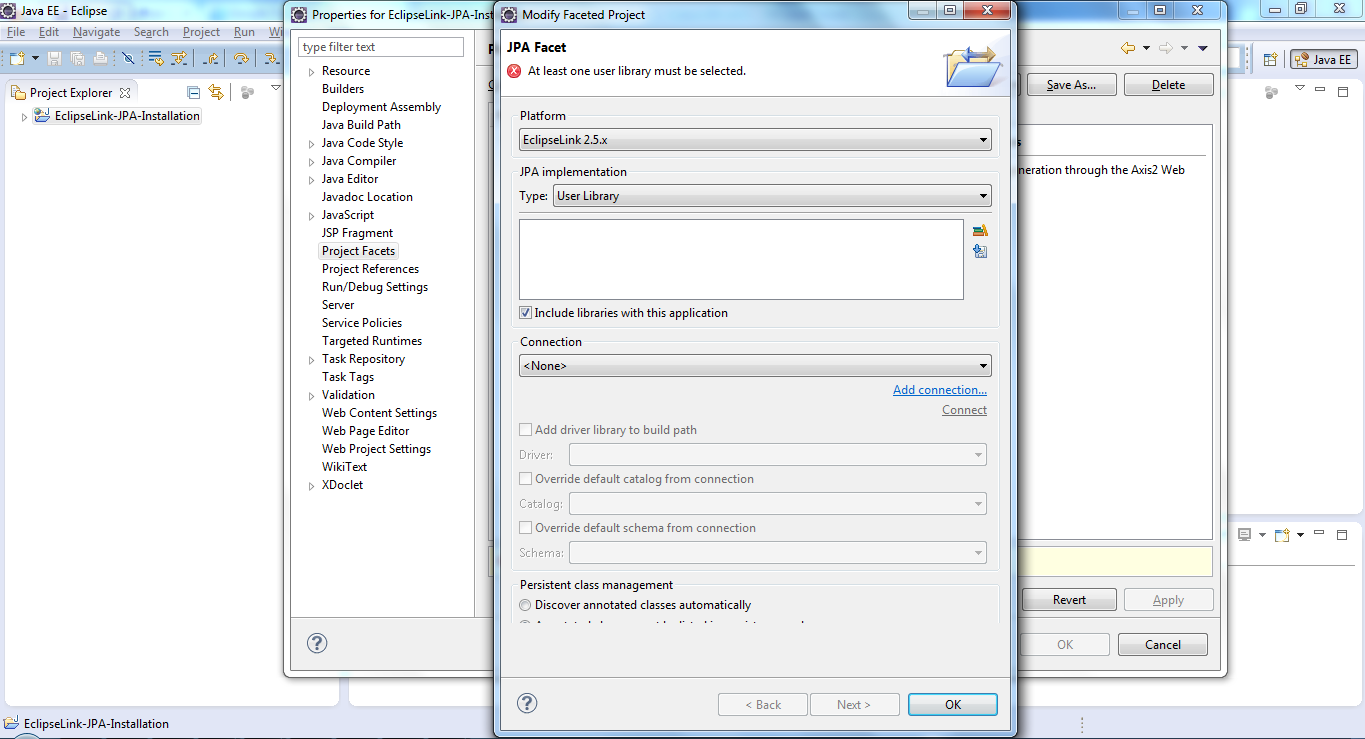
Figure 1.3
-
The dialog shows the platform of the persistence that will be used; it is by default select the “Generic 2.1” option. Change the platform to be “EclipseLink 2.5.x”.
- Let the JPA implementation menu without any change. The type “User Library” allows you to add a user driven library. And add the JPA library.
- Click on “Manage Libraries”. Another way of adding library can be achieved by using “Download Library” that not covered at this tutorial.
- Click on “New” to add a new library.
- Set the name of the library and click Okay.
Now, the library is ready to add the required JARs that mentioned in the “Install EclipseLink JAR files” step. See the figure 1.4.

Figure 1.4
Library Configuration
The configuration of the library require adding the needed JARs file for implementing the JPA. Follow the next steps for achieving that configuration.
- Click on “Add External JARs”.
- Add eclipselink.jar that’s located under “C:/JavaBeat/eclipselink/jlib”.
- Add each JAR starting with javax.persistence.* that’s located under “C:/JavaBeat/eclipselink/jlib/jpa”. See Figure 1.5.
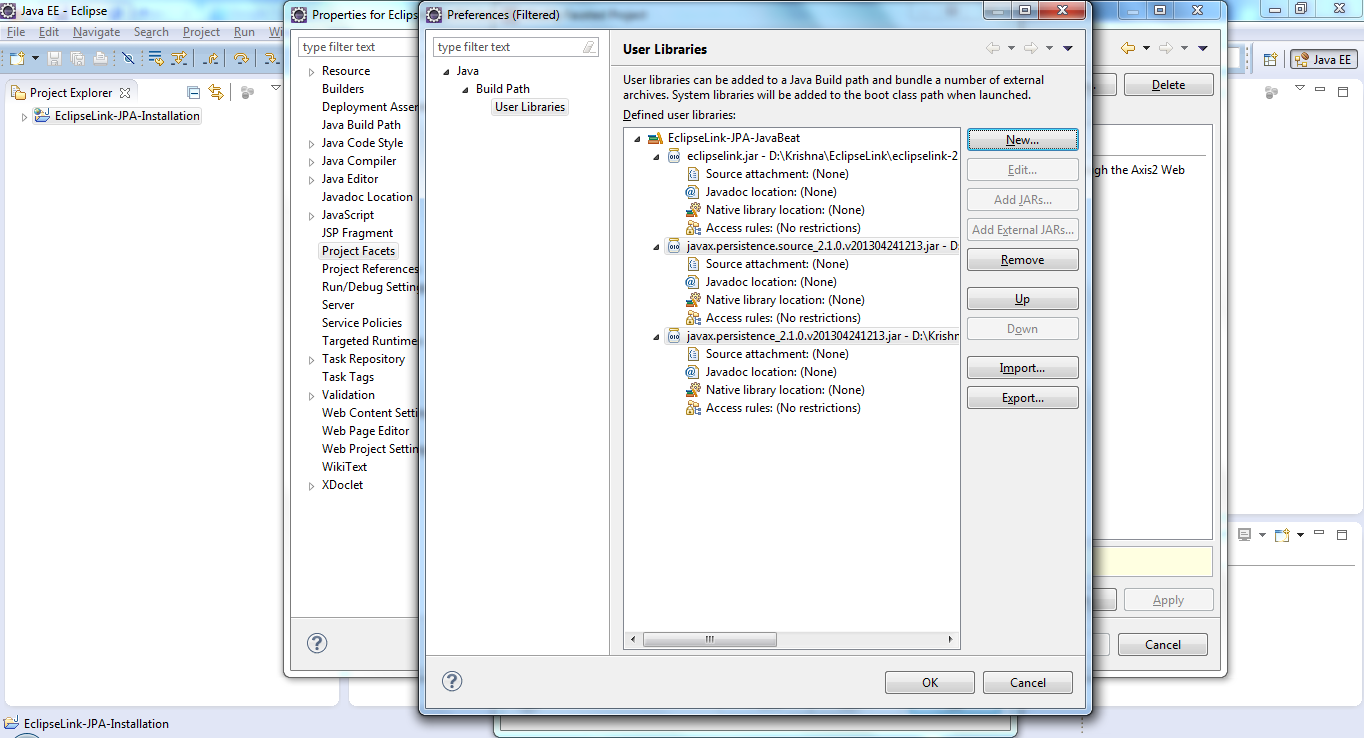
Figure 1.5
- Click Okay, should close the add library dialog. But to avoid the JPA Facet: “At least one user library must be selected”.
- Select the created library.
- Click “Okay”.
The dynamic project created is ready now for using a JPA. But the JPA is a persistence service that relates with the Relational-Database system. So one step remaining and it is the database connection creation.
Database Connection Creation
Once you have finished creating a user library, it is now the step of creating a database connection. The final dialog should appear as you can see at Figure 1.6.
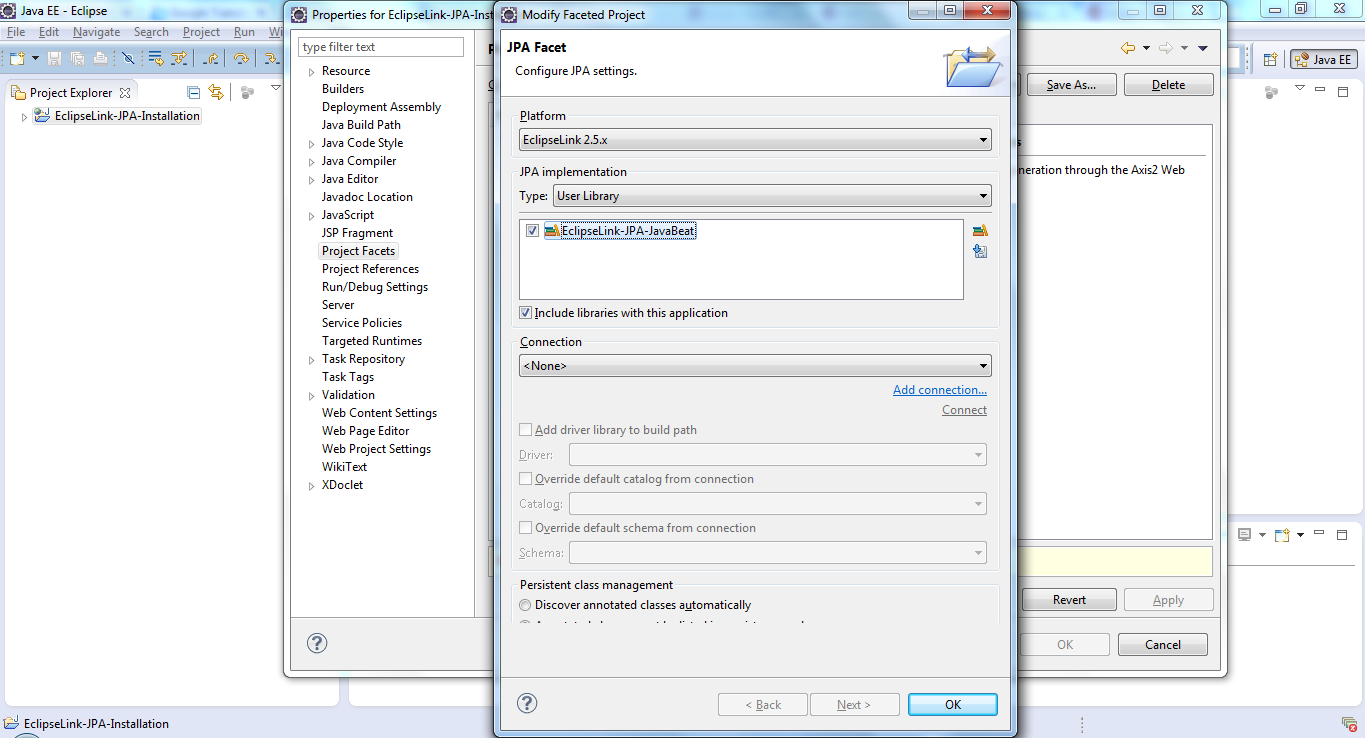
Figure 1.6
To create a database connection, follow the following steps:
- Click on “Add Connection”.
- Connection profile dialog will be opened.
- Choose the type of the database that your project would use. This tutorial assumes that the database that would be used is a MySQL database.
- Change the name of the connection. Click next.
- Fill the form of the “Specify a Driver and Connection Details”. The dialog should select the driver of the database that you had selected automatically. if it doesn’t, you have to go through to install a new driver definition; that will not be covered at this article. But when you come to the properties of the connection, you should specify the correct database connection information and then click on the “Test Connection”. See Figure 1.7.
- By end of the step 5, you are ready to use your connection in your JPA project.
- Click finish.
- The dialog should be closed, so be sure that the created connection has been selected.
- Click Okay will close the Further configuration dialog.
- Click Okay will close the project facets.

Figure 1.7
Now, you have created a new “Dynamic Project” and configured it for JPA use. Navigate the project created and open the persistence.xml that you have within a “META-INF” folder.
Persistence Configuration
I you have reached here, it seems everything are done successfully, so it’s a time for editing the persistence.xml that would help us to connect our database.
To configure the persistence.xml file you have to double click on it. It should be opened in a separate editor. The opened editor has multiple titled tabs shown at the bottom of the editor. Follow the below steps for full configuration of persistence.xml.
- Navigate to Connection tab.
- Change the transaction type into “Resource Local”. This change should activate the EclipseLink connection pool.
- Click on “populate from connection”.
- Choose the connection that created before.
- Use the Ctrl + S to save the file.
- Navigate to Source tab. You should see the minimal amount of configuration that required to connect your database.
See the Figure 1.8 for correct database connection.
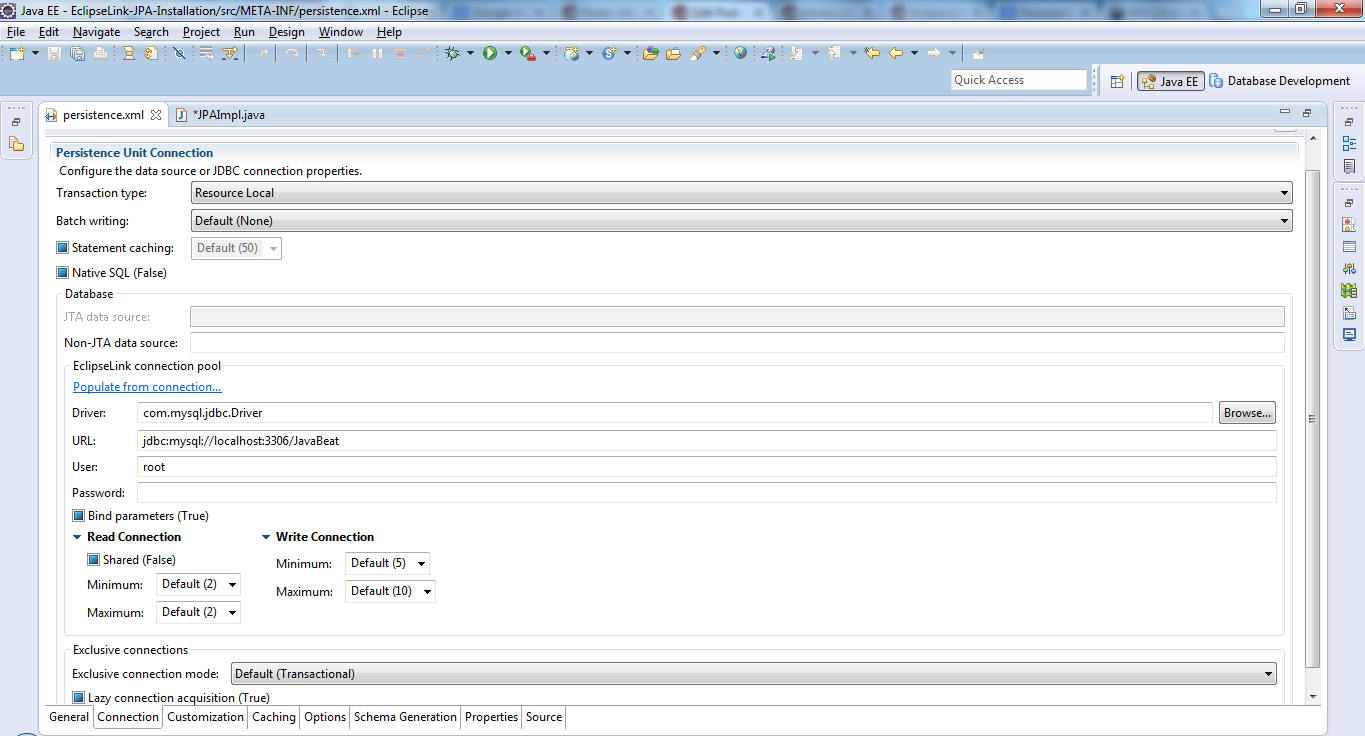
Figure 1.8
Testing EclipseLink Application
For testing the configuration of your project if whether it is working or not, you have to develop a Java Class. That Java Class should use the persistence name of your persistence.xml. In our case, the persistence name is “EclipseLink-JPA-Installation”.
- Write a main method and use Persistence class to create EntityManagerFactory; that is consider as an entry point for the JPA.
- Test you connection via calling isOpen() method from the entity manager that created before. See Figure 1.9.
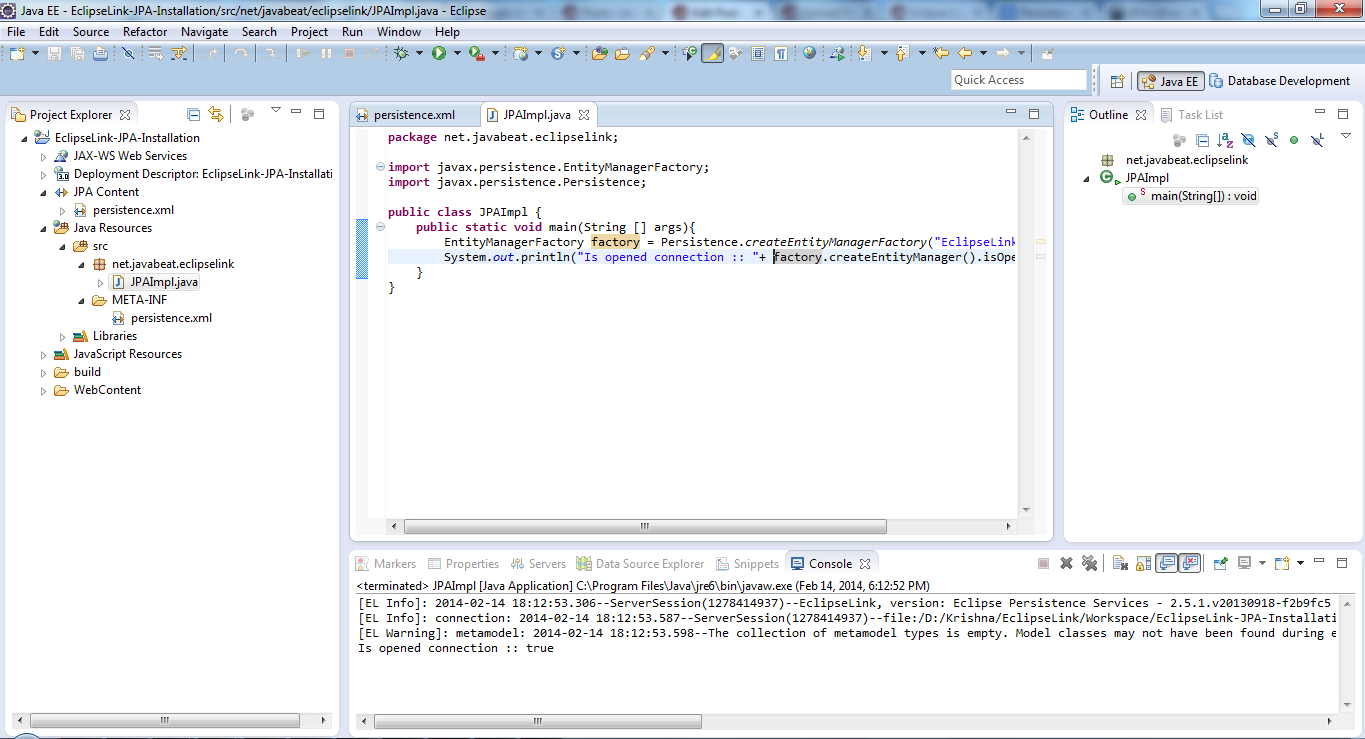
Figure 1.9
The code of the testing application:
package net.javabeat.eclipselink;
import javax.persistence.EntityManagerFactory;
import javax.persistence.Persistence;
public class JPAImpl {
public static void main(String [] args){
EntityManagerFactory factory = Persistence.createEntityManagerFactory("EclipseLink-JPA-Installation");
System.out.println("Is opened connection :: "+ factory.createEntityManager().isOpen());
}
}
 JPA Annotations – @GeneratedValue, @SequenceGenerator and @TableGenerator