
This tutorial explains the very basic configuration and installation of hibernate configuration for your project. It is a standalone program, but the same configuration would applicable for the web applications. Here I am using the XML configuration approach, I will write another tutorial for using the annotations. Here I assume that you have installed the MYSQL database required for this application.
1. Project Structure and Libraries
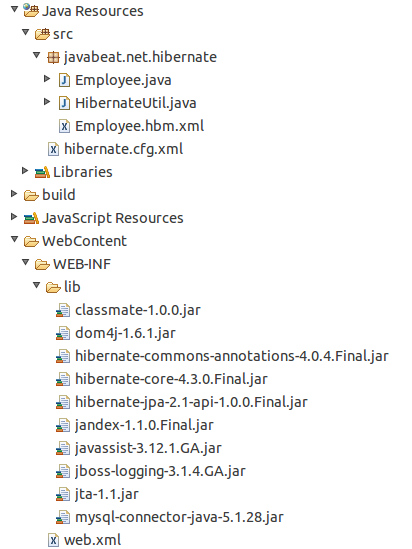
Look at the below screen shot for the sample project structure for the hibernate project. The file locations are as follows.
- hibernate.cfg.xml – This is the main hibernate configuration file for loading the database configuration and mapping files for the entities. This must be the classpath location inside your project. By default hibernate would look for the root of the classpath directory. If you want to use the different location, you have to pass the location to the config object at the time of loading the configurations.
- employee.hbm.xml – This is the mapping file for entity Employee in the database. This file will be different for each entity. Name of the file is <entity-name>.hbm.xml.
- The following JAR files are required to start writing your first hibernate application. using MySQL database. These JAR files can be downloaded from the repository or add as the dependency in maven’s pom.xml.
- classmate-1.0.0.jar
- dom4j-1.6.1.jar
- hibernate-commons-annotations-4.0.4.Final.jar
- hibernate-core-4.3.0.Final.jar
- hibernate-jpa-2.1-api-1.0.0.Final.jar
- jandex-1.1.0.Final.jar
- javassist-3.12.1.GA.jar
- jboss-logging-3.1.4.GA.jar
- jta-1.1.jar
- mysql-connector-java-5.1.28.jar
2. Maven Dependency
This section provides the list of dependency entry for the maven configuration. If I have missed any of the dependency here, please add it by searching from the maven repository.
        <!-- MySQL database driver -->
	<dependency>
		<groupId>mysql</groupId>
		<artifactId>mysql-connector-java</artifactId>
		<version>5.1.28</version>
	</dependency>
	<!-- Hibernate framework -->
	<dependency>
		<groupId>org.hibernate</groupId>
		<artifactId>hibernate-core</artifactId>
		<version>4.3.0</version>
	</dependency>
	<!-- Hibernate library dependecy start -->
	<dependency>
		<groupId>dom4j</groupId>
		<artifactId>dom4j</artifactId>
		<version>1.6.1</version>
	</dependency>
	<dependency>
		<groupId>org.jboss.logging</groupId>
		<artifactId>jboss-logging</artifactId>
		<version>3.1.4</version>
	</dependency>
	<dependency>
		<groupId>javax.transaction</groupId>
		<artifactId>jta</artifactId>
		<version>1.1</version>
	</dependency>
	<dependency>
		<groupId>com.fasterxml</groupId>
		<artifactId>classmate</artifactId>
		<version>1.0.0</version>
	</dependency>
 </dependencies>
</project>
3. MYSQL Database Table Creation
Create Table Employee
CREATE TABLE `employee` (
    `id` INT(10) NOT NULL AUTO_INCREMENT,
    `empname` VARCHAR(50) NULL DEFAULT NULL,
    `branch` VARCHAR(15) NOT NULL,
    PRIMARY KEY (`id`)
)
Database credentials
Connection URL: jdbc:mysql://localhost:3306/test
DB Username:    root
DB Password:    <your mysql password>
4. Entity Class
Lets see the entity class for persisting the object. It is a simple class defines the properties mapped to each column in the EMPLOYEE table.
Employee.java
package javabeat.net.hibernate;
public class Employee {
	private int id;
	private String empName;
	private String branch;
	public int getId() {
		return id;
	}
	public void setId(int id) {
		this.id = id;
	}
	public String getEmpName() {
		return empName;
	}
	public void setEmpName(String empName) {
		this.empName = empName;
	}
	public String getBranch() {
		return branch;
	}
	public void setBranch(String branch) {
		this.branch = branch;
	}

}
5. Hibernate Configuration File (hibernate.cfg.xml)
It is the main configuration file. Here you have to define the database details and mapping files locations. Here I have defined only the basic properties needed for an application, you can use lot many advanced properties like caching, etc. based on your requirement.
<?xml version='1.0' encoding='utf-8'?>
<!DOCTYPE hibernate-configuration PUBLIC
        "-//Hibernate/Hibernate Configuration DTD 3.0//EN"
        "http://www.hibernate.org/dtd/hibernate-configuration-3.0.dtd">

<hibernate-configuration>

   <session-factory>
        <!-- Database connection settings -->
        <property name="connection.driver_class">com.mysql.jdbc.Driver</property>
        <property name="connection.url">jdbc:mysql://localhost:3306/test</property>
        <property name="connection.username">root</property>
        <property name="connection.password">admin</property>

        <!-- JDBC connection pool (use the built-in) -->
        <property name="connection.pool_size">1</property>

        <!-- SQL dialect -->
        <property name="dialect">org.hibernate.dialect.MySQLDialect</property>

        <!-- Echo all executed SQL to stdout -->
        <property name="show_sql">true</property>

        <!-- Mapping files -->
        <mapping resource="javabeat/net/hibernate/Employee.hbm.xml"/>
    </session-factory>

</hibernate-configuration>
6. Hibernate Mapping File (Employee.hbm.xml)
It is the per mapping configuration file. Normally this file will be placed along with the entity object. If you look at this file, it simply use the Employee class object and mapping the corresponding column names in the table. Few points to note:
- Package attribute used for defining the package path for the entity classes defined under that element.
- If column attribute is not defined, by default it takes the property name as the column name. If your column name is different from the Java property name, then define it explicitly.
- Id attribute is used for defining the primary key column in the table.
<?xml version="1.0"?>
<!DOCTYPE hibernate-mapping PUBLIC
        "-//Hibernate/Hibernate Mapping DTD 3.0//EN"
        "http://www.hibernate.org/dtd/hibernate-mapping-3.0.dtd">

<hibernate-mapping package="javabeat.net.hibernate">
<class name="Employee" table="employee">
        <id name="id" column="id">
            <generator class="increment"/>
        </id>
        <property name="empName" column="empname"/>
        <property name="branch"/>
    </class>
</hibernate-mapping>
7. Run The Application
Once the above configurations are completed, lets write the util class to save some details to the database. This sample application stores values from the Employee object to the database.
package javabeat.net.hibernate;

import org.hibernate.Session;
import org.hibernate.SessionFactory;
import org.hibernate.boot.registry.StandardServiceRegistryBuilder;
import org.hibernate.cfg.Configuration;

public class HibernateUtil {
    public static void main(String args[]){
    	Configuration configuration = new Configuration().configure();
    	StandardServiceRegistryBuilder builder = new StandardServiceRegistryBuilder().applySettings(configuration.getProperties());
    	SessionFactory factory = configuration.buildSessionFactory(builder.build());
    	Session session = factory.openSession();
    	Employee employee = new Employee();
    	employee.setEmpName("Senthil Kumar");;
    	employee.setBranch("Pune");
    	session.beginTransaction();
    	session.save(employee);
    	session.getTransaction().commit();
    }
}
 How To Create Session Factory in Hibernate 4