In this tutorial we will write a simple Java project to demonstrate Hibernate, HSQL and Maven. We will first create a Java project using Maven and then will add Hibernate on it. HSQL database is used to make the project simple, as we can use in-memory database and we would need only a JAR file to be included in our project. If you have any questions, please post it in the comments section. If you are interested in receiving the future articles on Java topics, please subscribe here. If you are beginner for hibernate, please read the articles about introduction to hibernate, interceptors in hibernate and spring & hibernate integration. We also recommend good reference books for learning hibernate in our post about hibernate books. .
.
Following are the tools and technologies required for this project:
- Java JDK 5 or above
- Eclipse IDE 3.2 or above
- Maven 3.0 or above
- Hibernate 3.0 or above (Download from http://hibernate.org/downloads)
- HsqlDB (Download from http://hsqldb.org/)
- Download Source Code: [download id=”11″]
1. Generating Maven Java project compatible with Eclipse
We will create a Java project using Maven (Refer post Creating Simple Java Project Using Apache Maven). Open the command line window and execute the following command:
mvn archetype:generate
-DgroupId=net.javabeat.hibernate
-DartifactId=HibernateHelloWorldXML
-DarchetypeArtifactId=maven-archetype-quickstart
-DinteractiveMode=false
On execution of the above command, a java project HibernateHelloWorldXML is created (In our case we have created it in the directory C:\HibernateProject). This java project already has a directory structure (as explained in the post (Refer post Creating Simple Java Project Using Apache Maven)). To make this project compatible with eclipse, let’s execute the following command:
mvn eclipse:eclipse
The goal eclipse:eclipse generates the following eclipse configuration files:
- .project and .classpath files.
- .setting/org.eclipse.jdt.core.prefs with project specific compiler settings.
- Various configuration files for WTP (Web Tools Project), if the parameter wtpversion is set to a valid version (WTP configuration is not generated by default).
2. Import project into Eclipse
Open Eclipse and import the above Java project as explained below:
File > Import… > General > Existing Projects into Workspace > Choose above Java project
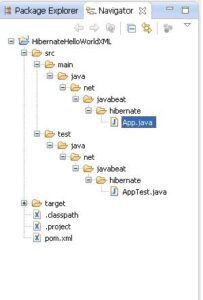
Once the project is imported the directory structure would be as in the screen below:

Build-path settings
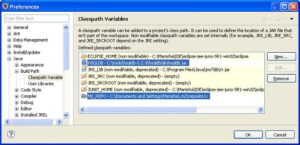
Goto Window > Preferences… > Java > Build Path > Classpath Variables >
- Define new variable M2_REPO pointing to your local maven repository. (In our case it is:C:/Documents and Settings/Manisha/.m2/repository).
- Define new variable HSQLDB pointing to the hsqldb.jar. (C:/tools/hsqldb-2.2.9/hsqldb/lib/hsqldb.jar).
3. Adding the Hibernate and HSQLDB Dependency to pom.xml
We need to add the Hibernate, HSQLDB and some other dependencies to the Maven pom.xml as shown below:
 <project xmlns="http://maven.apache.org/POM/4.0.0" xmlns:xsi="http://www.w3.org/2001/XMLSchema-instance"
 xsi:schemaLocation="http://maven.apache.org/POM/4.0.0 http://maven.apache.org/maven-v4_0_0.xsd">
 <modelVersion>4.0.0</modelVersion>
 <groupId>net.javabeat.hibernate</groupId>
 <artifactId>HibernateHelloWorldXML</artifactId>
 <packaging>jar</packaging>
 <version>1.0-SNAPSHOT</version>
 <name>HibernateHelloWorldXML</name>
 <url>http://maven.apache.org</url>
 <dependencies>
   <dependency>
     <groupId>junit</groupId>
     <artifactId>junit</artifactId>
     <version>3.8.1</version>
     <scope>test</scope>
   </dependency>
<!-- Hibernate library dependecy start -->
  <dependency>
     <groupId>org.hibernate</groupId>
     <artifactId>hibernate</artifactId>
     <version>4.1.9.Final</version>
  </dependency>
  <dependency>
     <groupId>org.hsqldb</groupId>
     <artifactId>hsqldb</artifactId>
     <version>2.2.9</version>
  </dependency>
  <dependency>
     <groupId>org.hibernate</groupId>
     <artifactId>hibernate-annotations</artifactId>
     <version>3.3.1.GA</version>
  </dependency>
  <dependency>
     <groupId>dom4j</groupId>
     <artifactId>dom4j</artifactId>
     <version>1.6.1</version>
  </dependency>
  <dependency>
     <groupId>commons-logging</groupId>
     <artifactId>commons-logging</artifactId>
     <version>1.1.1</version>
  </dependency>
  <dependency>
     <groupId>commons-collections</groupId>
     <artifactId>commons-collections</artifactId>
     <version>3.2.1</version>
  </dependency>
  <dependency>
     <groupId>cglib</groupId>
     <artifactId>cglib</artifactId>
     <version>2.2</version>
  </dependency>
  <dependency>
     <groupId>asm</groupId>
     <artifactId>asm</artifactId>
     <version>4.0</version>
  </dependency>
  <dependency>
     <groupId>dom4j</groupId>
     <artifactId>dom4j</artifactId>
     <version>1.6.1</version>
  </dependency>
  <dependency>
      <groupId>ehcache</groupId>
      <artifactId>ehcache</artifactId>
      <version>1.2.3</version>
  </dependency>
  <dependency>
      <groupId>hibernate-tools</groupId>
      <artifactId>hibernate-tools</artifactId>
      <version>3.2.3.GA</version>
  </dependency>
  <dependency>
      <groupId>jta</groupId>
      <artifactId>jta</artifactId>
      <version>1.1</version>
  </dependency>
  <dependency>
      <groupId>log4j</groupId>
      <artifactId>log4j</artifactId>
      <version>1.2.11</version>
  </dependency>
  <dependency>
      <groupId>oscache</groupId>
      <artifactId>oscache</artifactId>
      <version>2.1</version>
  </dependency>
  <dependency>
      <groupId>persistence-api</groupId>
      <artifactId>persistence-api</artifactId>
      <version>1.0</version>
   </dependency>
  <!-- Hibernate library dependecy end -->
</dependencies>
</project>
As a next step, let’s execute the following command so that maven will download all the required JARs and add the same to eclipse classpath.
mvn eclipse:eclipse
This step is optional. If your Eclipse has Maven plugin installed in your IDE (Latest eclipse comes with this plugin built-in) you can just enable Maven dependencies by following these instructions : Right click on project > Maven > Enable Dependency Management.
4. Create Model Class and Hibernate Mapping file
As a next step let’s create the model class (src\main\java\net\javabeat\hibernate\Contact.java) as below:
package net.javabeat.hibernate;
import java.io.Serializable;
/**
   * Model class for Contact
*/
public class Contact implements Serializable {
   private Integer contactId;
   private String name;

   public Contact() {
    }

   public Integer getContactId() {
      return contactId;
   }

   public void setContactId(Integer contactId) {
       this.contactId = contactId;
   }

   public String getName() {
       return name;
   }

   public void setName(String name) {
       this.name = name;
   }

}
Next let’s write a Hibernate XML Mapping file to the directory:/src/main/resources . Create the resources directory as follows: Right click on Project > New > Source Folder > Give folder name “/src/main/resources/” and click Finish. Write the file src\main\resources\net\javabeat\hibernate\Contact.hbm.xml for the Model class as below:
 <?xml version="1.0"?>
 <!DOCTYPE hibernate-mapping PUBLIC "-//Hibernate/Hibernate Mapping DTD 3.0//EN"
 "http://hibernate.sourceforge.net/hibernate-mapping-3.0.dtd">

<hibernate-mapping>
    <class name="net.javabeat.hibernate.Contact" table="contact">
         <id name="contactId" type="java.lang.Integer">
             <column name="CONTACT_ID" />
             <generator class="identity" />
         </id>
         <property name="name" type="string">
             <column name="NAME" length="10" not-null="true" unique="true" />
         </property>
       </class>
</hibernate-mapping>
The details of the above file are as below:
- The hibernate-mapping element is the root element.
- The class element is used to map the Java class with the database table.
- The Java class name is specified using the name attribute of the class element
- The database table name is specified using the table attribute of the class element.
- The id element is used to create the primary key.
- The name attribute of the id element refers to the property in the Contact class and the column attribute refers to the column in the CONTACT table.
- The type attribute holds the hibernate mapping type, this mapping types will convert from Java to SQL data type and vice versa.
- The generator element within the id element is used to automatically generate the primary key values.
- The property element is used to link a property in the Java class to a column in the database table.
5. Adding Hibernate Configuration file
As a next step let’s add the hibernate.cfg.xml to the directory:/src/main/resources . Write the new file hibernate.cfg.xml in this directory. The hibernate.cfg.xml is as follows:
<?xml version='1.0' encoding='utf-8'?>
<!DOCTYPE hibernate-configuration PUBLIC
        "-//Hibernate/Hibernate Configuration DTD 3.0//EN"
        "http://hibernate.sourceforge.net/hibernate-configuration-3.0.dtd">
<?xml version='1.0' encoding='utf-8'?>
<!DOCTYPE hibernate-configuration PUBLIC
        "-//Hibernate/Hibernate Configuration DTD 3.0//EN"
        "http://hibernate.sourceforge.net/hibernate-configuration-3.0.dtd">
<hibernate-configuration>
  <session-factory>
    <!-- Database connection settings, Connect to HSQL, IN Memory  -->
    <property name="dialect">org.hibernate.dialect.HSQLDialect</property>
    <property name="connection.driver_class">org.hsqldb.jdbcDriver</property>
    <property name="connection.url">jdbc:hsqldb:mem:test</property>
    <property name="connection.username">sa</property>
    <property name="connection.password"></property>

     <!-- JDBC connection pool (use the built-in) -->
     <property name="connection.pool_size">1</property>
     <property name="show_sql">true</property><property name="format_sql">true</property>
     <property name="cache.provider_class">org.hibernate.cache.NoCacheProvider</property>
     <!--create the database schema on startup if required -->
     <property name="hbm2ddl.auto">update</property>
     <mapping resource="net/javabeat/hibernate/Contact.hbm.xml"></mapping>
  </session-factory>
</hibernate-configuration>
In the above file we have set the database connection to HSQL-In memory database (mem is in-memeory, and test is the database name). The show_sql option, if set to true will display all the executed SQL queries on the console. The property hbm2ddl.auto , if set to update, will change the existing database schema on each startup. In the end we add the Contact.hbm.xml file to the configuration.
Note : In case you want to use any other database then, you need to change these properties –
“dialect”, “connection.driver_class”, “connection.url”, “connection.username”, and “connection.password”
6. Create Utility class
Next, we will write a utility class to take care of Hibernate start up and retrieve the session easily. We will write the file src\main\java\net\javabeat\hibernate\HibernateUtil.java as below:
package net.javabeat.hibernate;

import org.hibernate.SessionFactory;
import org.hibernate.cfg.Configuration;

public class HibernateUtil {
    private static final SessionFactory sessionFactory;
    static {
        try {
            sessionFactory = new Configuration().configure()
            .buildSessionFactory();
        } catch (Throwable ex) {
            System.err.println("Initial SessionFactory creation failed." + ex);
            throw new ExceptionInInitializerError(ex);
        }
    }

    public static SessionFactory getSessionFactory() {
        return sessionFactory;
    }
}
7. Revise the App class
Next we will revise the App.java (generated by Maven), to create and list the contact names as below:
package net.javabeat.hibernate;

import java.util.Iterator;
import java.util.List;

import org.hibernate.HibernateException;
import org.hibernate.Session;
import org.hibernate.Transaction;

public class App {
  public static void main(String[] args) {
     System.out.println("Maven + Hibernate + HSQL");
     Session session = HibernateUtil.getSessionFactory().openSession();
     session.beginTransaction();
     App app = new App();
     app.saveContact("Jiya");
     app.saveContact("Manisha");
     app.saveContact("Riya");
     app.listContact();
   }

   public Integer saveContact(String contactName) {
      Session session = HibernateUtil.getSessionFactory().openSession();
      session.beginTransaction();
      Integer contactId = null;
      Transaction transaction = null;
      try {
           transaction = session.beginTransaction();
           Contact contact = new Contact();
           contact.setName(contactName);
           contactId = (Integer) session.save(contact);
           transaction.commit();
       } catch (HibernateException e) {
           transaction.rollback();
           e.printStackTrace();
       } finally {
           session.close();
       }
       return contactId;
   }

   public void listContact() {
       Session session = HibernateUtil.getSessionFactory().openSession();
       Transaction transaction = null;
       try {
           transaction = session.beginTransaction();
           @SuppressWarnings("unchecked")
           List<Contact> contactList = session.createQuery("from Contact")
               .list();
           for (Iterator<Contact> iterator = contactList.iterator(); iterator
                   .hasNext();) {
               Contact contact = (Contact) iterator.next();
               System.out.println(contact.getName());
           }
           transaction.commit();
       } catch (HibernateException e) {
           transaction.rollback();
           e.printStackTrace();
       } finally {
           session.close();
       }
   }

}
Here the saveContact() method is used to save a new Contact object to the database. In the saveContact() method a new object of the Contact class is created and the contactName value is set, the contactId value is auto generated so the value need not be set here. The session.save() method is used to persist the value in the database and once the value is saved, the id value (Primary key) is returned. Here the contactId value is of type Integer so we typecast the returned value to Integer. Once the object is saved, the transaction is committed. If any exception occurs then the transaction is rolledback. The transaction ends either through commit or rollback action. Once the transaction ends the session is closed.
The listContact() method is used to list all the contacts. The session.createQuery() method is used to create a query object which helps in retrieving the persistant objects. Here we use Hibernate Query Language (HQL). “from Contact” returns a list of all the contacts in the CONTACT table. Note that in the HQL we only specify the java class names and not the table names. Later, using the for loop we iterate the list of contacts and display them on the console.
8. Final project structure
Once you have created all these source files, your project structure should look like following:

9. Execution of the above code
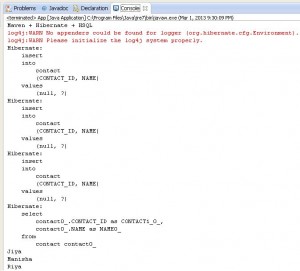
Now let us execute the code we created above. Let’s run the App class.
Right click on App.java >Run As > Java Application.
On start of each thread, a database schema will be created and the following actions will happen.
- Each time a new thread starts the database schema will change the existing one as we have set hbm2ddl.auto option to update.
- The SQL statement generated gets displayed on the console. This is set using the show_sql option in the hibernate configuration file.
Summary
- Download Source Code: [download id=”11″]
In this post we first created a simple Java project using Maven and made it compatible with eclipse. Then we added the Hibernate XML mapping to this project. We used a simple HSQL database, to insert records into CONTACT table and also listed these records. In the next article we shall look into creating hibernate project using Java Annotations. If you have any questions, please post it in the comments section. If you are interested in receiving the future articles on Java topics, please subscribe here


