
In this tutorial we will see how to create stylized buttons using the jQuery UI library. In reality 100% of the systems we develop, whether desktop, mobile or web, there are situations where it is required to submit data by the user. And to submit these data or even to perform a simple action like opening a new window, the most common practice is to use buttons.
When we need this type of element (button) on web pages, usually we are resorted to traditional tags <button> and <input>, but these have always the same standard look and which the user is often sick of. Seeking to improve the look of the buttons, we can apply styles with CSS and Javascript effects with, which ensures a considerable improvement in the application interface. In these cases we change the background color, borders, font, and sometimes insert small images on the buttons, facilitating the identification of the function of the same.
In this tutorial we will see how to stylize buttons in simple and practical manner, using the jQuery UI library, which is based on jQuery combined with efficient cascading style sheets. With it, we will see that even links (tags <a>) can become stylized buttons.
Definition from jQuery UI Team:
jQuery UI is a curated set of user interface interactions, effects, widgets, and themes built on top of the jQuery JavaScript Library. Whether you’re building highly interactive web applications or you just need to add a date picker to a form control, jQuery UI is the perfect choice.
Importing the jQuery UI library
To use the features of this powerful library, you only need to import three files in the HTML document:
- the jQuery library (Javascript file)
- the actual jQuery UI (Javascript file)
- and the stylesheet jquery UI (CSS file)
Add the following tags under the header of the HTML page.
Listing 1: Import the jQuery UI
<link rel="stylesheet" href="http://code.jquery.com/ui/1.9.0/themes/base/jquery-ui.css" />
<script src="http://code.jquery.com/jquery-1.8.2.js"> </ script>
<script src="http://code.jquery.com/ui/1.9.0/jquery-ui.js"> </ script>
It is essential that the jQuery script is referenced before the script of jQuery UI, because the second depends on the syntax of the first to run.
Basic Buttons using jQuery UI
In the first example we will see how to get the buttons on the most basic way possible, what can be done with a call to the function button() from the element you want to style. In the following case, we use the button tags, and anchor input to create the buttons.
Listing 2: Creating basic buttons using jQuery UI
<!doctype html>
 <html
<head>
    <meta charset="utf-8" />
    <title>Default functionality</title>
<link rel="stylesheet" href="http://code.jquery.com/ui/1.9.0/themes/base/jquery-ui.css" />
<script src="http://code.jquery.com/jquery-1.8.2.js"></script>
<script src="http://code.jquery.com/ui/1.9.0/jquery-ui.js"></script>
    <script>
    $(function() {
        $("input[type=submit], a, button").button();
    });
    </script>
</head>
<body>
 	<button>Button Tag </button>
 	<input type="submit" value="Input Tag(submit)" />
 	<a href="#">Anchor Tag (a)</a>
 </body>
</html>
As we can see, the syntax is quite simple. First use jQuery to select the three elements from the tag names and then call the function button, responsible for shaping element. The result of this code, when saved in a html file extension and open the browser, is the following.
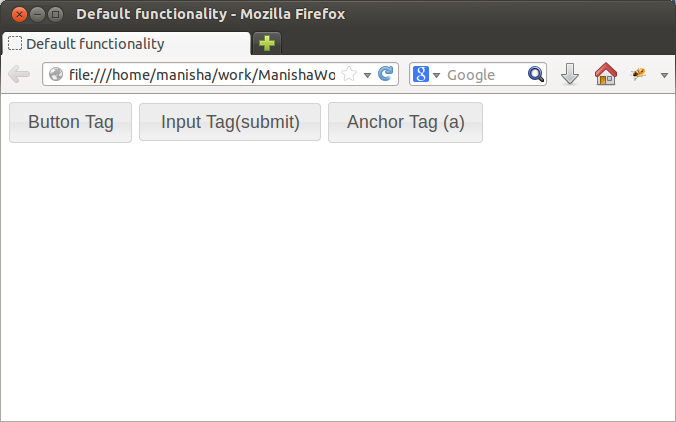 Figure 1: Basic buttons
Groups of Buttons
Often we have several buttons whose functions are related somehow. In such cases, you may want to group them in order to make it clear that they are similar in some way. For these cases there is Buttonset function () which when applied to a div tag containing buttons, makes a “bar” of tools, grouping the items. When using the function Buttonset, the call to the function button for the individual buttons no longer needed, they are automatically stylized, as we shall see in the following example.
Listing 3: Created group of buttons
<!doctype html>
<html>
<head>
    <meta charset="utf-8" />
    <title>jQuery UI Button</title>
    <link rel="stylesheet" href="http://code.jquery.com/ui/1.9.0/themes/base/jquery-ui.css" />
    <script src="http://code.jquery.com/jquery-1.8.2.js"></script>
    <script src="http://code.jquery.com/ui/1.9.0/jquery-ui.js"></script>
    <script>
    $(function() {
        $( "#bar" ).buttonset();
    });
    </script>
</head>
<body>
    <div id="bar">
        <button>Add</button>
        <button>Delete</button>
        <button>Edit</button>
        <button>Save</button>
    </div>
</body>
</html>
If necessary, you can also use links and inputs and these would also be formatted. The result is shown in the following figure.
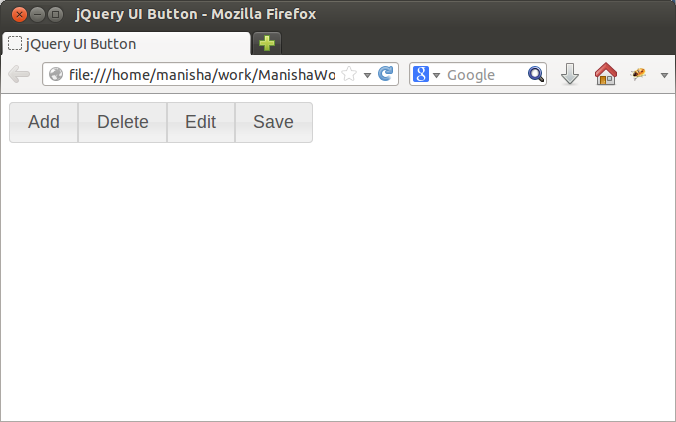 Figure 2: Buttons grouped
Checkboxes and Radios
With jQuery UI it is also possible to stylize input from checkbox and radio types so that they are similar to buttons, avoiding some of the visual pattern. Reaffirming the simplicity of use that library, formatting checkboxes and radio is made in exactly the same way as for common buttons.
In the following example we have checkboxes and radios, clustered and non-clustered, marked and unmarked, to illustrate the general operation of the button functions and Buttonset for these elements.
Listing 4: Creating checkboxes and radios
<!doctype html>
<html>
<head>
    <meta charset="utf-8" />
    <title>jQuery UI Button</title>
    <link rel="stylesheet" href="http://code.jquery.com/ui/1.9.0/themes/base/jquery-ui.css" />
    <script src="http://code.jquery.com/jquery-1.8.2.js"></script>
    <script src="http://code.jquery.com/ui/1.9.0/jquery-ui.js"></script>
    <script>
    $(function() {
        $(".Checking").button();
        $("#bar").buttonset();
    });
    </script>
</head>
<body>
    <h1>Checkboxes</h1>
    <input type="checkbox" class="check" checked="ckecked" id="chk1"/><label for="chk1">Marked</label>
    <input type="checkbox" class="check" id="chk2"/><label for="chk2">Unchecked</label>
    <h1>Radios</h1>
    <div id="barra">
        <input type="radio" id="radio1" name="radio" /><label for="radio1">Option 1</label>
        <input type="radio" id="radio2" name="radio"/><label for="radio2">Option 2</label>
        <input type="radio" id="radio3" name="radio" checked="checked" /><label for="radio3">Option 3</label>
    </div>
</body>
</html>
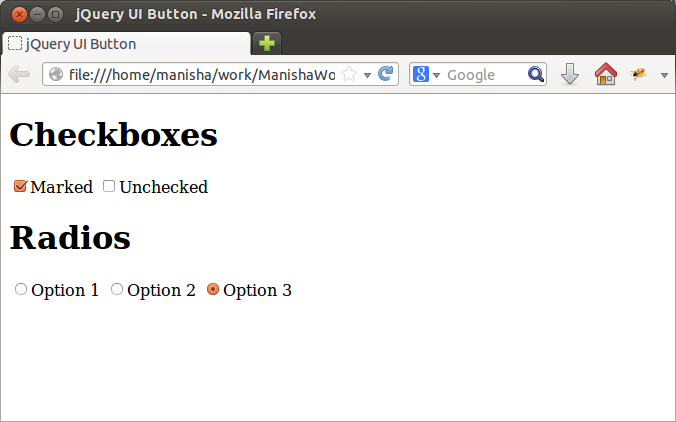
Figure 3: Checkboxes and radios stylized
As it turns out, the look is much more appealing than the standard.
Summary
You can also add icons to the buttons and create submenus (split buttons),. This tutorial aims to give an overview of the element jQuery UI Button. For more information about this feature, a suggestion is to visit the jQuery UI page and read the official documentation of the library at the address JqueryUI .
 PrimeFaces Hello World Example