Android Layout acts as a container of UI elements. It decides how the different UI elements are arranged and rendered to the user. This article explores the various types of layouts available in the Android development with examples. If you have issues on Android programming, please post it in the comments section.
Declaring Layouts
Layouts can be declared in two ways.
- Declaring layouts in xml file.
Android allows you to create UI elements of layout in simple xml files using xml vocabulary.
- Layout xml files are placed in /res/layout/ directory. The layout (.xml file) is called inside java code in the method OnCreate() using the following code.
setContentView(R.layout.main);
R refers to resource and main is the layout xml file saved in /res/layout/ directory.
- You can programmatically create view layout and manipulate its properties inside java code.
- Since different applications want to display their UI elements differently, android provides different ways of specifying the layouts.
Most Basic layouts in android:
- Linear Layout.
- Relative Layout.
- Table Layout.
LinearLayout
LinearLayout is a ViewGroup used to display the UI elements in a linear fashion in either horizontal rows or vertical columns. This is the default layout present when a new project is created. The following are the few properties that decide how the contents will be shown.
- android: orientation -This can be set to either horizontal or vertical.
- android: layout_height
- android: layout_weigh
- android: gravity
- android: layout_width
Example1:
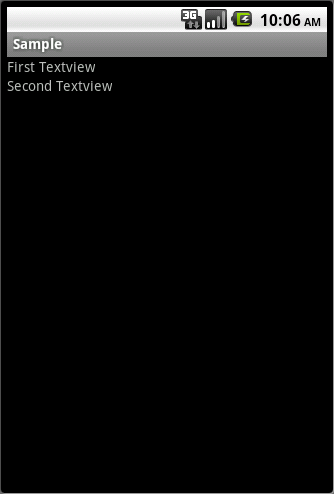
Linear layout with vertical orientation:
<?xml version="1.0" encoding="utf-8"?>
<LinearLayout xmlns:android="http://schemas.android.com/apk/res/android"
	android:orientation="vertical"
    android:layout_width="fill_parent"
	android:layout_height="fill_parent">
	<TextView android:id="@+id/TextView01"
	 android:layout_width="wrap_content"
	 android:layout_height="wrap_content"
	 android:text="First Textview"></TextView>
	<TextView android:id="@+id/TextView02"
	 android:layout_width="wrap_content"
	 android:layout_height="wrap_content"
	 android:text="Second Textview"></TextView>
</LinearLayout>
The output for vertical orientation is as below :
If the value of the attribute android:orientation changes to Horizontal i.e. android:orientation=”horizontal”, then the two textviews will be arranged in horizontal fashion (Refer Image3)
Image3: LinearLayout with horizontal orientation
RelativeLayout
RelativeLayout is a ViewGroup used to layout child elements in positions relative to the parent or in positions relative to other child elements. Different attributes like layout_above, layout_below can be used to describe the relative positions and the value of the attribute is the id of the element with respect to which the child element is relatively positioned.
You cannot have a circular dependency between the size of the RelativeLayout and the position of its child element. For ex: You cannot have a RelativeLayout whose height is set to WRAP_CONTENT and its child’s relative position ALIGN_PARENTBOTTOM set to true.
Example:
RelativeLayout
<?xml version="1.0" encoding="utf-8"?>
<RelativeLayout android:id="@+id/RelativeLayout01"
	android:layout_width="fill_parent" android:layout_height="fill_parent"
	xmlns:android="http://schemas.android.com/apk/res/android">
	<TextView android:id="@+id/TextView01"
	    android:layout_width="wrap_content"
		android:layout_height="wrap_content"
		android:text="Enter your Name"
		android:textStyle="bold"
		android:textColor="#FFFF"></TextView>
	<EditText android:id="@+id/EditText01"
	    android:layout_below="@id/TextView01"
		android:layout_width="fill_parent"
		android:layout_height="50dip"></EditText>
	<Button android:layout_below="@id/EditText01"
		android:layout_width="wrap_content"
		android:layout_height="wrap_content"
		android:text="OK" android:id="@+id/ButtonOk"></Button>
	<Button android:layout_width="wrap_content"
		android:layout_height="wrap_content"
		android:text="Cancel"
		android:id="@+id/ButtonCancel"
		android:layout_below="@+id/EditText01"
		android:layout_toRightOf="@+id/ButtonOk"></Button>
	<TextView android:id="@+id/TextView02"
	    android:layout_width="wrap_content"
		android:layout_height="wrap_content"
		android:layout_alignParentBottom="true"
		android:layout_centerHorizontal="true"
		android:text="Parent Bottom"
		android:textStyle="bold"
		android:textColor="#FFFF"></TextView>
</RelativeLayout>
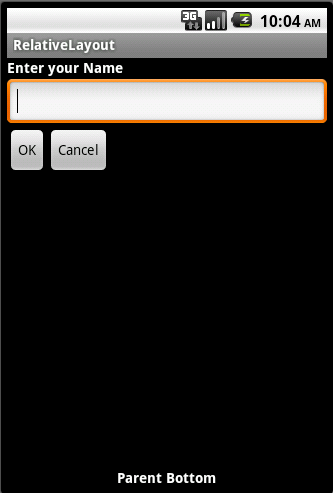
The Output of the above code is as below:
In this RelativeLayout Activity the cancel Button position is relative to OK button. The “Parent Bottom” is a textview whose position is relative to its parent layout. android: layout_alignparentBottom=”True”
TableLayout
TableLayout is a ViewGroup that will lay child elements into rows and columns forming a table. Rows are introduced in the table by using TableRow and then each row is populated with a UI component. Android controls the number of columns while user controls the number of rows. The column number can be specified by the user using android: layout_column property.
Example: TableLayout
<?xml version="1.0" encoding="utf-8"?>
<TableLayout android:id="@+id/TableLayout01"
	android:layout_width="fill_parent" android:layout_height="fill_parent"
	xmlns:android="http://schemas.android.com/apk/res/android"
	android:shrinkColumns="*" android:stretchColumns="*-">
	<!-- Row1 -->
	<TableRow android:id="@+id/TableRow01" android:layout_height="wrap_content"
		android:layout_width="fill_parent">
		<TextView android:id="@+id/TextView01" android:layout_width="wrap_content"
			android:layout_height="wrap_content" android:layout_weight="1"
			android:text="Row1" android:background="#97b7d6" android:padding="20dip"
			android:textColor="#FFFF" android:textSize="15sp" android:textStyle="bold"
			android:gravity="center"></TextView>
	</TableRow>
	<!-- Row2 -->
	<TableRow android:id="@+id/TableRow02" android:layout_width="wrap_content"
		android:layout_height="wrap_content">
		<TextView android:id="@+id/TextView02" android:layout_width="wrap_content"
			android:layout_height="wrap_content" android:layout_weight="1"
			android:background="#C8E4E9" android:text="R2 C1" android:padding="20dip"
			android:textSize="15sp" android:textStyle="bold" android:textColor="#FFFF"
			android:gravity="center"></TextView>
		<TextView android:id="@+id/TextView03" android:layout_width="wrap_content"
			android:layout_height="wrap_content" android:layout_weight="1"
			android:text="R2 C2" android:background="#FFe4e4e4" android:padding="20dip"
			android:textSize="15sp" android:textStyle="bold" android:textColor="#FFFF"
			android:gravity="center"></TextView>
		<TextView android:id="@+id/TextView04" android:layout_width="wrap_content"
			android:layout_height="wrap_content" android:layout_weight="1"
			android:background="#aca59d" android:text="R2 C3" android:padding="20dip"
			android:textColor="#FFFF" android:textStyle="bold" android:textSize="15sp"
			android:gravity="center"></TextView>
	</TableRow>
	<!-- Row3 -->
	<TableRow android:id="@+id/TableRow03" android:layout_width="wrap_content"
		android:layout_height="wrap_content">
		<TextView android:id="@+id/TextView05" android:layout_width="wrap_content"
			android:layout_height="wrap_content" android:layout_weight="1"
			android:text="R3 C1" android:background="#0273b1" android:padding="20dip"
			android:textSize="15sp" android:textStyle="bold" android:textColor="#FFFF"
			android:gravity="center"></TextView>
		<TextView android:id="@+id/TextView06" android:layout_width="wrap_content"
			android:layout_height="wrap_content" android:layout_weight="1"
			android:text="R3 C2" android:background="#ffe4b5" android:padding="20dip"
			android:textColor="#FFFF" android:textSize="15sp" android:textStyle="bold"
			android:gravity="center"></TextView>
	</TableRow>
</TableLayout>
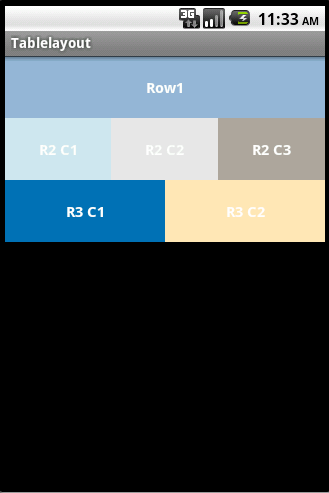
Image7: The output of TableLayout
- Row1 is first row with one column
- Second row with 3 columns(R2 C1,R2 C2,R2 C3)
- Third row with 2 columns(R3 C1,R3 C2,R3 C3)
The other Layouts used in android
- GridView – A GridView displays items in a two-dimensional, scrolling grid.
- WebView – This is used to open web Browser which can be used further for accessing different sites.
- DatePicker – A DatePicker is a widget that allows the user to select a month, day and year
- TimePicker – A TimePicker is a widget that allows the user to select the time by hour, minute and AM or PM
- Form Stuff – This page introduces a variety of widgets, like image buttons, text fields, checkboxes and radio buttons.
- ListView – This View displays items in the form of a list. It also allows scrolling when the list exceeds the available vertical space on the screen Single value select or multiple values selection Property can be set for the list.
- Spinner – This widget allows the user to select a value from the dropdown and also allows scrolling when the list exceeds the available vertical space on the screen.
- AutoComplete – When the user types in the Edittext , this widget helps him to auto-complete the word by prompting suggestions extracted from a collection of strings.
- Gallery – It displays items in a horizontal scrolling list.
- TabWidget – This displays items in the form of tabs.
- MapView – A MapView allows you to create your own map-viewing Activity. Internet connection is needed to access Google Maps.


 Spring Classpath Scanning & Managed Components