A Dialog is a small window that appears in front of the current Activity. An AlertDialog is a Dialog which can have zero, one, two or three buttons. We have discussed about creating a simple AlertDialog in one of our earlier posts AlertDialog. The previous tutorial on AlertDialog demonstrated how to create an AlertDialog which has title, simple message and buttons. This tutorial demonstrates how to add lists, CheckBoxes and Radio Buttons to an AlertDialog.
Prerequisites:
You must have enough knowledge on how to create an AlertDialog. If you are not familiar with creating an AlertDialog, please refer to the post Create an AlertDialog .Unlike the previous post, here in this tutorial we would be using few methods of the Activity
- onCreateDialog()
- onPrepareDialog()
- showDialog()
When you want to show a dialog, call showDialog(int) method and pass in an integer variable that uniquely identifies your dialog.
When the dialog is requested for the first time, Android calls onCreateDialog(int) from your Activity. You should instantiate your dialog inside onCreateDialog method. This callback returns the Dialog object.
If you want to do change any properties of your dialog each time it is opened, you can make use of an optional callback onPrepareDialog(int,dialog), which is called every time your dialog is opened whereas onCreateDialog(int) is only called for the very first time your dialog is opened. If you donot define onPrepareDialog method, your dialog’s selection state remains unchanged(such as items checked in the checkbox or radio button remains checked even when the dialog is opened for the second time).
Your job is to call the method showDialog with the unique integer that identifies your dialog. Android calls the rest of the methods onCreateDialog and onPrepareDialog.
It is recommended to use switch statement inside onCreateDialog and onPrepareDialog callbacks that checks the id parameter that is passed as parameters to these methods and creates the dialog accordingly.
@Override
protected Dialog onCreateDialog(int id) {
// TODO Auto-generated method stub
switch (id) {
case LIST_ALERTDIALOG:

break;
case CHECKBOX_ALERTDIALOG:

break;
case RADIOBUTTON_ALERTDIALOG:

break;

}
return null;
}
Creating an AlertDialog with a list of items
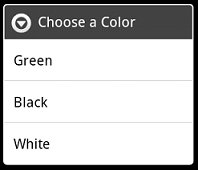
Above is the picture of an AlertDialog with a list of items. To create an AlertDialog with a list of selectable items, use the method setItems().
public AlertDialog.Builder setItems (CharSequence[] items,
DialogInterface.OnClickListener listener);
The setItems() method takes 2 parameters, first one is the list of items to be displayed in the dialog as its content and the next is the listener which notifies about the selected item.
When you call showDialog(LIST_ALERTDIALOG) method, where LIST_ALERTDIALOG is the variable representing your list AlertDilaog, Android calls the onCreateDialog(LIST_ALERTDIALOG) where in it goes to the first case statement which matches your List AlertDialog. The below code snippet is used to define and create your dialog inside the first case .
case LIST_ALERTDIALOG:

AlertDialog.Builder builder=new AlertDialog.Builder(AlertDialogDemo.this)
.setTitle("Choose a Color")
.setItems(colors_list, new DialogInterface.OnClickListener() {
@Override
public void onClick(DialogInterface dialog, int which) {
// TODO Auto-generated method stub
Toast.makeText(getApplicationContext(),
"The selected color is "+colors_list[which], Toast.LENGTH_LONG).show();
}
});
AlertDialog alertdialog=builder.create();
return alertdialog;
In the above code colors_list is the array of items to display.
final CharSequence[] colors_list={"Green","Black","White"};
Here in the case statement, we are displaying a Toast message on click of a list item. The toast displays the selected item. If you want more information about how to create a toast message, please go through the post Toast . Finally the case statement returns the Dialog object.
Note: Few lines in the above case statement are not explained here, since it has been covered in one of our previous posts. Please refer to the post How to create an AlertDialog to know how to create a simple Alertdialog.
Creating an AlertDialog with Checkboxes
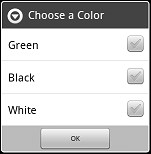
Now we would be discussing about the second case statement “case CHECKBOX_ALERTDIALOG:” An AlertDialog with checkBoxes is as shown below.
As you can see in the above screen of alertDialog, I have added a button “OK” to get the checked item details. However adding “OK” button is optional.
To create an AlertDialog with a list of multiple-choice items, you have to make use of the method setMultiChoiceItems(). The code is as same as the previous code snippet, but setItems() method is replaced with the setMultiChoiceItems() method. This method takes 3 parameters. The syntax of the method setMultiChoiceItems() is as below.
public AlertDialog.Builder setMultiChoiceItems (CharSequence[] items,
boolean[] checkedItems, DialogInterface.OnMultiChoiceClickListener listener);
First parameter is the text of the items to be displayed in the list, second parameter specifies which items are checked. It should be null in which case no items are checked. If non null it must be exactly the same length as the array of items. you will be notified of the selected item via the supplied listener as the third parameter. Clicking on an item in the list will not dismiss the dialog hence I have added a button “OK” which takes the items that you have checked and dismisses the dialog on click of it.
Creating an AlertDialog with RadioButtons
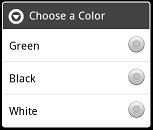
The alertDialog with a list of single-choice items is as shown below.
We have to use setSingleChoiceItems() method to create such AlertDialogs. This method takes three parameters. The syntax is as below.
public AlertDialog.Builder setSingleChoiceItems (CharSequence[] items,
int checkedItem, DialogInterface.OnClickListener listener);
First parameter is the list of items to be displayed. Second is the “checkedItem” specifies which item is checked. If -1 no items are checked. The third parameter is a “listener” notified when an item on the list is clicked. The dialog will not be dismissed when an item is clicked.
Add the below code to the third case statement of the onCreateDialog method to create an AlertDialog with radiobuttons.
case RADIOBUTTON_ALERTDIALOG:

AlertDialog.Builder builder2=new AlertDialog.Builder(AlertDialogDemo.this)
.setTitle("Choose a Color")
.setSingleChoiceItems(colors_radio, -1, new DialogInterface.OnClickListener() {

@Override
public void onClick(DialogInterface dialog, int which) {
// TODO Auto-generated method stub
Toast.makeText(getApplicationContext(),
"The selected color is "+colors_radio[which], Toast.LENGTH_LONG).show();

//dismissing the dialog when the user makes a selection.
dialog.dismiss();
}
});
AlertDialog alertdialog2=builder2.create();
return alertdialog2;
As you see in the above code, We have used dialog.dismiss inside onclick() of the list since clicking on the list item do not dismisses the dialog. colors_radio is the list of items to be displayed.
final CharSequence[] colors_radio={"Green","Black","White"};
If you create any one of the above selectable lists(checkbox or radiobuttons) in the onCreateDialog() callback method, the state of the selected item is managed by Android as long as the Activity is active.
So far we have seen details on AlertDialog with lists, CheckBoxes and RadioButtons. Let us now learn how to create a project which has all these types of dialogs.
Required layouts
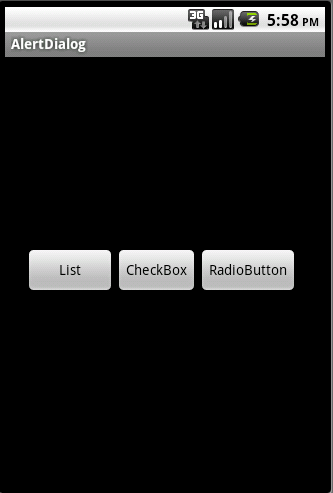
- main.xml which has three buttons namely “List”(shows a List AlertDialog), “CheckBox” and “RadioButton”.
Required Activity
- AlertDialogDemo
Step 1: Set up the android developement evvironment
This topic has already been discussed in one of our previous posts Environment. Please refer the post for more queries. I would be using Android 2.2 for this example.
Step 2: Create the Project
Create a project named “AlertDialog” with the launcher activity AlertDialogDemo.java. For more information on how to create a new project in android, please refer to the post Create an android project.
Step 3: Create the required layouts
As i said earlier, I would be using main.xml layout file. To know more about layout xml files, please go through the post Layouts. Open the main.xml file and paste the below code.
main.xml

<?xml version="1.0" encoding="utf-8"?>
<RelativeLayout android:id="@+id/RelativeLayout01"
android:layout_width="fill_parent" android:layout_height="fill_parent"
xmlns:android="<a href="http://schemas.android.com/apk/res/android">
http://schemas.android.com/apk/res/android</a>">
<Button android:id="@+id/Button01" android:layout_height="wrap_content"
android:text="List" android:layout_width="90dip"
android:layout_marginLeft="20dip" android:layout_centerVertical="true"></Button>
<Button android:id="@+id/Button02" android:layout_width="wrap_content"
android:layout_height="wrap_content" android:layout_toRightOf="@+id/Button01"
android:text="CheckBox" android:layout_centerVertical="true"></Button>
<Button android:id="@+id/Button03" android:layout_width="wrap_content"
android:layout_height="wrap_content" android:layout_toRightOf="@+id/Button02"
android:text="RadioButton" android:layout_centerVertical="true"></Button>
</RelativeLayout>
As you can notice, I have used three buttons to trigger your three AlertDilaogs.
Step 4: Create the required Activities
Here in this example, I would be using the launcher activity “AlertDialogdemo”. Open the activity and paste the below code.
package my.app;
import android.app.Activity;
import android.app.AlertDialog;
import android.app.Dialog;
import android.content.DialogInterface;
import android.os.Bundle;
import android.view.View;
import android.view.View.OnClickListener;
import android.widget.Button;
import android.widget.ListView;
import android.widget.Toast;

public class AlertDialogDemo extends Activity implements OnClickListener {
/** Called when the activity is first created. */

final int LIST_ALERTDIALOG=0,CHECKBOX_ALERTDIALOG=1,RADIOBUTTON_ALERTDIALOG=2;
final boolean checked_state[]={false,false,false}; //The array that holds the checked state of the checkbox items
final CharSequence[] colors_check={"Green","Black","White"}; //items in the alertdialog that displays checkboxes
final CharSequence[] colors_list={"Green","Black","White"}; //items in the alertdialog that displays list
final CharSequence[] colors_radio={"Green","Black","White"}; //items in the alertdialog that displays radiobuttons
Button list,check,radio;

@Override
public void onCreate(Bundle savedInstanceState) {
super.onCreate(savedInstanceState);
setContentView(R.layout.main);

list=(Button)findViewById(R.id.Button01);
check=(Button)findViewById(R.id.Button02);
radio=(Button)findViewById(R.id.Button03);

list.setOnClickListener(this);
check.setOnClickListener(this);
radio.setOnClickListener(this);
}

/*triggered by showDialog method. onCreateDialog creates a dialog*/
@Override
public Dialog onCreateDialog(int id) {
switch (id) {
case LIST_ALERTDIALOG:

AlertDialog.Builder builder=new AlertDialog.Builder(AlertDialogDemo.this)
.setTitle("Choose a Color")
.setItems(colors_list, new DialogInterface.OnClickListener() {
@Override
public void onClick(DialogInterface dialog, int which) {
// TODO Auto-generated method stub
Toast.makeText(getApplicationContext(), "The selected color is "+colors_list[which], Toast.LENGTH_LONG).show();
}
});
AlertDialog alertdialog=builder.create();
return alertdialog;

case CHECKBOX_ALERTDIALOG:

AlertDialog.Builder builder1=new AlertDialog.Builder(AlertDialogDemo.this)
.setTitle("Choose a Color")
.setMultiChoiceItems(colors_check, null, new DialogInterface.OnMultiChoiceClickListener() {

@Override
public void onClick(DialogInterface dialog, int which, boolean isChecked) {
// TODO Auto-generated method stub

//storing the checked state of the items in an array
checked_state[which]=isChecked;
}
})
.setPositiveButton("OK", new DialogInterface.OnClickListener() {

@Override
public void onClick(DialogInterface dialog, int which) {
// TODO Auto-generated method stub
String display_checked_colors = "";
for(int i=0;i<3;i++){
if(checked_state[i]==true){
display_checked_colors=display_checked_colors+" "+colors_check[i];
}
}
Toast.makeText(getApplicationContext(), "The selected color(s) is
"+display_checked_colors, Toast.LENGTH_LONG).show();

//clears the String used to store the displayed text
display_checked_colors=null;

//clears the array used to store checked state
for(int i=0;i<checked_state.length;i++){
if(checked_state[i]==true){
checked_state[i]=false;
}
}

//used to dismiss the dialog upon user selection.
dialog.dismiss();
}
});
AlertDialog alertdialog1=builder1.create();
return alertdialog1;

case RADIOBUTTON_ALERTDIALOG:

AlertDialog.Builder builder2=new AlertDialog.Builder(AlertDialogDemo.this)
.setTitle("Choose a Color")
.setSingleChoiceItems(colors_radio, -1, new DialogInterface.OnClickListener() {

@Override
public void onClick(DialogInterface dialog, int which) {
// TODO Auto-generated method stub
Toast.makeText(getApplicationContext(),
"The selected color is "+colors_radio[which], Toast.LENGTH_LONG).show();

//dismissing the dialog when the user makes a selection.
dialog.dismiss();
}
});
AlertDialog alertdialog2=builder2.create();
return alertdialog2;
}
return null;

}

@Override
protected void onPrepareDialog(int id, Dialog dialog) {
// TODO Auto-generated method stub

switch (id) {
case CHECKBOX_ALERTDIALOG:
AlertDialog prepare_checkbox_dialog=(AlertDialog)dialog;
ListView list_checkbox=prepare_checkbox_dialog.getListView();
for(int i=0;i<list_checkbox.getCount();i++){
list_checkbox.setItemChecked(i, false);
}
break;
case RADIOBUTTON_ALERTDIALOG:
AlertDialog prepare_radio_dialog=(AlertDialog)dialog;
ListView list_radio=prepare_radio_dialog.getListView();
for(int i=0;i<list_radio.getCount();i++){
list_radio.setItemChecked(i, false);
}
break;

}
}
@Override
public void onClick(View v) {
// TODO Auto-generated method stub

switch (v.getId()) {
case R.id.Button01:
//triggering the List alertdialog
showDialog(LIST_ALERTDIALOG);
break;
case R.id.Button02:
//triggering the checkbox alertdialog
showDialog(CHECKBOX_ALERTDIALOG);
break;
case R.id.Button03:
//triggering the radio alertdialog
showDialog(RADIOBUTTON_ALERTDIALOG);
break;

default:
break;
}

}
}
I have used onPrepareDialog() method to change the selection state of the selected list items. Since Android manages the state of the selectable list, doing this is recommended.
Step 5: Declare the activities in AndroidManifest.xml
Your launcher activity is registered automatically. If you want to know more on Manifest file, please follow the post on Manifest. Your AndroidManifest.xml has the below code.
<?xml version="1.0" encoding="utf-8"?>
<manifest xmlns:android="<a href="http://schemas.android.com/apk/res/android">
http://schemas.android.com/apk/res/android</a>"
package="my.app"
android:versionCode="1"
android:versionName="1.0">
<application android:icon="@drawable/icon" android:label="@string/app_name">
<activity android:name=".AlertDialogDemo"
android:label="@string/app_name">
<intent-filter>
<action android:name="android.intent.action.MAIN" />
<category android:name="android.intent.category.LAUNCHER" />
</intent-filter>
</activity>

</application>
<uses-sdk android:minSdkVersion="8" />
</manifest>
Step 6: Run your Project
Select your project->Right click->Run As->Android Application. Your first activity pops up as below.
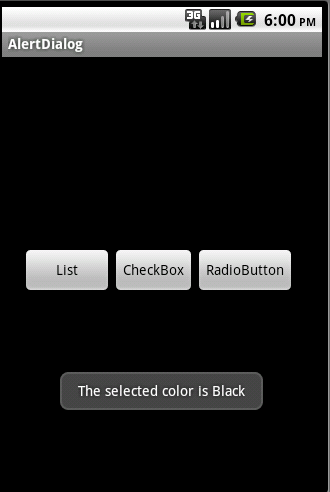
your activity is displaying three buttons. Click on the button “List” which displays your first AlertDialog with List of items “Green”, “Black” and “White” as below.
Select any one of the item from the list displayed inside your AlertDialog. I would be selecting “Black” from the list. You will get a Toast message showing the selected item as below.
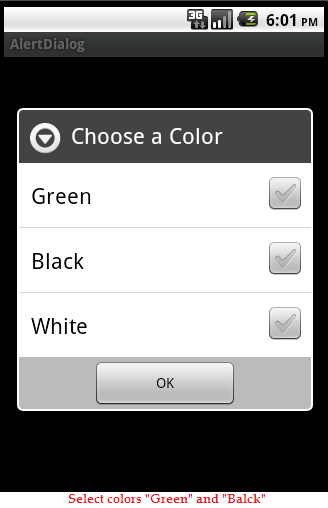
Now click on the button “CheckBox”, It displays an AlertDialog with list having checkBoxes.
Select any number of items and click on “OK”. The checked items are displayed in the toast as below.
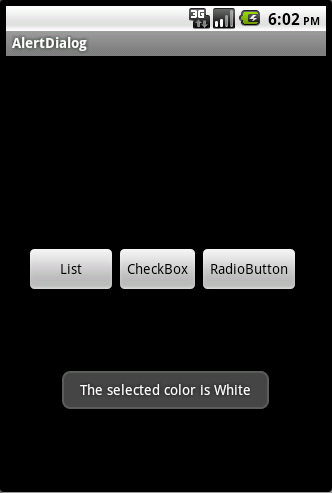
Click the button “RadioButton” which displays the Dialog with list having radioButtons.
select any item. The AlertDialog is closed and a toast is displayed showing the checked item name.
This is how you can create AlertDialog with different content areas. If you have any queries, please post it in comments section.

