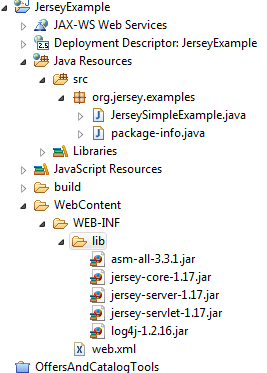
In this tutorial I am going to explain a very basic example using Jersey REST Services. Building webservices using the REST concept is popular because of its simple nature and light weight. We have already explained how to write REST services using the Spring MVC framework. Spring provides out of the box support for the REST integration using their MVC framework. Jersey is the reference implementation for the REST specification. Writing your first REST service is very simple.
1. SetUp Jersey Environment
You have to get the required JAR files to get start with Jersey development. You would require the following JAR files.
- asm-all-3.3.1.jar
- jersey-core-1.17.jar
- jersey-server-1.17.jar
- jersey-servlet-1.17.jar

Alternatively you can set the maven dependency if you use maven as the build tool.
<dependency>
 <groupId>com.sun.jersey</groupId>
 <artifactId>jersey-server</artifactId>
 <version>1.17.1</version>
</dependency>
<dependency>
 <groupId>com.sun.jersey</groupId>
 <artifactId>jersey-servlet</artifactId>
 <version>1.17.1</version>
</dependency>
<dependency>
 <groupId>com.sun.jersey</groupId>
 <artifactId>jersey-core</artifactId>
 <version>1.17.1</version>
</dependency>
<dependency>
 <groupId>asm</groupId>
 <artifactId>asm</artifactId>
 <version>3.3.1</version>
</dependency>
2. Create Jersey REST Service
package org.jersey.examples;
import javax.ws.rs.GET;
import javax.ws.rs.Path;
import javax.ws.rs.PathParam;
import javax.ws.rs.core.Response;

@Path("/hello")
public class JerseySimpleExample {
		@GET
		@Path("/{param}")
		public Response getMsg(@PathParam("param") String message) {
			String output = "HI Jersey : " + message;
			return Response.status(200).entity(output).build();
		}
}
3. Configure Web.xml for Jersey Implementation
<?xml version="1.0" encoding="UTF-8"?>
<web-app id="WebApp_ID" version="2.4"
	xmlns="http://java.sun.com/xml/ns/j2ee" xmlns:xsi="http://www.w3.org/2001/XMLSchema-instance"
	xsi:schemaLocation="http://java.sun.com/xml/ns/j2ee http://java.sun.com/xml/ns/j2ee/web-app_2_4.xsd">
	<display-name>Jersey Example</display-name>
	<welcome-file-list>
		<welcome-file>index.jsp</welcome-file>
	</welcome-file-list>
	<servlet>
		<servlet-name>jersey</servlet-name>
		<servlet-class>
                     com.sun.jersey.spi.container.servlet.ServletContainer
        </servlet-class>
		<init-param>
		     <param-name>com.sun.jersey.config.property.packages</param-name>
		     <param-value>org.jersey.examples</param-value>
		</init-param>
		<load-on-startup>1</load-on-startup>
	</servlet>
	<servlet-mapping>
		<servlet-name>jersey</servlet-name>
		<url-pattern>/jersey/*</url-pattern>
	</servlet-mapping>
</web-app>
4. Run First Jersey Service
Onec the above steps are completed, you can access the Jersey application using the following URL:
http://localhost:8080/DOJO_APP/rest/hello/krishna
I hope this tutorial helped you to easily get started on using the Jersey REST API. In my future articles, I will come up with few more examples.

 Use Flexbox in CSS3 For Creating Flexible Layouts