In my previous article I have explained about how to set up the android environment. This article shows you how you can create a simple Android Application using eclipse. This example assumes that you have already set up the android environment and ready for the development. If you have any questions, please post it in the comments section.
Step1: Open the Eclipse IDE and create an Android App
Select File->New->Project->Android->Android Project->Next Refer the below screen for more details about the dialog box.
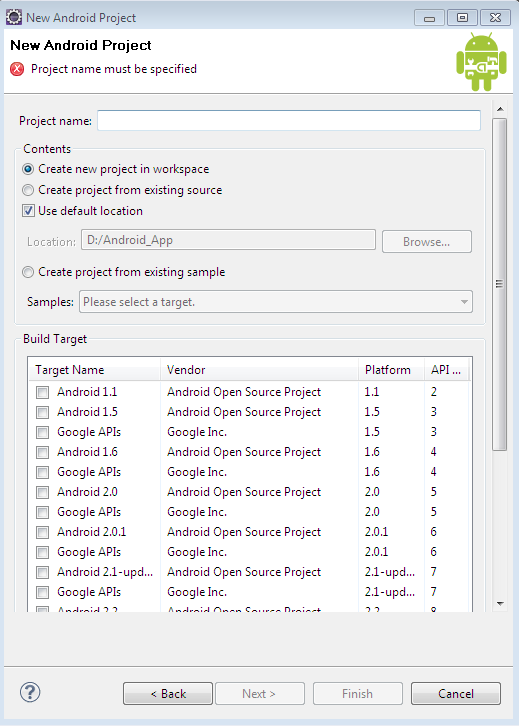
Enter the Following Details in the screen:
- Project name: MyFirstApp
- Application name: Android App
- Package name: my.android.app
- Create Activity: helloWorld
- Min SDK version: 8(Min SDK version should be same as the API level)
- Build Target: Android 2.2
After filling up the above details, click on “Finish” button.
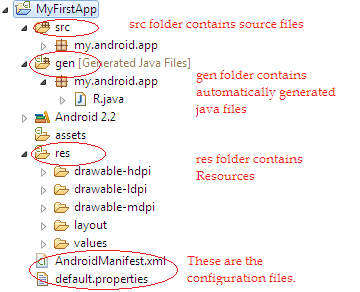
Android Project Structure
Now the project MyFristApp is created in your workspace. The project Structure is as below.
The Activity helloWorld that you have just created is as below.
package my.android.app;
import android.app.Activity;
import android.os.Bundle;
public class helloWorld extends Activity {
    /** Called when the activity is first created. */
    @Override
    public void onCreate(Bundle savedInstanceState) {
        super.onCreate(savedInstanceState);
        setContentView(R.layout.main);
    }
}
main.xml is the automatically created layout file. The content of main.xml is as below.
<?xml version="1.0" encoding="utf-8"?>
<LinearLayout xmlns:android="http://schemas.android.com/apk/res/android"
    android:orientation="vertical"
    android:layout_width="fill_parent"
    android:layout_height="fill_parent"
    >
<TextView
    android:layout_width="fill_parent"
    android:layout_height="wrap_content"
    android:text="@string/hello"
    />
</LinearLayout>
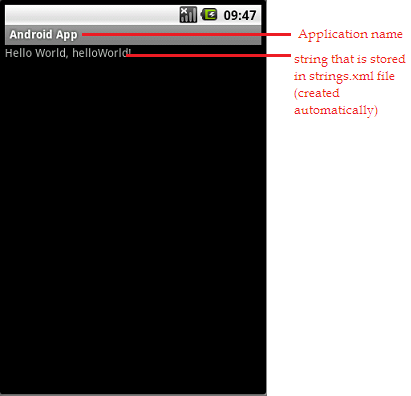
android:text=”@string/hello” here hello contains “Hello World, helloWorld!” string that gets displayed as output. You can store any string in the Textview to get the output of your choice. You can add any number of views to your xml.
Step2: Register the Activity in AndroidManifest.xml
The Default Activity will be automatically registered. The manifest file is as below.
<?xml version="1.0" encoding="utf-8"?>
<manifest xmlns:android="http://schemas.android.com/apk/res/android"
      package="my.android.app"
      android:versionCode="1"
      android:versionName="1.0">
    <application android:icon="@drawable/icon" android:label="@string/app_name">
        <activity android:name=".helloWorld"
                  android:label="@string/app_name">
            <intent-filter>
                <action android:name="android.intent.action.MAIN" />
                <category android:name="android.intent.category.LAUNCHER" />
            </intent-filter>
        </activity>
    </application>
    <uses-sdk android:minSdkVersion="8" />
</manifest>
Step3: Run the android application
Create the Android Virtual Device to run your app. Select the project Files that you need to run->click on the below highlighted symbol from the toolbar of eclipse IDE.

In the Run as window select Android Application and click OK. Now the Eclipse installs your app in the AVD.
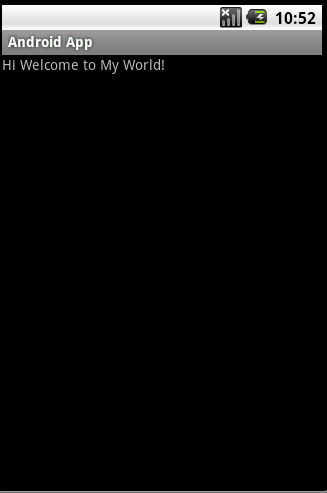
Step4: Getting the desired Output
strings.xml that gets created automatically is as below:
<?xml version="1.0" encoding="utf-8"?>
<resources>
    <string name="hello">Hello World, helloWorld!</string>
    <string name="app_name">Android App</string>
</resources>
Change the contents of strings.xml to alter the output go to res folder in your project structure->values->open strings.xml->click on the “hello” string. Let us now change the contents of “hello” string to “Hi Welcome to My World!” The contents of new strings.xml is as below.
<?xml version="1.0" encoding="utf-8"?>
<resources>
    <string name="hello">Hi Welcome to My World!</string>
    <string name="app_name">Android App</string>
</resources>
Run the Project as in Step3. The new output is as below