Build Your REST API with Spring - VIDEO Courses
When you define a bean in the configuration file, you are just defining the structure of the bean or it is just a class. With that definition, you can create any number of instances. Here the advantage of the bean is that, you are not only allowed to define the dependencies for the beans, you also can set the scope for the beans. The spring framework supports following five scopes. Out of which three scopes are supported only in web ApplicationContext.
- Singleton
- Prototype
- Request
- Session
- Global Session
As you already have some idea of these scopes, let’s see an example for each of these types (I shall cover the Request, Session and Global session in the next post). This artcles explores the two scopes Singleton and Prototype.
- [download id=”18″]
Note:Request, Session and Global Session scopes are valid in the context of a web-aware Spring ApplicationContext. This means that you can only use these scoped beans in a an application deployed to a web server. Spring can be used in applications that run in standard JVMs along with applications that run in servlet containers (Tomcat, etc). Request, Session and Global session however, only exists in web servers so it has no meaning if the application is running in a standard desktop environment.
also read: follow us on @twitter and @facebook
- Spring Tutorials ( Collection for Spring reference documentations)
- Spring Framework Interview Questions
- Email Integration in Spring Framework
- Introduction to Spring REST Services
Setup Spring Framework
Following setup is used for all the examples in this post. Let us have working Eclipse IDE in place and follow the following steps to create a Spring application:
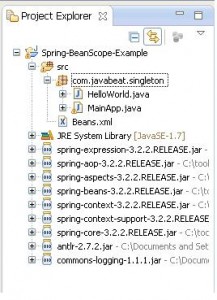
- Create a simple Java Project using Eclipse IDE. Follow the option File -> New -> Project and finally select Java Project wizard from the wizard list. Now name your project as Spring-BeanScope-Example using the wizard window.
- Next let’s add the Spring Framework and common logging API libraries in our project. Right click on your project name Spring-BeanScope-Example and then follow the following option available in context menu: Build Path -> Configure Build Path to display the Java Build Path window. Now use Add External JARs button available under Libraries tab to add the following core JARs from Spring Framework and Common Logging installation directories:
- antlr-2.7.2.jar
- spring-aop-3.2.2.RELEASE.jar
- spring-aspects-3.2.2.RELEASE.jar
- spring-beans-3.2.2.RELEASE.jar
- spring-context-support-3.2.2.RELEASE.jar
- spring-context-3.2.2.RELEASE.jar
- spring-core-3.2.2.RELEASE.jar
- spring-expression-3.2.2.RELEASE.jar
- commons-logging-1.1.1.jar
Singleton and Prototype
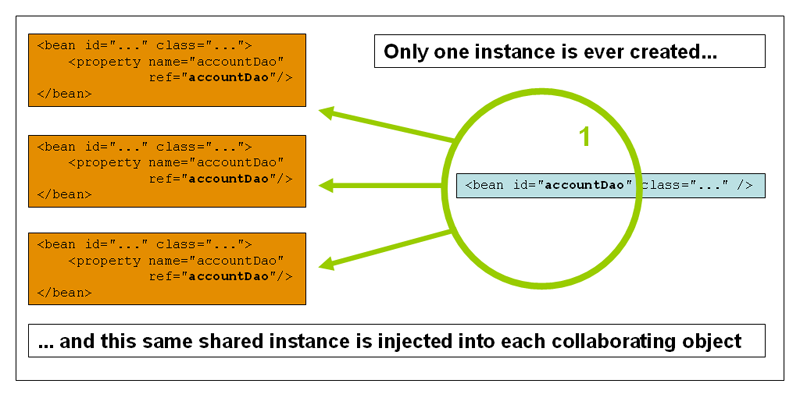
The Singleton scopes the bean definition to a single instance per Spring IoC container (default). If scope is set to singleton, the Spring IoC container creates exactly one instance of the object defined by that bean definition. This single instance is stored in a cache of such singleton beans, and all subsequent requests and references for that named bean return the cached object. You have to carefully understand that it is single for its own IoC container, not the JVM or your entire application. Because your application may have more than one IoC container.
The Prototype scopes a single bean definition to have any number of object instances. If scope is set to prototype, the Spring IoC container creates new bean instance of the object every time a request for that specific bean is made. As a rule, use the prototype scope for all state-full beans and the singleton scope for stateless beans.
(Image source : SpringSource)
Singleton and Prototype Example
Step 1:
Now that we have our project Spring-BeanScope-Example ready, let’s create Java classes HelloWorld and MainApp under the com.javabeat package. Create a package called com.javabeat. To do this, right click on src in package explorer section and follow the option : New -> Package.
HelloWorld.java
package com.javabeat;

import java.util.Date;

public class HelloWorld {
   private String message;
   private Date date;

   public Date getDate() {
      return date;
   }

   public void setDate(Date date) {
      this.date = date;
   }

   public void setMessage(String message) {
      this.message = message;
   }

   public String getMessage() {
      return message;
   }

}
MainApp.java
package com.javabeat;

import java.util.Date;

import org.springframework.context.ApplicationContext;
import org.springframework.context.support.ClassPathXmlApplicationContext;

public class MainApp {
   public static void main(String[] args) {
      ApplicationContext context = new ClassPathXmlApplicationContext(
            "Beans.xml");

      HelloWorld objA = (HelloWorld) context.getBean("singletonscope");
      System.out.println("*********SINGLETON SCOPE************");
      objA.setMessage("Message by object A");
      objA.setDate(new Date());
      System.out.println("Your Message : " + objA.getMessage());
      System.out.println("Date : " + objA.getDate().toString());

      HelloWorld objB = (HelloWorld) context.getBean("singletonscope");
      System.out.println("Your Message : " + objB.getMessage());
      System.out.println("Date : " + objB.getDate().toString());
      System.out.println("********************************");

      HelloWorld objC = (HelloWorld) context.getBean("prototypescope");
      System.out.println("*********PROTOTYPE SCOPE************");
      objC.setMessage("Message by object C");
      objC.setDate(new Date());
      System.out.println("Your Message : " + objC.getMessage());
      System.out.println("Date : " + objC.getDate().toString());

      HelloWorld objD = (HelloWorld) context.getBean("prototypescope");
      System.out.println("Your Message : " + objD.getMessage());
      System.out.println("Your Date : " + objD.getDate());

      System.out.println("********************************");
   }
}
Step 2:
Create Beans configuration file Beans.xml under the src folder.
<?xml version="1.0" encoding="UTF-8"?>

<beans xmlns="http://www.springframework.org/schema/beans"
    xmlns:xsi="http://www.w3.org/2001/XMLSchema-instance"
    xsi:schemaLocation="http://www.springframework.org/schema/beans
    http://www.springframework.org/schema/beans/spring-beans-3.0.xsd">

   <bean id="prototypescope" class="com.javabeat.HelloWorld" scope="prototype">
   </bean>
   <bean id="singletonscope" class="com.javabeat.HelloWorld" scope="singleton">
   </bean>
  </beans>
Step 3:
As a final step, let us run the application. If everything is fine with your application, the following output is printed:
*********SINGLETON SCOPE************
Your Message : Message by object A
Date : Fri Mar 29 17:39:21 IST 2013
Your Message : Message by object A
Date : Fri Mar 29 17:39:21 IST 2013
********************************
*********PROTOTYPE SCOPE************
Your Message : Message by object C
Date : Fri Mar 29 17:39:21 IST 2013
Your Message : null
Your Date : null
********************************
Details of the above output:
Here we see that in the case of singleton scope, the second retrieval by ‘objB’ will display the same message and Date which was set by ‘objA, even though it’s retrieved by a new getBean() method. In singleton scope, no matter how many times you retrieve it with getBean(), it will always return the same instance. In prototype scope, you will have a new instance for each getBean() method called. Hence for the second retrieval you see that both message and date are null.
- [download id=”18″]
Summary
In this post we saw an example of how to use the scopes Singleton and Prototype. My next post shall cover Request, Session and Global Session scopes. If you are interested in receiving the future articles, please subscribe here.


