Spring FacesThe main focus of the Spring Web Flow framework is to deliver the infrastructure to describe the page flow of a web application. The fl ow itself is a very important element of a web application, because it describes its structure, particularly the structure of the implemented business use cases. But besides the fl ow which is only in the background, the user of your application is interested in the graphical user interface (GUI). Therefore, we need a solution of how to provide a rich user interface to the users. One framework which offers components is JavaServer Faces (JSF).
also read:
With the release of Spring Web Flow 2, an integration module to connect these two technologies has been introduced. The name of the module is Spring Faces. This chapter starts with the description of the configuration of the integration. Following this, the usage of the Spring Faces module is shown. This chapter is no introduction to the JavaServer Faces technology. It is only a description about the integration of Spring Web Flow 2 with JSF. If you have never previously worked with JSF, please refer to the JSF reference to gain knowledge about the essential concepts of JavaServer Faces.
JavaServer Faces (JSF)—a brief introduction
The JavaServer Faces (JSF) technology is a web application framework with the goal to make the development of user interfaces for a web application (based on Java EE) easier. JSF uses a component-based approach with an own lifecycle model, instead of a request-driven approach used by traditional MVC web frameworks. The version 1.0 of JSF is specified inside JSR (Java Specification Request) 127 (http://jcp.org/en/jsr/detail?id=127).
Enabling Spring Faces support
To use the Spring Faces module, you have to add some configuration to your application. The diagram below depicts the single configuration blocks. These blocks are described in this chapter.
The first step in the configuration is to configure the JSF framework itself. That is done in the deployment descriptor of the web application—web.xml. The servlet has to be loaded at the startup of the application. This is done with the 1 element.
	<!-- Initialization of the JSF implementation. The Servlet is not
	  used at runtime -->
	<servlet>
		<servlet-name>Faces Servlet</servlet-name>
		<servlet-class>javax.faces.webapp.FacesServlet</servlet-class>
		<load-on-startup>1</load-on-startup>
	</servlet>
	<servlet-mapping>
		<servlet-name>Faces Servlet</servlet-name>
		<url-pattern>*.faces</url-pattern>
	</servlet-mapping>
For the work with the JavaServer Faces, there are two important classes.These are the javax.faces.webapp.FacesServlet and the javax.faces.context.FacesContext classes. You can think of FacesServlet as the core base of each JSF application. Sometimes that servlet is called an infrastructure servlet. It is important to mention that each JSF application in one web container has its own instance of the FacesServlet class. This means that an infrastructure servlet cannot be shared between many web applications on the same JEE web container. FacesContext is the data container which encapsulates all information that is necessary around the current request. For the usage of Spring Faces, it is important to know that FacesServlet is only used to instantiate the framework. A further usage inside Spring Faces is not done.
To be able to use the components from Spring Faces library, it’s required to use Facelets instead of JSP. Therefore, we have to configure that mechanism.
If you are interested in reading more about the Facelets technology, visit the Facelets homepage from java.net with the following URL: https://facelets.dev.java.net. A good introduction inside the Facelets technology is the http://www.ibm.com/developerworks/ java/library/j-facelets/ article, too.
The configuration process is done inside the deployment descriptor of your web application—web.xml. The following sample shows the configuration inside the mentioned file.
	<context-param>
		<param-name>javax.faces.DEFAULT_SUFFIX</param-name>
		<param-value>.xhtml</param-value>
	</context-param>
As you can see in the above code, the configuration parameter is done with a context parameter. The name of the parameter is javax.faces.DEFAULT_SUFFIX. The value for that context parameter is .xhtml.
Inside the Facelets technology
To present the separate views inside a JSF context, you need a specific view handler technology. One of those technologies is the well-known JavaServer Pages (JSP) technology. Facelets are an alternative for the JSP inside the JSF context. Instead, to define the views in JSP syntax, you will use XML. The pages are created using XHTML.
The Facelets technology offers the following features:
- A template mechanism, similar to the mechanism which is known from the
Tiles framework - The composition of components based on other components.
- Custom logic tags
- Expression functions
- With the Facelets technology, it’s possible to use HTML for your pages.
Therefore, it’s easy to create the pages and view them directly in a browser,
because you don’t need an application server between the processes of
designing a page - The possibility to create libraries of your components
The following sample shows a sample XHTML page which uses the component aliasing mechanism of the Facelets technology.
	<!DOCTYPE html PUBLIC "-//W3C//DTD XHTML 1.0 Transitional//EN"
	  "http://www.w3.org/TR/xhtml1/DTD/xhtml1-transitional.dtd">
	<html xmlns="http://www.w3.org/1999/xhtml" xmlns:h="http://java.sun.
	  com/jsf/html">
		<body>
			<form jsfc="h:form">
				<span jsfc="h:outputText" value="Welcome to our page: #{user.name}"
				  disabled="#{empty user}" />
				<input type="text" jsfc="h:inputText" value="#{bean.theProperty}"/>
				<input type="submit" jsfc="h:commandButton" value="OK"
				  action="#{bean.doIt}" />
			</form>
		</body>
	</html>
The sample code snippet above uses the mentioned expression language (for example, the #{user.name} expression accesses the name property from the user instance) of the JSF technology to access the data.
What is component aliasing
One of the mentioned features of the Facelets technology is that it is possible to view a page directly in a browser without that the page is running inside a JEE container environment. This is possible through the component aliasing feature. With this feature, you can use normal HTML elements, for example an input element. Additionally, you can refer to the component which is used behind the scenes with the jsfc attribute. An example for that is . If you open this inside a browser, the normal input element is used. If you use it inside your application, the h:inputText element of the component library is used.
The ResourceServlet
One main part of the JSF framework are the components for the GUI. These components often consist of many files besides the class files. If you use many of these components, the problem of handling these files arises. To solve this problem, the files such as JavaScript and CSS (Cascading Style Sheets) can be delivered inside the JAR archive of the component.
If you deliver the file inside the JAR file, you can organize the components in one file and therefore it is easier for the deployment and maintenance of your component library.
Regardless of the framework you use, the result is HTML. The resources inside the HTML pages are required as URL. For that, we need a way to access these resources inside the archive with the HTTP protocol. To solve that problem, there is a servlet with the name ResourceServlet (package org.springframework.js.resource).
The Servlet can deliver the following resources:
- resources which are available inside the web application (for example, CSS files)
- resources inside a JAR archive
The configuration of the Servlet inside web.xml is shown below.
	<servlet>
		<servlet-name>Resource Servlet</servlet-name>
		<servlet-class>org.springframework.js.resource.ResourceServlet</servlet-class>
		<load-on-startup>0</load-on-startup>
	</servlet>

	<servlet-mapping>
		<servlet-name>Resource Servlet</servlet-name>
		<url-pattern>/resources/*</url-pattern>
	</servlet-mapping>
It is important that you use the correct url-pattern inside servlet-mapping. As you can see in the sample above, you have to use /resources/*. If a component does not work (from the Spring Faces components), first check if you have the correct mapping for the Servlet. All resources in the context of Spring Faces should be retrieved through this Servlet. The base URL is /resources.
Internals of the ResourceServlet
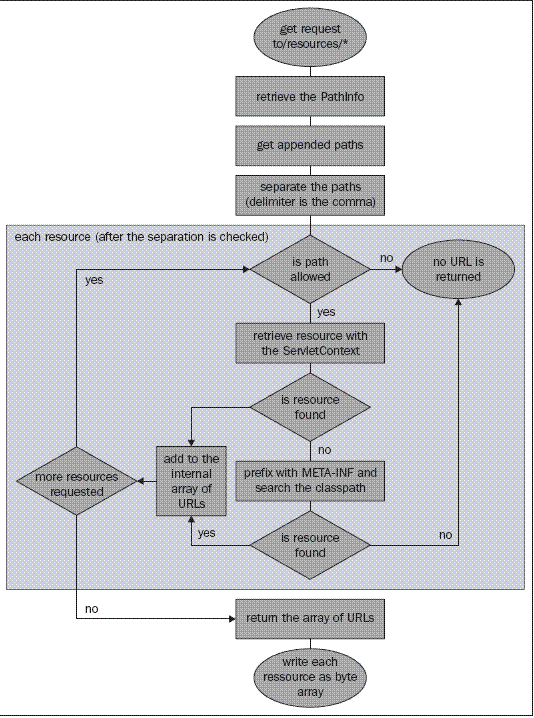
ResourceServlet can only be accessed via a GET request. The ResourceServlet servlet implements only the GET method. Therefore, it’s not possible to serve POST requests. Before we describe the separate steps, we want to show you the complete process, illustrated in the diagram below.
For a better understanding, we choose an example for the explanation of the mechanism which is shown in the previous diagram. Let us assume that we have registered the ResourcesServlet as mentioned before and we request a resource by the following sample URL: http://localhost:8080/ flowtrac-web-jsf/resources/css/test1.css..
How to request more than one resource with one request
First, you can specify the appended parameter. The value of the parameter is the path to the resource you want to retrieve. An example for that is the following URL: http://localhost:8080/ flowtracweb-jsf/resources/css/test1.css?appended=/css/test2.css. If you want to specify more than one resource, you can use the delimiter comma inside the value for the appended parameter. A simple example for that mechanism is the following URL: http:// localhost:8080/ flowtrac-web-jsf/resources/css/test1.css?appended=/css/test2.css, http://localhost:8080/flowtrac-web-jsf/resources/css/test1.css?appended=/css/test3.css. Additionally, it is possible to use the comma delimiter inside the PathInfo. For example: http://localhost:8080/flowtrac-web-jsf/resources/css/test1.css,/css/test2.css. It is important to mention that if one resource of the requested resources is not available, none of the requested resources is delivered. This mechanism can be used to deliver more than one CSS in one request.
From the view of development, it can make sense to modularize your CSS files to get more maintainable CSS files. With that concept, the client gets one CSS, instead of many CSS files. From the view of performance optimization, it is better to have as few requests for rendering a page as possible. Therefore, it makes sense to combine the CSS files of a page. Internally, the files are written in the same sequence as they are requested.
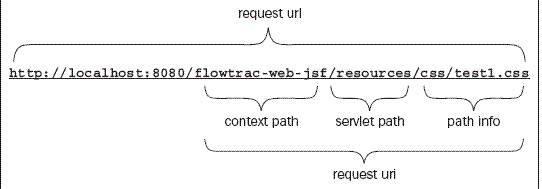
To understand how a resource is addressed, we separate the sample URL into the specific parts. The example URL is a URL on a local servlet container which has an HTTP connector at port 8080. See the following diagram for the mentioned separation.
The table below describes the five sections of the URL that are shown in the previous diagram.
| request url | request url is the complete URL. You can retrieve it with the help of the getRequestURL method from HttpServletRequest. |
| request uri | This is the URL without the server information. You can retrieve it with the help of the getRequestURI method from HttpServletRequest. |
| context path | The name of the servlet context. You can retrieve it with the help of the getContextPath method from HttpServletRequest. |
| servlet path | The name of the servlet. You can retrieve it with the help of the getServletPath method from HttpServletRequest. |
| path info | path info is the part of the URL after the name of the servlet and before the first parameter begins. In other words, before the query sign starts. The reason for that parameter type is to have the possibility to provide a servlet (or a CGI script) with a complete absolute filename. You can retrieve it with the help of the getPathInfo method from HttpServletRequest. |
Step 1: Collect the requested resources
The GET method of ResourceServlet calls the internal getRequestResourceURLs method , which fetches the path info and appends the value from the appended parameter. As a delimiter, a comma is used. At the end, the complete string is separated to an array.
Step 2: Check whether the path is allowed or not
The first step for each resource is to check whether the specified path is allowed to be retrieved or not, because it is not appropriate to allow the deliverance of the class or library files inside the secured WEB-INF directory. That check is done through the internal method called isAllowed of ResourceServlet. At first, it is validated whether the path is a protected path or not. The protected path is /?WEBINF/.*. That means everything inside the /WEB-INF directory can not be delivered with ResourceServlet. The protected path (stored inside private final variable protectedPath) can not be changed.
With the protection of the WEB-INF directory, it’s ensured that there will be a web application, which is compliant to the Servlet specification. In that specification, all content inside the WEB-INF directory cannot be accessed. With the protectedPath variable, it is ensured that there is no possibility to directly address a resource. If you want to change that, you have to write your own ResourceServlet, an extension of the existing servlet does not help in that case.
The next check is whether the specified path is inside the list of allowed paths (stored inside the allowedResourcePaths array. The array is implemented as a private instance variable of the String[] type). The following paths are allowed in the default implementation:
- /**/*.css
- /**/*.gif
- /**/*.ico
- /**/*.jpeg
- /**/*.jpg
- /**/*.js
- /**/*.png
- META-INF/**/*.css
- META-INF/**/*.gif
- META-INF/**/*.ico,
- META-INF/**/*.jpeg
- META-INF/**/*.jpg
- META-INF/**/*.js
- META-INF/**/*.png•
The paths are in Ant-style (http://ant.apache.org) path patterns. The paths are checked through an implementation of the PathMatcher class (package org.springframework.util).
The class which implements the Ant-Style is the AntPathMatcher class inside the same package as the interface. Both are inside the Spring Core framework. You can use it without the other parts of the Spring framework (maybe in your own classes to have an ant-like resource selecting, too). You only need a dependency to the spring-core-x.x.x.jar library (in the case of version 2.5.4, spring-core-2.5.4.jar).
If you want to allow other parameters, there is a public method called setAllowedResourcePaths. ResourceServlet, which extends from HttpServletBean (package org.springframework.web.servlet). This servlet implements the opportunity to configure a servlet in a Spring way. That means for each init parameter inside the web.xml file, a setter method on the servlet is called. In our case, if you have an init parameter allowedPaths, the setAllowedPaths method is called. See an example for the configuration below.
	<servlet>
		<servlet-name>Resource Servlet</servlet-name>
		<servlet-class>org.springframework.js.resource.ResourceServlet</servlet-class>
		<load-on-startup>0</load-on-startup>
		<init-param>
			<param-name>allowedResourcePaths</param-name>
			<param-value>/**/*.png,/**/*.css</param-value>
		</init-param>
	</servlet>
In most of the cases, you want to specify more than one value for the allowedResourcePaths parameter. Therefore, the usage of a comma to separate the values is preferred. Unfortunately, the default implementation does not convert that value into an array. If you want to use a comma as a delimiter for the values, you have to manually register StringArrayPropertyEditor inside the org.
springframework.beans.propertyeditors package. An easy way to implement this is to overwrite the initBeanWrapper method of ResourceServlet.
	@Override
	protected void initBeanWrapper(BeanWrapper bw) throws
	BeansException {
		bw.registerCustomEditor(String[].class, new
		StringArrayPropertyEditor());
	}
Finally, we want to show how to use such a servlet inside the web deployment descriptor of your web application. Just assume that the servlet has the name ResourceServlet and is inside the flowtrac.swf.extension.resources sample package. The configuration is done as shown below.
	<servlet>
		<servlet-name>Resource Servlet</servlet-name>
		<servlet-class>flowtrac.swf.extension.resources.
			ResourceServlet</servlet-class>
		<load-on-startup>0</load-on-startup>
		<init-param>
			<param-name>allowedResourcePaths</param-name>
			<param-value>/**/*.tss,/**/*.css</param-value>
		</init-param>
	</servlet>

	Just remember: If the resource is not allowed, the isAllowed method
	returns false and the servlet delivers no resource for the actual request.
Step 3: Try to load from the servlet context
The next step after the positive check on allowance is to try to load the resource within the servlet context. This is done with the getServletContext().getResou rce(resourcePath) expression. Do not confuse the load from the servlet context with a load from the classpath. With that method, you only get resources which are reachable directly through a filesystem access. There is no search done. That means the specified resourcePath is relative to the base directory of the web application.
Step 4: Load from the classpath
I f the resource cannot be found, the META-INF path (that prevents from delivering classes which are on the classpath) is prefixed to the path of the resource. The next step is to try to load the resource with the classloader. This is done with the ClassUtils.getDefaultClassLoader().getResource(resourcePath) helper method. The ClassUtils utility class is inside the org.springframework.util package of the spring-core library. If no resource is found, the method returns null and no resource is delivered by the actual request.
Step 5: Stream the resources
Each resource is now written as a separate byte stream.
Remember if you request more than one resource, the resources are only delivered if all of the resources could be found from ResourceServlet.If one of the requested resources could not be found (or not allowed), none of the requested resources is delivered.
For the usage of ResourceServlet, dependency to the org.springframework.js library is necessary.
Configuration of the application context
The next step is to configure the application context which is used for the Spring Web Flow project. This is done in the deployment descriptor of the web application. We use the same technique as in the samples in the chapters before. For our example, we
choose the name web-application.config.xml in the /WEB-INF/config directory.
	<context-param>
		<param-name>contextConfigLocation</param-name>
		<param-value>
			/WEB-INF/config/web-application-config.xml
		</param-value>
	</context-param>
	<listener>
		<b><listener-class>org.springframework.web.context.
			ContextLoaderListener</listener-class></b>
	</listener>
The configuration of web.xml is now complete. For the simple purpose of an verview, we repeat the configuration steps below:
- Configure the Resources Servlet
- Configure contextConfigLocation
- Configure the Faces Servlet
- Configure faces.DEFAULT_SUFFIX
After we have configured the used file for the configuration of the application context, it is time to configure the application context itself. For that case, we have to add an additional XSD file (http://www.springframework.org/schema/facesspring-faces-2.0.xsd). Therefore, the header of the file is extended with the definition of that grammar under the accessor faces.
	<beans xmlns="http://www.springframework.org/schema/beans"
		xmlns:xsi="http://www.w3.org/2001/XMLSchema-instance"
		xmlns:webflow="http://www.springframework.org/schema/
		webflow-config"
		<b>xmlns:faces="http://www.springframework.org/schema/faces"</b>
		xsi:schemaLocation="
			http://www.springframework.org/schema/beans
			http://www.springframework.org/schema/beans/
			  spring-beans-2.5.xsd
			http://www.springframework.org/schema/webflow-config
			http://www.springframework.org/schema/webflow-config/
			  spring-webflow-config-2.0.xsd
			http://www.springframework.org/schema/faces
			<b>http://www.springframework.org/schema/faces/
			  spring-faces-2.0.xsd"></b>
The integration of JSF into Spring Web Flow is done through the configuration of a special parser which creates builders for the integration. To register that parser, the following line is added to the application context configuration file:
<faces:flow-builder-services id="facesFlowBuilderServices" />
In the case of the usage of the faces: prefix in the XML configuration file, the FacesNamespaceHandler class (package: org.springframework.faces.config) is used to handle the tags. The class is extended from NamespaceHandlerSupport
(package: org.springframework.beans.factory.xml) and implements only the init method. The implementation of the method is shown below.
	public void init() {
		registerBeanDefinitionParser("flow-builder-services", new
		FacesFlowBuilderServicesBeanDefinitionParser());
	}
As you can see, the method creates an instance of FacesFlowBuilderServicesBeanDefinitionParser, which resides inside the org.springframework.faces.config package. Besides the definition of facesFlowBuilderServices, it is important to provide that instance to flow-registry. The instance can be provided with the help of the flow-builder-services attribute of the flow-registry.
	<webflow:flow-registry id="flowRegistry" flow-builder-services="facesF
	  lowBuilderServices">
		<webflow:flow-location path="/WEB-INF/issue/add/add.xml" />
	</webflow:flow-registry>
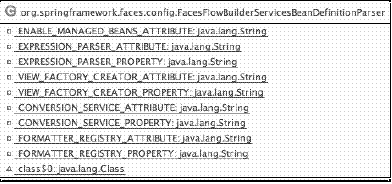
W ith the registration of facesFlowBuilderServices, some other default classes for the JSF integration are instantiated. It is possible to change the default behavior. To better understand what is customizable, we look at the FacesFlowBuilderServicesBeanDefinitionParser class. The class defines some internal constants which are used through the process of parsing the XML configuration file. The following diagram shows the class diagram of FacesFlowBuilderServicesBeanDefinitionParser.
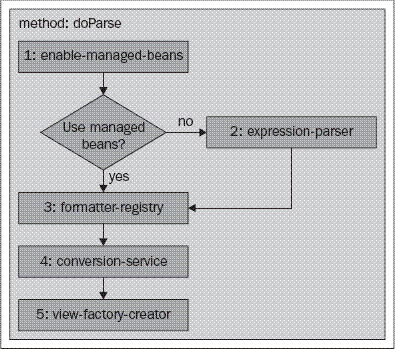
There are five important attributes that you can configure in the faces:flowbuilder-services tag. These attributes infl uence the behavior of the application. Therefore, it is important to understand the meaning of the attributes. The attributes are evaluated through FacesFlowBuilderServicesBeanDefinitionParser. The diagram below shows the sequence of the evaluation of the attributes. The evaluation of the attributes is done in four or five steps. The number of steps depends on the value of the enable-managed-beans attribute. The value is of the Boolean type.
Step 1: Evaluation of the enable-managed-beans attribute.
Step 2: If the enable-managed-beans attribute is set to false, the expression-parser value is evaluated.
Step 3: Evaluate the formatter-registry attribute.
Step 4: Evaluate the conversion-service attribute.
Step 5: Evaluate the view-factory-creator attribute.
The doParse internal method is called from the AbstractSingleBeanDefinitionParser class. The doParse method has to be provided with an instance of the BeanDefinitionBuilder class inside the org.springframework.beans.factory.support package. That instance is created
inside the parseInternal method of AbstractSingleBeanDefinitionParser. The instance is created with the genericBeanDefinition static method of the BeanDefinitionBuilder class.
After the evaluation sequence, we describe the meaning of the attributes.
| Name of the attribute | Description |
|---|---|
| enable-managed-beans | JSF uses the concept of managed beans. In the context of the Spring framework, there is a concept of Spring beans. If you want to use the managed beans facility of JSF, you have to provide the enable-managed-beans attribute. The attribute is a boolean attribute. If you set that attribute to true, the JsfManagedBeanAwareELExpressionParser class (package: org. springframework.faces.webflow) is used for the evaluation of the referenced beans inside the fl ow. Otherwise, the expression-parser attribute is evaluated. The default value for that attribute is false. |
| expression-parser | If the enable-managed-beans attribute is not set or set to false, the expression-parser attribute is evaluated. With that attribute, you can provide a specific parser of the expression which is used inside the fl ow. If the value is not set, a new instance of the WebFlowELExpressionParser class (package: org. springframework.webflow.expression.el) is created. That instance is created with an ExpressionFactory by using the createExpressionFactory static method of the DefaultExpressionFactoryUtils class. The default expression factory is org.jboss.el.ExpressionFactoryImpl. |
| formatter-registry | A formatter registry is the class which creates or provides the formatter for a specific class. With a formatter from the org.springframework. binding.format.Formatter type, you can format a specific class for the output. Additionally, a formatter provides a method called parse to create the specific class. If you do not provide that attribute, a default formatter registry is created with the getSharedInstance method of the DefaultFormatterRegistry class. That registry has formatters for the following classes: Integer (for numbers, a NumberFormatter inside the org.springframework. binding.format.formatters package is used), Long, Short, Float, Double, Byte, BigInteger, BigDecimal, Boolean (for Boolean, a BooleanFormatter inside the org.springframework. binding.format.formatters package is registered) and Date (for Date, a DateFormatter inside the org.springframework.binding. format.formatters package is registered). DefaultFormatterRegistry extends the GenericFormatterRegistry class from the org.springframework. binding.format.registry package. If you want to implement your own formatter registry, it could be a choice to extend from that class. |
| conversion-service | A conversion service is responsible to provide instances of ConversionExecutor (package: org.springframework. binding.convert) for a specific class. A conversion service is from type ConversionService (package: org.springframework. binding.convert). A conversion service converts a source object into a specific target object. If no value for the conversion-service attribute is provided, an instance of the FacesConversionService class (package: org.springframework.faces.model.converter) is registered. The class extends DefaultConversionService. If you implement your own conversion service, you could extend from GenericConversionService (package: org.springframework. binding.convert.service). This default implementation registers the following four converters: TextToClass (the FacesConversionService class registers on the TextToClass converter an alias for the DataModel class from the javax.model. DataModel. TextToClass package converts a piece of text to a class.), TextToBoolean, TextToLabeledEnum and TextToNumber. |
| view-factory-creator | A view factory creator is responsible to provide a view factory. A view factory creator is from type ViewFactoryCreator (package: org.springframework.webflow.engine.builder). Such a ViewFactoryCreator is responsible for creating instances from type ViewFactory (package: org.springframework.webflow. execution). If the value for the view-factory-creator attribute is not provided, an instance of the JsfViewFactoryCreator class (package: org.springframework.faces.webflow) is registered. That class creates instances of JsfViewFactory (package: org. springframework.faces.webflow). |
The next step is the configuration of JSF itself. This is done in faces-config.xml, which can be located inside the WEB-INF directory.
	<?xml version="1.0"?>
	<!DOCTYPE faces-config PUBLIC
	  "-//Sun Microsystems, Inc.//DTD JavaServer Faces Config 1.0//EN"
	  "http://java.sun.com/dtd/web-facesconfig_1_0.dtd">
	<faces-config>
		<application>
			<!-- Enables Facelets -->
			<view-handler>com.sun.facelets.FaceletViewHandler</view-handler>
		</application>
	</faces-config>
Using Spring Faces
The following section shows you how to use the Spring Faces module.
Overview of all tags of the Spring Faces tag library
The Spring Faces module comes with a set of components, which are provided through a tag library. If you want more detailed information about the tag library, look at the following files inside the Spring Faces source distribution:
- spring-faces/src/main/resources/META-INF/spring-faces.tld
- spring-faces/src/main/resources/META-INF/springfaces.taglib.xml
- spring-faces/src/main/resources/META-INF/faces-config.xml
If you want to see the source code of a specific tag, refer to faces-config.xml and springfaces.taglib.xml to get the name of the class of the component. The spring-faces.tld
file can be used for documentation issues.
The following table should give you a short description about the available tags from the Spring Faces component library.
| Name of the tag | Description |
|---|---|
| includeStyles | The includeStyles tag renders the necessary CSS stylesheets which are essential for the components from Spring Faces. The usage of this tag in the head section is recommended for performance optimization. If the tag isn’t included, the necessary stylesheets are rendered on the first usage of the tag. If you are using a template for your pages, it’s a good pattern to include the tag in the header of that template. For more information about performance optimization, refer to the Yahoo performance guidelines, which are available at the following URL: http:// developer.yahoo.com/performance. Some tags (includeStyles, resource, and resourceGroup) of the Spring Faces tag library are implementing patterns to optimize the performance on client side. |
| resource | The resource tag loads and renders a resource with ResourceServlet. You should prefer this tag instead of directly including a CSS stylesheet or a JavaScript file because ResourceServlet sets the proper response headers for caching the resource file. |
| resourceGroup | With the resourceGroup tag, it is possible to combine all resources which are inside the tag. It is important that all resources are the same type. The tag uses ResourceServlet with the appended parameter to create one resource file which is sent to the client. |
| clientTextValidator | With the clientTextValidator tag, you can validate a child inputText element. For the validation, you have an attribute called regExp where you can provide a regular expression. The validation is done on client side. |
| clientNumberValidator | With the clientNumberValidator tag, you can validate a child inputText element. With the provided validation methods, you can check whether the text is a number and check some properties for the number, e.g. range. The validation is done on client side. |
| clientCurrencyValidator | With the clientCurrencyValidator tag, you can validate a child inputText element. This tag should be used if you want to validate a currency. The validation is done on client side. |
| clientDateValidator | With the clientDateValidator tag, you can validate a child inputText element. The tag should be used to validate a date. The field displays a pop-up calendar. The validation is done on client side. |
| validateAllOnClick | With the validateAllOnClick tag, you can execute all client-side validation on the click of a specific element. That can be useful for a submit button. |
| commandButton | With the commandButton tag, it is possible to execute an arbitrary method on an instance. The method itself has to be a public method with no parameters and a java.lang.Object instance as the return value. |
| commandLink | The commandLink tag renders an AJAX link. With the processIds attribute, you can provide the ids of components which should be processed through the process. |
| ajaxEvent | The ajaxEvent tag creates a JavaScript event listener. This tag should only be used if you can ensure that the client has JavaScript enabled. |
A complete example
After we have shown the main configuration elements and described the Spring Faces components, the following section shows a complete example in order to get a good understanding about how to work with the Spring Faces module in your own web application.
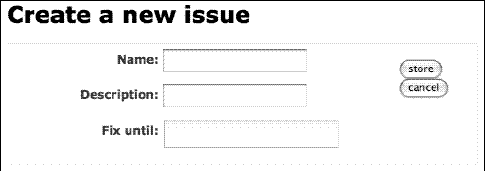
The following diagram shows the screen of the sample application. With the shown screen, it is possible to create a new issue and save it to the bug database.
It is not part of this example to describe the bug database or to describe how to work with databases in general. The sample uses the model classes which are described inside the Appendix of this book.
The diagram has three required fields. These fields are:
- Name: the name of the issue
- Description: a short description for the issue
- Fix until: the fixing date for the issue
Additionally, there are the following two buttons:
- store: With a click on the store button, the system tries to create a new issue that includes the provided information.
- cancel: With a click on the cancel button, the system ignores the data which is entered and navigates to the overview page.
Now, the first step is to create the implementation of that input page. That implementation and its description are shown in the section below.
Creating the input page
As we described above, we use Facelets as a view handler technology. Therefore, the pages have to be defined with XHTML, with.xhtml as the file extension. The name for the input page will be add.xhtml. In the example from Chapter 3, the name of the page was add.jsp. This is because in that example we had used JavaServer Pages as a view technology.
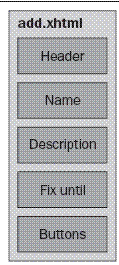
For the description, we separate the page into the following five parts:
- Header
- Name
- Description
- Fix until
- The Buttons
This separation is shown in the diagram below.
The Header part
The first step in the header is to define that we have an XHTML page. This is done through the definition of the correct doctype.
	<!DOCTYPE composition PUBLIC "-//W3C//DTD XHTML 1.0 Transitional//EN"
	"http://www.w3.org/TR/xhtml1/DTD/xhtml1-transitional.dtd">
An XHTML page is described as an XML page. If you want to use special tags inside the XML page, you have to define a namespace for that. For a page with Facelets and Spring Faces, we have to define more than one namespace. The following table describes those namespaces.
| Namespace | Description |
|---|---|
| http://www.w3.org/1999/xhtml | The namespace for XHTML itself. |
| http://java.sun.com/jsf/facelets | The Facelet defines some components (tags). These components are available under this namespace. |
| http://java.sun.com/jsf/html | The user interface components of JSF are available under this namespace. |
| http://java.sun.com/jsf/core | The core tags of JSF, for example converter, can be accessed under this namespace. |
| http://www.springframework.org/tags/faces | The namespace for the Spring Faces component library. |
For the header definition, we use the composition component of the Facelets components. With that component, it is possible to define a template for the layout. This is very similar to the previously mentioned Tiles framework. The following code snippet shows you the second part (after the doctype) of the header definition.
	A description and overview of the JSF tags is available at:
	http://developers.sun.com/jscreator/archive/learning/
	bookshelf/pearson/corejsf/standard_jsf_tags.pdf.

	<ui:composition xmlns="http://www.w3.org/1999/xhtml"
					xmlns:ui="http://java.sun.com/jsf/facelets"
					xmlns:h="http://java.sun.com/jsf/html"
					xmlns:f="http://java.sun.com/jsf/core"
					  xmlns:sf="http://www.springframework.org/tags/faces"
					  template="/WEB-INF/layouts/standard.xhtml">
With the help of the template attribute, we refer to the used layout template. In our example, we refer to /WEB-INF/layouts/standard.xhtml.
The following code shows the complete layout file standard.xhtml. This layout file is also described with the Facelets technology. Therefore, it is possible to use Facelets components inside that page, too. Additionally, we use Spring Faces components inside that layout page.
	<!DOCTYPE html PUBLIC "-//W3C//DTD XHTML 1.0 Transitional//EN"
	"http://www.w3.org/TR/xhtml1/DTD/xhtml1-transitional.dtd">
	<html xmlns="http://www.w3.org/1999/xhtml"
		xmlns:ui="http://java.sun.com/jsf/facelets"
		xmlns:f="http://java.sun.com/jsf/core"
		xmlns:c="http://java.sun.com/jstl/core"
		xmlns:sf="http://www.springframework.org/tags/faces">
	<f:view contentType="text/html">
	<head>
		<meta http-equiv="Content-Type" content="text/html; charset=UTF-8"/>
		<title>flow.tracR</title>
		<sf:includeStyles/>
		<sf:resourceGroup>
			<sf:resource path="/css-framework/css/tools.css"/>
			<sf:resource path="/css-framework/css/typo.css"/>
			<sf:resource path="/css-framework/css/forms.css"/>
			<sf:resource path="/css-framework/css/layout-navtop-localleft.css"/>
			<sf:resource path="/css-framework/css/layout.css"/>
		</sf:resourceGroup>
		<sf:resource path="/css/issue.css"/>
		<ui:insert name="headIncludes"/>
	</head>
	<body class="tundra spring">
	<div id="page">
		<div id="content">
			<div id="main">
				<ui:insert name="content"/>
			</div>
		</div>
	</div>
	</body>
	</f:view>
	</html>
The Name part
The first element in the input page is the section for the input of the name. For the description of that section, we use elements from the JSF component library. We access this library with h as the prefix, which we have defined in the header section. For the general layout, we use standard HTML elements, such as the div element. The definition is shown below.
	<div class="field">
		<div class="label">
			<h:outputLabel for="name">Name:</h:outputLabel>
		</div>
		<div class="input">
			<h:inputText id="name" value="#{issue.name}" />
		</div>
	</div>
The Description part
The next element in the page is the Description element. The definition is very similar to the Name part. Instead of the definition of the Name part, we use the element description inside the h:inputText element—the required attribute with true as its value. This attribute tells the JSF system that the issue.description value is mandatory. If the user does not enter a value, the validation fails.
	<div class="field">
		<div class="label">
			<h:outputLabel for="description">Description:</h:outputLabel>
		</div>
		<div class="input">
			<h:inputText id="description" value="#{issue.description}"
				required="true"/>
		</div>
	</div>
The Fix until part
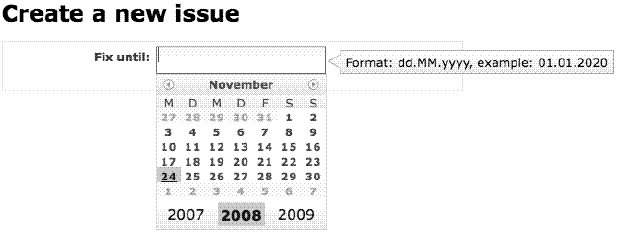
The last input section is the Fix until part. This field is a very common field in web applications, because there is often the need to input a date. Internally, a date is often represented through an instance of the java.util.Date class. The text which is entered by the user has to be validated and converted in order to get a valid instance. To help the user with the input, a calendar for the input is often used. The Spring Faces library offers a component which shows a calendar and adds client-side validation. The complete definition of the Fix until part is shown below. The name of the component is clientDateValidator. The clientDateValidator component is used with sf as the prefix. This prefix is defined in the namespace definition in the shown header of the add.xhtml page.
	<div class="field">
		<div class="label">
			<h:outputLabel for="checkinDate">Fix until:</h:outputLabel>
		</div>
		<div class="input">
			<b><sf:clientDateValidator required="true" invalidMessage="please
		insert a correct fixing date. format: dd.MM.yyyy"
		promptMessage="Format: dd.MM.yyyy, example: 01.01.2020"></b>
				<h:inputText id="checkinDate" value="#{issue.fixingDate}"
			required="true">
					<f:convertDateTime pattern="dd.MM.yyyy" timeZone="GMT"/>
				</h:inputText>
			</sf:clientDateValidator>
		</div>
	</div>
In the example above, we use the promptMessage attribute to help the user with the format. The message is shown when the user sets the cursor on the input element.
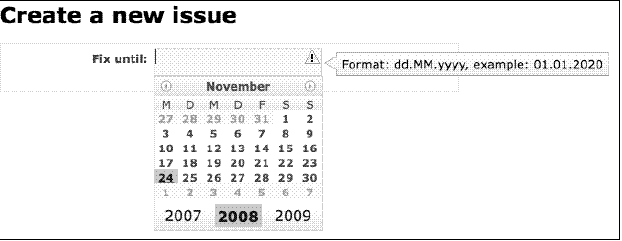
If the validation fails, the message of the invalidMessage attribute is used to show the user that a wrong formatted input has been entered.
The Buttons part
The last element in the page are the buttons. For these buttons, the commandButton component from Spring Faces is used. The definition is shown below:
	<div class="buttonGroup">
		<sf:commandButton id="store" action="store" processIds="*"
	value="store"/>
		<sf:commandButton id="cancel" action="cancel" processIds="*"
	value="cancel"/>
	</div>
It is worth mentioning that JavaServer Faces binds an action to the action method of a backing bean. Spring Web Flow binds the action to events.
Handling of errors
It’s possible to have validation on the client side or on the server side. For the Fix until element, we use the previously mentioned clientDateValidator component of the Spring Faces library. The following figure shows how this component shows the error message to the user.
Reflecting the actions of the buttons into the flow definition file
Clicking the buttons executes an action that has a transition as the result. The name of the action is expressed in the action attribute of the button component which is implemented as commandButton from the Spring Faces component library. If you click on the store button, the validation is executed first. If you want to prevent that validation, you have to use the bind attribute and set it to false. This feature is used for the cancel button, because in this state it is necessary to ignore the inputs.
	<view-state id="add" model="issue">
		<transition on="store" to="issueStore" >
			<evaluate expression="persistenceContext.persist(issue)"/>
		</transition>
		<transition on="cancel" to="cancelInput" bind="false">
		</transition>
	</view-state>
Showing the results
To test the implemented feature, we implement an overview page. We have the choice to implement the page as a fl ow with one view state or implement it as a simple JSF view. Independent from that choice, we will use Facelets to implement that overview page, because Facelets does not depend on the Spring Web Flow framework as it is a feature of JSF.
The example uses a table to show the entered issues. If no issue is entered, a message is shown to the user. The figure below shows this table with one row of data. The Id is a URL. If you click on this link, the input page is shown with the data of that issue. It is the same mechanism we saw in Chapter 3. With data, we execute an update. The indicator for that is the valid ID of the issue.
If your data is available, the No issues in database message is shown to the user. This is done with a condition on the outputText component. See the code snippet below:
	<h:outputText id="noIssuesText" value="No Issues in the database"
	rendered="#{empty issueList}"/>
For the table, we use the dataTable component.
	<h:dataTable id="issues" value="#{issueList}" var="issue"
	rendered="#{not empty issueList}" border="1"></b>
		<h:column>
			<f:facet name="header">Id</f:facet>
			<a href="add?id=#{issue.id}">#{issue.id}</a>
		</h:column>
		<h:column>
			<f:facet name="header">Name</f:facet>
			#{issue.name}
		</h:column>
		<h:column>
			<f:facet name="header">fix until</f:facet>
			#{issue.fixingDate}
		</h:column>
		<h:column>
			<f:facet name="header">creation date</f:facet>
			#{issue.creationDate}
		</h:column>
		<h:column>
			<f:facet name="header">last modified</f:facet>
			#{issue.lastModified}
		</h:column>
	</h:dataTable>
Integration with other JavaServer Faces component libraries
One of the basic concepts of JavaServer Faces is the components. The idea is to have one implementation of the JavaServer Faces infrastructure and use the components which are appropriate for your web application. It should be possible to use any third-party JSF component library with Spring Faces.
It is important to say that the configuration in the web deployment descriptor web.xml is different if you are using Spring Faces, because the requests are not routed through the standard FacesServlet. FacesServlet is used only to establish the infrastructure for the JavaServer Faces subsystem.
Many JSF component libraries are available in the market. Some libraries are open-source, other libraries are commercial. In this section, we will have a look at the following two open-source JSF component libraries:
- JBoss RichFaces, available at: http://www.jboss.org/jbossrichfaces.
- Apache MyFaces Trinidad, available at:
http://myfaces.apache.org/trinidad.
Integration with JBoss RichFaces
One open-source JavaServer Faces component library is JBoss RichFaces. The web site of that framework is available at the following URL: http://www.jboss.org/ jbossrichfaces. This component library offers many components which are based on AJAX (Asynchronous JavaScript and XML). If you want to use that component library in conjunction with Spring Faces, you first have to download the latest release from the download section of the web page of JBoss RichFaces at the http://www.jboss.
org/jbossrichfaces/downloads/ URL. We have used Version 3.2.2 in our example. After the download of the richfaces-ui-3.2.2.GA-bin.zip archive (the size is about 25 MB), extract the archive into an arbitrary folder. Other formats (tar.gz) and the source files are also available from the mentioned download page. The directory layout of the extracted archive looks like the figure which is shown below.

The binary libraries are located inside the lib folder. The apidocs, docs, and tlddoc folders contain the documentation for the component library. If you need more information, it is highly recommended to read the documentation inside the docs folder. To use the RichFaces component library inside your web application, copy the richfaces-api-3.2.2.GA.jar, richfaces-impl-3.2.2.GA.jar, and richfacesui-3.2.2.GA.jar files into the WEB-INF/lib folder of your web application.
The next step is the configuration inside the web deployment descriptor file web.xml. RichFaces comes with a servlet filter which has to be configured as shown in the example below:
	<filter>
		<display-name>RichFaces Filter</display-name>
		<filter-name>richfaces</filter-name>
		<filter-class>org.ajax4jsf.Filter</filter-class>
	</filter>
After the configuration of the filter, the mapping of the filter has to be done. The important parameter for the integration with Spring Faces is the servlet-name parameter. Here, you have to mention the name of your used dispatch servlet.
	<filter-mapping>
		<filter-name>richfaces</filter-name>
		<b><servlet-name>flowtrac</servlet-name></b>
		<dispatcher>REQUEST</dispatcher>
		<dispatcher>FORWARD</dispatcher>
		<dispatcher>INCLUDE</dispatcher>
	</filter-mapping>
After this configuration, you can use the components inside your views. The namespace for the components is available at http://richfaces.org/rich. The example page header below shows the usage of the namespace.
	<ui:composition xmlns="http://www.w3.org/1999/xhtml"
					xmlns:ui="http://java.sun.com/jsf/facelets"
					xmlns:h="http://java.sun.com/jsf/html"
					xmlns:f="http://java.sun.com/jsf/core"
					<b>xmlns:rich="http://richfaces.org/rich"</b>
					xmlns:sf="http://www.springframework.org/tags/faces"
					template="/WEB-INF/layouts/standard.xhtml">
After the configuration in the page header, you can use the components with the configured prefix rich. The following example uses the component for uploading a file.
<rich:fileUpload maxFilesQuantity="3" />
The figure below shows the sample component in action:
The n umber of components inside the RichFaces library is quite comprehensive. We recommend reading chapter 6 of the documentation of RichFaces to learn more about the possibilities which are offered through these components.
Integration with Apache MyFaces Trinidad
Apach e MyFaces Trinidad is an open-source JSF framework which offers many components that you can use in conjunction with your own web application. The web page of 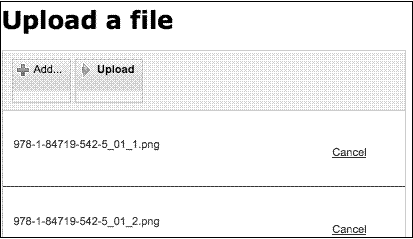
the framework is at http://myfaces.apache.org/trinidad. The first step is to download the distribution of Apache MyFaces Trinidad from the download section from the following URL: http://myfaces.apache.org/trinidad/
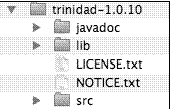
download.html. For our example, we have used the version 1.0.10 of Apache MyFaces Trinidad. After the download of the trinidad-1.0.10-dist.zip file (the size of the compressed archive is about 11.9 MB), extract it into an arbitrary folder. The layout of the folder is shown in the figure below.
The lib folder contains the binary libraries. The library as the source archive is included in the src folder. The javadoc folder comprehends the API documentation of the library. After the download, you have to copy two libraries, trinidad-api-
1.0.10.jar and trindad-impl-1.0.10.jar, into the WEB-INF/lib folder of your web application. The libraries themselves are located inside the lib folder. Apache MyFaces Trindad comes with two component libraries which can be used inside your web application. The n amespace of these libraries is shown in the table below:
| Recommended Shortcut for the library | Namespace |
|---|---|
| Tr | http://myfaces.apache.org/trinidad |
| Trh | http://myfaces.apache.org/trinidad/html |
The first step in the configuration process is the configuration inside the web deployment descriptor (web.xml) of your web application. You have to configure some context parameters, the Trinidad filter, and the Trinidad Resource Servlet.
If you use Facelets to describe your views, do not forget to set the org.apache. myfaces.trinidad.ALTERNATE_VIEW_HANDLER parameter.
	<context-param>
		<param-name>org.apache.myfaces.trinidad.ALTERNATE_VIEW_
	HANDLER</param-name>
		<param-value>com.sun.facelets.FaceletViewHandler</param-value>
	</context-param>
	<context-param>
		<param-name>javax.faces.STATE_SAVING_METHOD</param-name>
		<param-value>server</param-value>
	</context-param>
	<context-param>
		<param-name>
			org.apache.myfaces.trinidad.CHANGE_PERSISTENCE
		</param-name>
		<param-value>session</param-value>
	</context-param>
	<context-param>
		<param-name>
			org.apache.myfaces.trinidad.ENABLE_QUIRKS_MODE
		</param-name>
		<param-value>false</param-value>
	</context-param>
	<filter>
		<filter-name>Trinidad Filter</filter-name>
		<filter-class>
			org.apache.myfaces.trinidad.webapp.TrinidadFilter
		</filter-class>
	</filter>

	<filter-mapping>
		<filter-name>Trinidad Filter</filter-name>
		<b><servlet-name>Faces Servlet</servlet-name></b>
	</filter-mapping>

	<servlet>
		<servlet-name>Trinidad Resource Servlet</servlet-name>
		<servlet-class>
			org.apache.myfaces.trinidad.webapp.ResourceServlet
		</servlet-class>
	</servlet>

	<servlet-mapping>
		<servlet-name>Trinidad Resource Servlet</servlet-name>
		<url-pattern>/adf/*</url-pattern>
	</servlet-mapping>
The next step is the configuration of faces-config.xml.
	<?xml version="1.0"?>
	<!DOCTYPE faces-config PUBLIC
	  "-//Sun Microsystems, Inc.//DTD JavaServer Faces Config 1.0//EN"
	  "http://java.sun.com/dtd/web-facesconfig_1_0.dtd">
	<faces-config>
		<application>
			<default-render-kit-id>org.apache.myfaces.trinidad.core</
	default-render-kit-id>
			<property-resolver>org.springframework.faces.webflow.
	FlowPropertyResolver</property-resolver>
			<variable-resolver>org.springframework.faces.webflow.
	FlowVariableResolver</variable-resolver>
			<variable-resolver>org.springframework.web.jsf.
	DelegatingVariableResolver</variable-resolver>
		</application>
	</faces-config>
After the configuration inside faces-config.xml, we can use the mentioned namespaces inside the header of our views.
	<ui:composition xmlns="http://www.w3.org/1999/xhtml"
					xmlns:ui="http://java.sun.com/jsf/facelets"
					xmlns:h="http://java.sun.com/jsf/html"
					xmlns:f="http://java.sun.com/jsf/core"
					<b>xmlns:tr="http://myfaces.apache.org/trinidad"</b>
					xmlns:sf="http://www.springframework.org/tags/faces"
					template="/WEB-INF/layouts/standard.xhtml">
For our example, we use a color chooser for selecting a color.
also read:
	<div class="section">
		<h1>Choose color</h1>
		<h:messages errorClass="errors" />
		<h:form id="issueForm">
			<tr:inputColor id=<a href="https://javabeat.net/wp-content/uploads/2009/08/spring-faces-15.gif"><img class="aligncenter size-full wp-image-6598" alt="spring-faces-15" src="https://javabeat.net/wp-content/uploads/2009/08/spring-faces-15.gif" width="277" height="143" /></a>"sic1" chooseId="cc2"/>
			<tr:chooseColor id="cc2" width="18" />
		</h:form>
	</div>
The component in action is shown in the figure below.
As you have seen in the two examples, the integration of component libraries needs some additional work. Therefore, it is not recommended to use more than one or two component libraries. Our recommendation is to select one rich component library and take care that the integration is working in a maintainable way.


