In this article let us see how to how Spring supports multipart i.e file uploading. Spring has built-in multipart support for file uploads in web applications. This can be enabled with the interface org.springframework.web.multipart.MultipartResolver object. There are two implementations of the interface MultipartResolver provide by Spring as follows:
- One implementation is for use with Commons FileUpload
- Second implementation is for use with Servlet 3.0 multipart request parsing.
Following steps are followed to enable the Spring multipart handling:
- Add a multipart resolver to the web application’s context.
- Each request is inspected to see if it contains a multipart.
- If no multipart is found, the request continues as expected.
- If a multipart is found in the request, the MultipartResolver that has been declared in your context is used. The multipart attribute in your request is treated like any other attribute.
also read: follow us on @twitter and @facebook
- Spring Tutorials ( Collection for Spring reference tutorials)
- Spring Framework Interview Questions
- Introduction to Spring LDAP
- How to write Custom Spring Callback Methods?
Using a MultipartResolver with Commons FileUpload
The following declaration needs to be made in the application context file to enable the MultipartResolver (alongwith including necessary jar file in the application):
<bean id="multipartResolver"
    class="org.springframework.web.multipart.commons.CommonsMultipartResolver">

    <!-- one of the properties available; the maximum file size in bytes -->
    <property name="maxUploadSize" value="100000"/>
</bean>
Using a MultipartResolver with Servlet 3.0
To use Servlet 3.0 based multipart parsing, you need to :
- Mark the DispatcherServlet with a “multipart-config” section in web.xml orwith javax.servlet.MultipartConfigElement in programmatic Servlet registration.
- Next, when multipart parsing has been enabled in one of the above mentioned ways, then add the StandardServletMultipartResolver to your Spring configuration as follows:
<bean id="multipartResolver"
    class="org.springframework.web.multipart.support.StandardServletMultipartResolver">
</bean>
Spring Multipart Support Example
Let us see the multipart file uploading example:
Let us have working Eclipse IDE in place and follow steps below to create a Spring application:
Step 1: Create Project in Eclipse
Create a Dynamic Web Project with a name SpringMultipartFileUpload.
Follow the option File -> New -> Project ->Dynamic Web Projectand finally select Dynamic Web Project wizard from the wizard list. Now name your project as SpringMultipartFileUpload using the wizard window.
Step 2: Add external libraries
Drag and drop below mentioned Spring and other libraries into the folder WebContent/WEB-INF/lib:
- commons-logging-1.1.1.jar
- commons-fileupload-1.2.jar
- commons-io-1.4.jar
- org.springframework.web.servlet-3.2.2.RELEASE.jar
- spring-aop-3.2.2.RELEASE.jar
- spring-aspects-3.2.2.RELEASE.jar
- spring-beans-3.2.2.RELEASE.jar
- spring-context-support-3.2.2.RELEASE.jar
- spring-context-3.2.2.RELEASE.jar
- spring-core-3.2.2.RELEASE.jar
- spring-expression-3.2.2.RELEASE.jar
- spring-webmvc-3.2.2.RELEASE.jar
- spring-web-3.2.2.RELEASE.jar
Step 3: Create Controller and bean classes
Create the package com.javabeat.controller and com.javabeat.form under src folder. (Right click onsrc -> New -> Package ->)
Create the Controller FileUploadController under the package com.javabeat.controller and the bean FileUploadForm under the package com.javabeat.form.
Contents of FileUploadController are as follows:
package com.javabeat.controller;

import org.springframework.stereotype.Controller;
import org.springframework.ui.Model;
import org.springframework.web.bind.annotation.ModelAttribute;
import org.springframework.web.bind.annotation.RequestMapping;
import org.springframework.web.bind.annotation.RequestMethod;
import org.springframework.web.multipart.MultipartFile;

import com.javabeat.form.FileUploadForm;

@Controller
public class FileUploadController {
	@RequestMapping(value = "/show", method = RequestMethod.GET)
	public String displayForm() {
		return "file_upload_form";
	}

	@RequestMapping(value = "/save", method = RequestMethod.POST)
	public String save(@ModelAttribute("uploadForm") FileUploadForm uploadForm,
			Model map) {

		MultipartFile multipartFile = uploadForm.getFile();

		String fileName = "";

		if (multipartFile != null) {
			fileName = multipartFile.getOriginalFilename();

		}

		map.addAttribute("files", fileName);
		return "file_upload_success";
	}

}
Contents of FileUploadForm are :
package com.javabeat.form;

import org.springframework.web.multipart.MultipartFile;

public class FileUploadForm {
	private MultipartFile file;

	public MultipartFile getFile() {
		return file;
	}

	public void setFile(MultipartFile file) {
		this.file = file;
	}

}
Step 4: Create view files.
Create a sub-folder with a name jsp under the WebContent/WEB-INF folder. Create view files file_upload_form.jsp and file_upload_success.jsp under jsp sub-folder.
Contents of file_upload_form.jsp are:
<%@ taglib prefix="form" uri="http://www.springframework.org/tags/form"%>
<html>
<head>

</head>

<body>
	<h2>Spring MVC file upload example</h2>
 	<form:form method="post" action="save.html"
        modelAttribute="uploadForm" enctype="multipart/form-data">
 		Please select a file to upload : <input type="file" name="file" />
		<input type="submit" value="upload" />
		<span><form:errors path="file" cssClass="error" />
		</span>

	</form:form>

</body>
</html>
Contents of file_upload_success.jsp are:
 <%@ page language="java" contentType="text/html; charset=ISO-8859-1"
     pageEncoding="ISO-8859-1"%>
 <%@taglib uri="http://java.sun.com/jsp/jstl/core" prefix="c"%>
 <!DOCTYPE html PUBLIC "-//W3C//DTD HTML 4.01 Transitional//EN" "http://www.w3.org/TR/html4/loose.dtd">
 <html>
 <head>
 <meta http-equiv="Content-Type" content="text/html; charset=ISO-8859-1">
 <title>Spring MVC Multiple File Upload</title>
 </head>
 <body>
 <h1>Spring Multiple File Upload example</h1>
     ${files} uploaded successfully.
 </body>
</html>
Step 5: Create spring configuration files
Create the configuration files web.xml and spring-servlet.xml. under the the directory WEB-INF.
The contents of web.xml are:
<?xml version="1.0" encoding="UTF-8"?>
<web-app xmlns:xsi="http://www.w3.org/2001/XMLSchema-instance" xmlns="http://java.sun.com/xml/ns/javaee" xmlns:web="http://java.sun.com/xml/ns/javaee/web-app_2_5.xsd" xsi:schemaLocation="http://java.sun.com/xml/ns/javaee http://java.sun.com/xml/ns/javaee/web-app_2_5.xsd" id="WebApp_ID" version="2.5">
  <display-name>SpringMultipartFileUpload</display-name>
  <servlet>
		<servlet-name>spring</servlet-name>
		<servlet-class>
			org.springframework.web.servlet.DispatcherServlet
		</servlet-class>
		<load-on-startup>1</load-on-startup>
	</servlet>
	<servlet-mapping>
		<servlet-name>spring</servlet-name>
		<url-pattern>*.html</url-pattern>
	</servlet-mapping>
</web-app>
The contents of spring-servlet.xml are:
<?xml version="1.0" encoding="UTF-8"?>
<beans xmlns="http://www.springframework.org/schema/beans"
    xmlns:xsi="http://www.w3.org/2001/XMLSchema-instance"
    xmlns:context="http://www.springframework.org/schema/context"
    xmlns:mvc="http://www.springframework.org/schema/mvc"
    xsi:schemaLocation="http://www.springframework.org/schema/beans
    http://www.springframework.org/schema/beans/spring-beans.xsd
     http://www.springframework.org/schema/context
     http://www.springframework.org/schema/context/spring-context.xsd
     http://www.springframework.org/schema/mvc
     http://www.springframework.org/schema/mvc/spring-mvc.xsd">

  <context:component-scan base-package="com.javabeat.controller"/>
  <context:annotation-config />
 <bean id="multipartResolver"  class="org.springframework.web.multipart.commons.CommonsMultipartResolver"/>

  <bean id="jspViewResolver"
    class="org.springframework.web.servlet.view.InternalResourceViewResolver">
        <property name="viewClass"
            value="org.springframework.web.servlet.view.JstlView" />
        <property name="prefix" value="/WEB-INF/jsp/" />
        <property name="suffix" value=".jsp" />
  </bean>
</beans>
Here you will notice that bean with id multipartResolver is defined.
Step6: Deploy and execute the Spring multipart support example
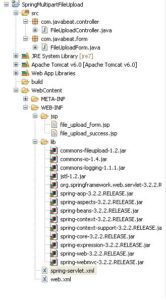
The final directory structure is as follows:

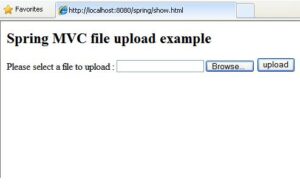
Once all the files are ready export the application. Right click on your application and use Export > WAR File option and save your spring.war file in Tomcat’s webapps folder. Now start the Tomcat server and try to access the URL http://localhost:8080/spring/show.html. You should see the following scree
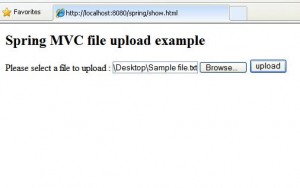
Now upload a file Sample.txt as show in the screen below

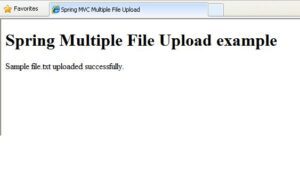
Click on the upload button and you shall see the following screen being displayed:

Summary
In this article we saw how Spring supports the multipart file upload. There are two ways to enable the multipart file uploading in Spring. One implementation is for use with Commons FileUpload and the other implementation is for use with Servlet 3.0 multipart request parsing. I’ve demonstrated using the Commons FileUpload. That’s it for today. If you are interested in receiving the future articles, please subscribe here. follow us on @twitter and @facebook


 Themes in Spring MVC