
A Toast in android is a transient notification that needs no user interaction. It disappears after a certain time period. It notifies user that something has happened.The current activity remains visible even when the toast message pops up. You can always make a toast to display messages of your choice.
Android toast can display,
- simple text
- complex view
How to toast a simple text?
We make use of makeText method to create a toast message. It takes the below three parameters
- context(The application context).
- The text message.
- The duration for the toast.
The third parameter “duration” to the makeText method can be provided using the below constants
- Toast.LENGTH_LONG
- Toast.LENGTH_SHORT
There are two variants of makeText method.
- makeText(context, text, duration);
here you can specify a simple text message as string that gets displayed as a toast. - makeText(context, resId, duration);
where as here you have to give the resource id of your string resource.
Add the below code snippet to display a toast message.
Toast.makeText(getApplicationContext(),
"Hi I am a simple Toast", Toast.LENGTH_LONG).show();
As you can notice the makeText method returns a Toast object. Use show() method on it to display the toast without which the toast is never displayed to the user.
Let us now create a simple application that demonstrates how we can toast a simple text of our choice in android.
Step 1: Open Eclipse and set up the required android environment. For details on how to set up the environment, please refer environment.
Step 2: create a simple android application “My_Toast” with “Android_Toast” as the launcher activity. For details on how to create a simple android application,please refer Simple application.
Step 3: Create the required layouts and Activities
When you create the project “My_Toast” with launcher activity “Android_Toast”, a main.xml layout file gets created automatically. You can edit the main.xml according to your need or you can create a new layout file for your activity “Android_Toast”. If you are not familiar with creating a layout file, please go through the post Create a layout file. I will edit the contents of main.xml layout file for my application. The project structure is as below.

Open the main.xml file and paste the below code.
<?xml version="1.0" encoding="utf-8"?>
<RelativeLayout android:id="@+id/RelativeLayout01"
android:layout_width="fill_parent" android:layout_height="fill_parent"
xmlns:android="<a href="http://schemas.android.com/apk/res/android">http://schemas.android.com/apk/res/android</a>">
<TextView android:id="@+id/TextView01" android:layout_width="wrap_content"
android:layout_height="wrap_content" android:text="Click Ok button to display a TOAST"
android:textSize="15sp" android:layout_marginTop="10sp"></TextView>
<Button android:id="@+id/Button01" android:layout_below="@+id/TextView01"
android:text="OK" android:layout_width="50dip" android:layout_height="50dip"
android:layout_marginTop="10dip"></Button>
</RelativeLayout>
Double click on Android_Toast activity class and paste the below code.
package my.app;
import android.app.Activity;
import android.os.Bundle;
import android.view.View;
import android.view.View.OnClickListener;
import android.widget.Button;
import android.widget.Toast;
public class Android_Toast extends Activity {
Button Ok_Btn;
/** Called when the activity is first created. */
@Override
public void onCreate(Bundle savedInstanceState) {
super.onCreate(savedInstanceState);
setContentView(R.layout.main);

Ok_Btn=(Button)findViewById(R.id.Button01);
Ok_Btn.setOnClickListener(new OnClickListener() {
@Override
public void onClick(View v) {
// TODO Auto-generated method stub
Toast.makeText(getApplicationContext(), "Hi I am a simple Toast", Toast.LENGTH_LONG).show();
}
});
}
}
Step 4: Declare the activities in AndroidManifest.xml
Your Launcher activity will be automatically registered in the manifest file. For more details about the manifest file, please refer AndroidManifest.xml.
Step 5: Run your application
Select your application->Right click on it-> Run As->Android Appllication.
Now your application fires up and shows the output as below.
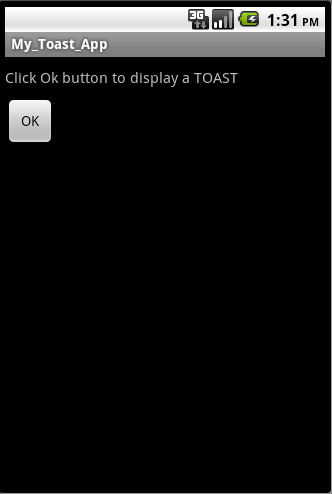
Click the button “OK” to get a toast message. After clicking “OK” the toast gets display.
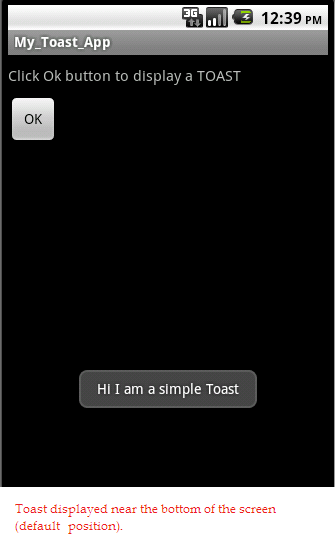
If you observe the above image the toast message is displayed near the bottom of the screen. This is the default position of a toast message. To change it, set the gravity parameter of the toast.
To position the Toast message change the code of the activity “Android_Toast” as below.
package my.app;
import android.app.Activity;
import android.os.Bundle;
import android.view.Gravity;
import android.view.View;
import android.view.View.OnClickListener;
import android.widget.Button;
import android.widget.Toast;

public class Android_Toast extends Activity {
Button Ok_Btn;
/** Called when the activity is first created. */
@Override
public void onCreate(Bundle savedInstanceState) {
super.onCreate(savedInstanceState);
setContentView(R.layout.main);

Ok_Btn=(Button)findViewById(R.id.Button01);
Ok_Btn.setOnClickListener(new OnClickListener() {

@Override
public void onClick(View v) {
// TODO Auto-generated method stub
Toast toast=Toast.makeText(getApplicationContext(), "Hi I am a simple Toast", Toast.LENGTH_LONG);
toast.setGravity(Gravity.CENTER_VERTICAL, 0, 0);
toast.show();
}
});
}
}
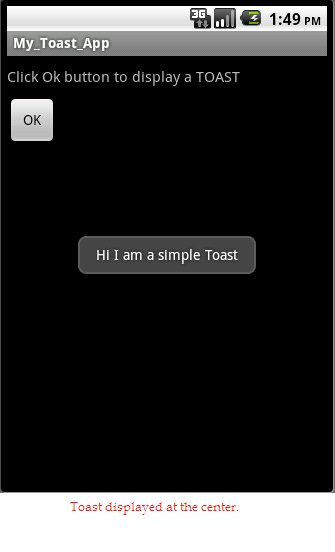
As you can see, the toast is now made to appear in the center by using setGravity method.
The Output is as below.
This is how you can create a simple toast message.
How to create a custom Toast View
Let us now see how we can create a custom toast view by defining a customized layout. To do this create a XML file customtoast_layout.xml and add the below code.
<?xml version="1.0" encoding="utf-8"?>
<LinearLayout xmlns:android="<a href="http://schemas.android.com/apk/res/android">http://schemas.android.com/apk/res/android</a>"
android:layout_width="wrap_content" android:layout_height="wrap_content"
android:id="@+id/custom_layout_root" android:background="#C8E4E9">
<ImageView android:id="@+id/ImageView01"
android:layout_width="wrap_content" android:layout_height="wrap_content"
android:background="@drawable/icon"></ImageView>
<TextView android:id="@+id/TextView01" android:layout_width="wrap_content"
android:layout_height="wrap_content" android:layout_marginTop="10dip"
android:textColor="#000000"></TextView>
</LinearLayout>
If you have any doubt on how to create a layout file, please refer create a layout.
Open the activity “Android_Toast.java” and paste the below code.
package my.app;
import android.app.Activity;
import android.os.Bundle;
import android.view.Gravity;
import android.view.LayoutInflater;
import android.view.View;
import android.view.View.OnClickListener;
import android.view.ViewGroup;
import android.widget.Button;
import android.widget.TextView;
import android.widget.Toast;

public class Android_Toast extends Activity {
Button Ok_Btn;
View obj;
TextView display;
/** Called when the activity is first created. */
@Override
public void onCreate(Bundle savedInstanceState) {
super.onCreate(savedInstanceState);
setContentView(R.layout.main);

LayoutInflater inflater=getLayoutInflater();
obj=inflater.inflate(R.layout.customtoast_layout,(ViewGroup)findViewById(R.id.custom_layout_root));
display=(TextView)obj.findViewById(R.id.TextView01);
display.setText("Hi I am a custom Toast");

Ok_Btn=(Button)findViewById(R.id.Button01);
Ok_Btn.setOnClickListener(new OnClickListener() {
@Override
public void onClick(View v) {
// TODO Auto-generated method stub
Toast toast=new Toast(getApplicationContext());
toast.setGravity(Gravity.CENTER_VERTICAL, 0, 0);
toast.setDuration(Toast.LENGTH_LONG);
toast.setView(obj);
toast.show();
}
});
}
}
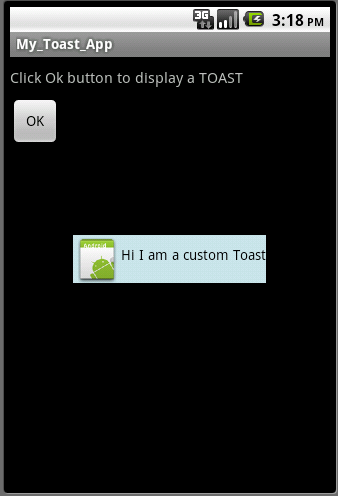
As you can notice in the above code, we have first retrieved the LayoutInflater from getLayoutInflater() method. Then inflate the layout xml using inflate(int,ViewGroup) method,where second parameter is the root view. Here instead of makeText method we are making using of setView(View) to create the Toast. If you do not have a custom layout to create your toast message then use of makeText method is a must.
The above code creates your toast message as below.
This is how you can create a simple and customized Toast messages in android. If you have any queries, please post it in comment section.
 Cache Abstraction In Spring (Example for @Cacheable and @CacheEvict)