JavaBeat

  • Home
  • Java
    • Java 7
    • Java 8
    • Java EE
    • Servlets
  • Spring Framework
    • Spring Tutorials
    • Spring 4 Tutorials
    • Spring Boot
  • JSF Tutorials
  • Most Popular
    • Binary Search Tree Traversal
    • Spring Batch Tutorial
    • AngularJS + Spring MVC
    • Spring Data JPA Tutorial
    • Packaging and Deploying Node.js
  • About Us
    • Join Us (JBC)
  • Privacy
  • Contact Us

Grails MVC Tutorial

June 24, 2014 by Mohmmad Amr Leave a Comment

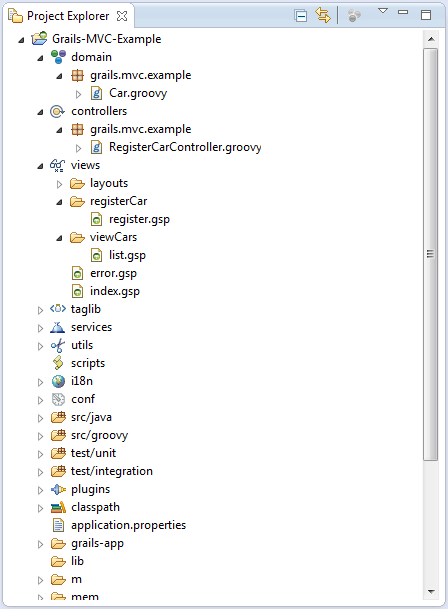
Grails is an MVC platform that’s used for developing MVC applications. Grails has supported the MVC architecture inherently. This tutorial walk you through the simple example for writing the Grails application using its MVC design pattern. It is for providing you detailed steps for making an MVC applications using the Grails and its GGTS suite that is already installed and configured in our previous tutorial.

We assume that you’ve the setup of Grails platform and GGTS suite installed and configured properly into your environment for writing the Grails MVC example as explained in this tutorial.

also read:

  • Introduction to Grails
  • Introduction to Groovey / Grails Suite
  • What is GVM?
  • Introduction to Groovy Language

1. Grails MVC

This section explains the architecture and different components used in the Grails MVC application. If you look at the below picture, it shows the request flow on a Grails MVC application.

Grails MVC Architecure

  • Model: Model is a Java object which stores the data that can be used by the controllers and views. Technically, controllers might create a model or may be just process them in some sort of normal operations. Grails provides you a binded mechanism that help you references your model from the grails UI components like g:each.
  • Controller: It is a servlet which handles all the request from the front end. In general, Grails servlet extends Spring’s DispatcherServlet to bootstrap the Grails environment (SimpleGrailsController) for handling the requests. SimpleGrailsController delegates to a class called SimpleGrailsControllerHelper that actually handles the request.
  • View: groovy server pages is responsible for rendering the models. Grails uses GroovyPagesTemplateEngine for rendering of GSP views as those views support the concept of custom tag libraries. You can access the g tags directly within your GSP without any need of importing it. A lot of ready-made tags are provided for your use. Grails g library provides you ability of accessing data binded and domain class associations.

This tutorial will provide you a simple example of how could we make a simple Grails MVC application.

  1. Create domain class.
  2. Create Grails controller.
  3. Create views.
  4. Bind your models to use from your views.
  5. Handling different ways of navigation including use of default action and g:link tag.

The project structure for this tutorial would look like this:

Gails - MVC - Project Directory

2. Create Grails Model

This section of tutorial will help you creating a Car model, let’s getting started with the required steps for doing that.

  • Open your GGTS (Grails Suite) and open your created Grails project.
  • Right click on the domain category and select new->domain class.
  • Inside Grails command wizard, type the name of the domain class you want to create. For our example we’ve typed Car and click finish.
  • You would see a fragment of code like static constraints = {} which added by the Grails in your model.
  • Grails provides an inline validation in the model. Grails domain class can express domain constraints simply by defining a public static property constraints that has a closure as a value. This level is what’s you need, further will be discussed in the next coming tutorials.
  • Define your Car class like any normal Plain Old Groovy Object (POGO), following below Car POGO that conform with the Groovy Beans convention.
  • Groovy also supports building relationships between different classes inside your domain. Relations like Inheritance, associations or aggregations also supported by the Groovy.

Car.groovy

[code lang=”java”]
package grails.mvc.example

class Car {
String carName
String carBrand
String productionCountry
String productionYear
}
[/code]

3. Create Grails Controller

This section provides you the steps required for creating a controller component. The main job of the controller is manipulating the data received from the client and decide whether to delegate the request to another controller, output directly into browser or delegating the request into another view populated with the required models.

Following below the steps required for creating a new controller:

  • Within your Grails project, make sure you are choosing the controller category initially.
  • Right click there and select new -> controller.
  • From within Grails command wizard, type the name of the controller you want to be created.
  • For our example we’ve typed RegisterCarController. A proper name for your controller must be ended with the controller phrase, that would help Grails to discover the controllers conventionally.
  • Click finish results in two files to be created, your controller and its unit test.
  • By default, an index action will be defined there.
  • For defining an action, you need to use def <<actionName>>{} construct.
  • Defining controller properties doesn’t differ from those normally defined inside Groovy beans.

Controller defined below contains custom defined properties as well as those required actions:

RegisterCarController.groovy

[code lang=”java”]
package grails.mvc.example

class RegisterCarController {
ArrayList&lt;Car&gt; carList = new ArrayList&lt;Car&gt;();
// Scope static variable used for specifying the scope of the controller
static scope ="session"
// Specify the default action of the RegisterCarController
static defaultAction = "initialize"

def initialize (){
// Default action will lead us into register view
render view:"/registerCar/register";
}

def registerAgain(){
// register again action will lead us into register view
render view:"/registerCar/register";
}

def register() {
// Create new instance of car
Car car = new Car()
// Populate the car instance with those corresponding matched request parameters
car.properties = params
try {
// Add car into list of cars
carList.add(car)
}
catch(Exception e){
// Debug the exception thrown
log.debug("Exception Occured ::", e)
}
// Render the next view
render view:"/viewCars/list",model:[cars:carList]
}
}
[/code]

Some important points should be noticed right now:

  • RegisterCarController has defined a list of car objects.
  • Grails MVC defines scopes for the controllers, scopes are hash-like objects the used for storing variables. Session, request, params, flash and ServletContext are all of scopes that you may use for your controllers.
  • Static variable scope is that variable used for determining the scope you used for your controller, as you’ve seen in the RegisterCarController, session was used as a scope.
  • Default action can be defined as following: using static defaultAction variable as we’ve did in the RegisterCarController, define an index action and provides no additional actions at the same time or by providing the only one action within your controller.
  • Default action has invoked by the Grails platform when specifies no action in the requested URI as it’s happened in the main page RegisterCarController under available controllers section.
  • Initialize action doesn’t provide any kind of data manipulation, but it delegates the control into register view.
  • RegisterAnother action doesn’t provide any kind of data manipulation, but it delegates the control into register view.
  • Register action does the targeted data manipulation we want, it’s used implicit object params for gathering the request parameters from the submitted form. An implicit conversion has been done by the Grails itself, when assigning params into car.properties, every single property inside car does take its value from the identical parameter. Name of property used for achieve the identification required.
  • Register action uses render phrase for determining the next view and optionally bind the list of cars into cars to be used later in the next view.
  • Grails provide you the ability to use the implicit log object for logging your messages. So, no need for defining the log object to be used. More about logging in future.

4. Create Grails Views

Grails consider the Groovy Server Pages (GSP) as a view technology; GSP is HTML-based with special Tag libraries technology. It’s just like JavaServer Pages (JSP) with major advantage of being Grails tags development process.

Grails suite, provides you the ability of creating views. In our example, you will be creating two views, register and list views are developed for registering a new cars while the latter for viewing them.

Let’s first creating the registration view by following the below steps:

  • From within your Grails project, make sure you’re selecting the views category.
  • Right click and create a folder with name registerCar. (That’s will help us leveraging the determination of controller conventionally as Grails had promised)
  • Into registerCar folder, create a new groovy server page with name register.gsp.

Below the form of the view that would help us registering a new cars:

register.gsp

[code lang=”xml”]
&lt;%@ page contentType="text/html;charset=UTF-8" %&gt;
&lt;html&gt;
&lt;head&gt;
&lt;meta http-equiv="Content-Type" content="text/html; charset=ISO-8859-1"/&gt;
&lt;meta name="layout" content="main"/&gt;
&lt;title&gt;Car Registration&lt;/title&gt;
&lt;/head&gt;
&lt;body&gt;
&lt;div class="body"&gt;
&lt;g:form action="register"&gt;
&lt;table&gt;
&lt;tr&gt;&lt;td&gt;Car Name:&lt;/td&gt;&lt;td&gt;&lt;input id="carName" name="carName" type="text"/&gt;&lt;/td&gt;&lt;/tr&gt;
&lt;tr&gt;&lt;td&gt;Car Brand:&lt;/td&gt;&lt;td&gt;&lt;input id="carBrand" name="carBrand" type="text"/&gt;&lt;/td&gt;&lt;/tr&gt;
&lt;tr&gt;&lt;td&gt;Car Production Country:&lt;/td&gt;&lt;td&gt;&lt;input id="productionCountry" name="productionCountry" type="text"/&gt;&lt;/td&gt;&lt;/tr&gt;
&lt;tr&gt;&lt;td&gt;Car Production Year:&lt;/td&gt;&lt;td&gt;&lt;input id="productionYear" name="productionYear" type="text"/&gt;&lt;/td&gt;&lt;/tr&gt;
&lt;tr&gt;&lt;td colspan="2"&gt;&lt;input value="Register" type="submit"/&gt;&lt;/td&gt;&lt;/tr&gt;
&lt;/table&gt;

&lt;/g:form&gt;
&lt;/div&gt;
&lt;/body&gt;
&lt;/html&gt;
[/code]

Some important tips should be mentioned here:

  • Grails provide you the g Tag library to be used within your Groovy server pages GSP. It’s so integral with the groovy server pages as well as it’s so customizable.
  • We’ve created a submission form by using g:form that will submit to a controller. Grails form component provides you additional attributes like action, controller, params, mapping and others beside the all HTML attributes.
  • In case you’ve eliminated the controller attribute from the form tag, the Grails will consider your GSP directory structure for considering the controller that’s responsible handling the form submission. Your GSP located under registerCar directory as it’s appeared in the directory structure above, so that it will convent your controller name by adding the controller phrase as a suffix into your directory structure that will lead us into registerCarController.
  • We’ve provided list of inputs for gathering the all required data that needed for creating a car object. Those form properties have the same name as those properties defined in the car class. Like that naming would help us leveraging the params implicit object.
  • Input of type submit will help us submitting the form.

Using the same steps above you can create the view of list cars. Follow the below form:

list.gsp

[code lang=”xml”]
&lt;%@ page contentType="text/html;charset=UTF-8"%&gt;
&lt;html&gt;
&lt;head&gt;
&lt;meta http-equiv="Content-Type" content="text/html; charset=ISO-8859-1" /&gt;
&lt;meta name="layout" content="main" /&gt;
&lt;title&gt;List Cars&lt;/title&gt;
&lt;/head&gt;
&lt;body&gt;
&lt;div class="body"&gt;
&lt;table&gt;
&lt;tr&gt;
&lt;th&gt;Car Name&lt;/th&gt;
&lt;th&gt;Car Brand&lt;/th&gt;
&lt;th&gt;Car Production Country&lt;/th&gt;
&lt;th&gt;Car Production Year&lt;/th&gt;
&lt;/tr&gt;
&lt;g:each var="car" in="${cars}"&gt;
&lt;tr&gt;
&lt;td&gt;
${car.carName}
&lt;/td&gt;
&lt;td&gt;
${car.carBrand}
&lt;/td&gt;
&lt;td&gt;
${car.productionCountry}
&lt;/td&gt;
&lt;td&gt;
${car.productionYear}
&lt;/td&gt;
&lt;/tr&gt;
&lt;/g:each&gt;
&lt;/table&gt;
&lt;/div&gt;
&lt;g:link controller="registerCar" action="registerAgain"&gt;Register Again&lt;/g:link&gt;
&lt;/body&gt;
&lt;/html&gt;
[/code]

Here is the detailed explanation for the code above:

  • We’ve used g:each Tag for iterating over the ${cars} binded variable that already returned by the register action.
  • We’ve used the g:link for navigating into registration view again, g:link provides you the ability defining what’s the controller you want to invoke and which the action would you execute. By clicking on the registerAgain link, register view will be shown.

5. Grails MVC Demo

For running the application, follow the below steps:

  • Right click on your project.
  • Select Run As.
  • Select Grails command (run-app).
  • Wait a while until you project started.
  • The link will be listed inside the console. Just click on.

Grails - MVC - Main Page

  • Click on your controller listed above. The controller has provided the default action initialize that will be used in the main page.
  • Initialize action has been executed and it will delegate the control of the application into register view.

Grails - MVC - Register View

  • One action provided for you, Register will invoke the RegisterCarController – register action based on the convention over configuration principle.
  • Register action will has created a new Car and adding it into Cars List.
  • Finally, the view would be selected using the reserved render phrase that’s also populate the needed model that will be used for the next view.

Grails - MVC - List View

  • You have the ability to register another cars by clicking on the Register Again.
  • Register Again action has been developed using the g:link grails component Tag. registerAgain action will be executed that will lead us into the register view again.

6. Summary

MVC architecture is the most often architecure used these days for developing the web applications. This tutorial tend to provide you the full detailed explanation of how could MVC sample be achieved using the Grails Platform. You can contributing us by leaving your comments, questions or suggestions right below.


Filed Under: Grails Tagged With: Grails, Grails GGTS

Introduction to Groovy / Grails Tool Suite (GGTS)

June 19, 2014 by Mohmmad Amr Leave a Comment

In our previous tutorial, we’ve discussed about basics of Grails platform and we presented the all required steps that help you building a Grails application using its console with grails commands. The programming of Grails has been so easy, it’s just set of commands that you may need to execute for gaining a full-featured application. When the huge amount of resources has to be managed, then it becomes much hard and needs some sort of organization or  handling of  tasks such as debugging, profiling and sensitive editing becomes real needs.

  • What is GVM?

also read:

  • Introduction to Groovy
  • WHat is GVM?
  • Templates in Groovy

– See more at: https://javabeat.net/grails/#sthash.iS2Ao0sA.dpuf

also read:

  • Introduction to Groovy
  • WHat is GVM?
  • Templates in Groovy

– See more at: https://javabeat.net/grails/#sthash.iS2Ao0sA.dpuf

also read:

  • Introduction to Groovy
  • WHat is GVM?
  • Templates in Groovy

– See more at: https://javabeat.net/grails/#sthash.iS2Ao0sA.dpuf

also read:

  • Introduction to Groovy
  • WHat is GVM?
  • Templates in Groovy

– See more at: https://javabeat.net/grails/#sthash.iS2Ao0sA.dpuf

also read:

  • Introduction to Groovy
  • WHat is GVM?
  • Templates in Groovy

– See more at: https://javabeat.net/grails/#sthash.iS2Ao0sA.dpuf

Groovy / Grails Tool Suite (GGTS) provides the out of the box integration for the Grails application development. It’s STS based (Spring Tool Suite) that’s based on Eclipse. That suite is packaged with the Groovy-Eclipse plugin for syntax highlighting and auto completion of Groovy code, and robust support for Grails artifacts.

This tutorial has assumed that you’re already having Grails platform installed into your machine as well as the grails special command is working on the console.

1. Install Groovy/Grails Suite

Installing Groovy/Grails suite could be done through the following steps:

  • Make sure that you have installed the Grails platform into your machine. See Grails introduction that shows you the installation process.
  • Download Groovy/Grails Suite.
  • Start the installation of the executable file by double clicking on it.

Groovy / Grails Suite Installation

  • Click next and accept the listed terms and terms.

Groovy / Grails Suite Installation Terms

  • Click next and choose the installation path. For our installation we’ve used D:\Grails\sprinsource.

Groovy / Grails Suite Installation Path

  • In case, you’ve not created that directory, you will be notifying about the directory that will be created. Then Click next.
  • Inside the packs window, just click next.
  • Inside the JDK window, browsing your installed JDK. We will use JDK 1.7 located at C:\Program Files\Java\jdk1.7.0_55. Click next.

Groovy / Grails Suite Installation JDK Selection

  • Wait a while for finishing the installation.

Groovy / Grails Suite Installation Finish

Suite - Installation - Step-6

  • Click next and setup shortcut and click next and finally finish for launching the suite.

Suite - Installation - Step-7

  • Setting up your workspace and click okay.

Groovy / Grails Suite Workspace

2. Create Grails Project

It’s time for creating a Grails project using suite installed. Follow the below steps for creating the project.

  • Right click into the Project Explorer scope and choose New.
  • From Wizard opened, expand the Grails node and choose Grails Project.
  • Type into the project name and configure Grails installation.

Grails - Create Project - Configure Grails Installation

  • For project name we’ve typed Grails-HelloWorldApplication.
  • Configure the Grails installation by clicking the link “Configure Grails Installation” and from the preferences add the Grails that installed in the Grails Introduction Tutorial.

Grails - Create Project - Edit Preferences Grails - Create Project - Add Installed Grails

  • Once you’ve reached into the below screen, just finish and you are about to getting a full-featured Grails project in your environment.

Grails - Create Project - Finish Creation

  • You may be asked for enabling the Grails view perspective, if you would like that, just accept by clicking yes.
  • Once you clicked Finish, the process of creation Grails project has been started, as you would see in the console of your Grails Suite.

Grails - Create Project - Console Messages

  • After you’ve noticed, it’s the time to return back into Project Explorer that should show your project structure.

Grails Project Structure

  • Your project is created but it’s not compiled for one reason that it’s required a modern Groovy compiler 2.3 while the compiler that’s used in your installed suite was 2.1.x and it’s very old.

3. Add Groovy Compiler & Configure Your Workspace

For installing the latest compiler that Groovy provided, you have to follow the below steps:

  • From the help menu select Install New Software.
  • Type http://dist.springsource.org/snapshot/GRECLIPSE/e4.3/ into Work with input.

Grails - Compiler Installation

  • Select Extra Groovy Compilers and Groovy-Eclipse. Click next and finish. Wait for installation to be finished.

Grails - Compiler Installation Is Processing

  • Configure Workspace settings by clicking into the project created. Select properties and from Groovy compiler pane, press hyperlinked Configure Workspace Settings.

Grails - Configure Workspace Settings

  • From Compiler window press Select to 2.3 .3.xx-2014~.

Grails - Configure Workspace Settings - Select the required compiler

  • Once you’ve switched into 2.3.3~ the suite would ask you for restarting, so just press yes.
  • Once the suite opened, select clean from the Project menu for cleaning the whole workspace and build it from scratch. That’s good for you to know if there are problems in your created project or not.
  • Your project should be compiled successfully and no issues should be reported.

Grails - Building Application

4. Running The Application

  • Without adding any snippet of code, your Grails project should work seamlessly as it works in your first project that you’ve created at the introduction tutorial.
  • For running the application, you have to right click into your project and select Run As and select Grails command (run-app). Wait for a while to see the console has activated and it’s  running your application.

Grails - Running Application Console

  • Copy the link that listed above and paste it into your browser’s address.

Grails - Deploying Created Application

  • As you’ve noticed, all of the listed controllers are provided by default for dummy Testing that you might need.

5. Create Controller

It’s the time for creating a controller using Groovy / Grails Suite. The process of controller creation is very simple by using the suite; the suite provide you a simple wizard for that. Follow the below steps for controller creation:

  • Open your project and point at controllers.
  • Right click and select New – Controller.
  • Type HelloWorldController inside the name tesx box.
  • Click on Finish button.
  • Wait while the suite has started creating the controller you want as you can note in the suite console.

Grails - Create Controller Using Suite

  • Once the creation process finished, the controller will be displayed into your Workspace.
  • Two files has been created as you’ve seen, one of them is the controller itself, while the other is just for your Test. (We’ll take a look at how could we doing a Unit Test in the another tutorial).

Grails - Controller Created

  • As we’ve did in the introduction tutorial, like that controller contains one method called index as it could lead us for index.gsp view.

Let’s create the view and run the application to see.

6. Create View

As you’ve created controller via suite, the creation of view also can be through using wizard. Follow the below steps for creating your first view.

  • Open the views directory inside your project.
  • Point at helloworld package.
  • Right click and select New – Groovy Server Pages (GSP).
  • Type index as a name.
  • Click finish.

Grails - View Created

  • Write down your Welcome Message using HTML Tags.

Grails - Welcome Message

  • From the Project menu – Clean.
  • Right click on the project, Run As – Grails Command (run-app).
  • Wait in the console until it provides you the application URL.
  • The console prints out the required URL and is http://localhost:8080/Grails-HelloWorldApplication. Click on it for seeing your Grails main page.
  • You should find out your controllers listed within the available controllers.

Grails - List of Controllers

  • Click on your HelloWorldController.

Grails - Your Application View

7. Summary

This tutorial is detailed one for how could you leverage Grails platform to be used through one of the most standardized IDE. Also, you will be able of define all what you want from Grails resources like controllers, views and others. If you have any questions, please write it in the comments section.

Filed Under: Grails Tagged With: GGTS, Groovy / Grails Tool Suite, Groovy Programming

Introduction to Grails

June 17, 2014 by Mohmmad Amr Leave a Comment

Grails is an open source platform that uses Groovy for developing Java Enterprise Applications, it’s used for handling everything from the view layer down into your persistence layer. Grails has leveraged the most popular open source technologies by adopting them in its platform inherently, Hibernate, Spring, SiteMesh, Tomcat, and H2. All of these frameworks, platforms and database engine are built inside the Grails platform without any need of doing additional configuration steps. This tutorial walks you through the writing simple hello world program using the Grails framework.

also read:

  • Introduction to Groovy
  • WHat is GVM?
  • Templates in Groovy

Grails introducing another layer of abstraction via Groovy language, you will not  be aware of all of these mentioned technologies, when it comes to deal with Grails platform, but you will have basic touch of those technologies. Look at the below picture to know the architecture of Grails stack.

Grails - Platform Demonstration

As you’ve seen, Grails isn’t a web framework, is a full featured environment presented for helping all Java Developers, taking the full advantage of Java and JVM and at the same time working with dynamic, popular and flexible language like Groovy.

No other dynamic language on the JVM integrates with the Java like Groovy, it’s designed to work seamlessly with Java at every level, starting from the syntax reaching into other similarities that can be summarized as follow:

  • The Groovy grammar is derived from the Java 5 grammar, making most valid Java code also valid Groovy code.
  • Groovy objects are Java objects, it is one of the great advantage.
  • Through Groovy’s joint compiler you can have circular references between Groovy and Java without getting issues while compilation.

Grails platform has firstly initiated at July 2005, where the final stable release was 2.4.0 which released at May 2014. Because of its robustness and maturity of Grails platform, many popular sites have adopted it such as LinkedIn, Atlassian,Sky, eHarmony and others. This tutorial intended to introduce you the Grails platform and stepping you into getting Grails installed and making a HelloWorld application.

1. Grails Installation

By following the below steps you will be able to installing the Grails platform into your machine.

  • Download JDK 1.6+ and configure the JAVA_HOME.

Define JAVA_HOME Variable

  • Configure PATH system variable for containing the value of JAVA_HOME\bin. That’s making the Java compiler and interpreter accessible from anywhere into your machine.
  • Make sure that you are able to execute the java on the command line.

Java Command Result

  • Download Grails platform.
  • Unzip the Grails platform into your machine’s directory. We’ve unzipped into D:\Grails\grails-2.4.0.
  • Configure your PATH system variables for the Grails.

Add Grails Into Your PATH

  • Make sure that grails command is recognized by the command console by opening a new command console and type grails and press enter. Grails will be opened in an interactive mode as you would see below. In case you’ve provided grails -version you would see a direct response. One big advantage for the interactive mode is that the Tab Completion.

Grails Interactive Mode

  • In case you would be asking help about any of the Grails commands, just type the grails followed with the help instruction plus your inquired command like grails help create-app.

Grails Help

2. Creating the Grails Hello World Application

For creating your own first Grails application, which will include a simple controller that would use the render scriptlet for providing a message for the browser, you have to follow the below steps.

  • It’s easy step, and for it’s the first step you must go through at every time you want creating a Grails application.
  • Either you’re using the Grails interactive mode or the default mode you have to type grails create-app <<application-name>> or you could use grails create-app and the Grails platform would prompt you asking about the name of the application.
  • Regardless of the used way, your windows console should look like

Grails - Create HelloWorldApplication Using create-app Command

Upon completion, the command have created your Grails application and the necessary directory structure. You can see the mentioned structure by executing tree command.

Tree Directory Structure

As you’ve seen the directories have created by the Grails. The same folder structures will be used for the next coming tutorials. But it’s noticed that Grails application contains directories for controllers, domain objects (models) and views where all of those are located beneath the grails-app folder.

3. Creating Controller

  • Grails is an excellent MVC platform, which means it has models, views and controllers for implementing the Separate of Concern (SoC) concept.
  • Controllers, are those components in the MVC architecture that responsible for manipulating the data that received from the view and determining the next view that should be rendered.
  • For creating controllers within Grails, you have simple command create-controller, which will do creation easily. This command isn’t mandatory as in the next coming tutorials, I will explain how to define and create the controllers through IDE like Eclipse.
  • Type grails create-controller HelloWorldController into your command console, and make sure that you’re beneath the Grails application that you’ve created.

Grails - Create Controller

    • If you’ve missed your Grails application and continue creating your controller, you will get an error tells you You aren’t inside Grails Application.

Grails - Create Controller - Error

    • Once the create-controller command has finished running, Grails will have created two classes for you; a new controller called HelloWorldController within grails-app/controllers directory and an associated test case in the test/unit directory (Grails assumes you’ll need a test if you’re writing a controller). Already Grails defaulted you the created controller within helloworldapplication package, since you’ve not specified the package name parameter while creating.

It’s good for you to know that dynamic language like Groovy doesn’t provide you as much compile-time sensation as typed language like Java. Some errors that you might expect to be caught at compile time are actually left to runtime. For that purpose, Grails provides you a Test Unit file listed above.

4. Grails Project Structure

Now, it’s the time for seeing the whole structure of the Grails application.

Grails - Application Structure

  • Customizing Controller Response: Since the controller HelloWorldController.groovy was created by Grails platform, it was contained the default single action called index.

HelloWorldController.groovy

[code lang=”java”]
package helloworldapplication

class HelloWorldController {

def index() {
}
}
[/code]

By the convention, index declaration instructs Grails to try render a view called grails-app/views/helloWorld/index.gsp automatically. Even, the controller looking for index.gsp but you can customize the controller for custom display. Open the controller and type into render ‘JavaBeat ! Hello World !’ inside the braces of index method like below:

HelloWorldController.groovy

[code lang=”java”]
package helloworldapplication

class HelloWorldController {

def index() {
render ‘JavaBeat ! Hello World !’
}
}

[/code]

Now, it’s time for getting the application running.

5. Run Grails Application

To run the application using Grails, command like run-app will make things easy. Make sure you’re locating at the root folder of the application (i.e. HelloWorldApplication) and execute run-app command. Wait for some time, Grails platform for providing you the URL for accessing your deployed application like below.

Grails - Running Application

Copy the url mentioned above and paste it into your browser’s address. After pasting that URL, you should see the Grails main page which gives you an indicator of successful deployment.

Grails - Main Page

As well as, if you’re looking into the available controllers you should find your created controller HelloWorldController listed above. Just, press into your controller to see the custom response that was developed using the render scriptlet.

Grails - HelloWorld View

Now, what should happened if we’ve left the index method blanked and at the same time we develop a new Groovy Server Page index.gsp.

index.gsp

[code lang=”xml”]
<!DOCTYPE html>
<html>
<head>
<meta name="layout" content="main"/>
<title>Welcome to Grails</title>
</head>
<body>
JavaBeat ! Hello World !
</body>
</html>
[/code]

  • For stopping the Grails server, just type stop-app from the same location that you’ve initiated the run-app.
  • Make sure that you are created the Groovy Server Page (index.gsp) and it’s located under grails-app/views/helloWorld.
  • Run the application again to see different view like below.

Grails - Hello World Groovy Server Page View

6. Summary

Grails is a platform created for developing Java EE applications in an easy manner. Grails depends on the Dynamic language like Groovy which is considered as a JVM language with less restrictions in comparison to Java. This tutorial intended for providing you a clear informative about Grails platform and guiding you through steps for creating your own first Grails application. Feel free to contribute us by commenting below.

Filed Under: Grails Tagged With: JVM Languages

Grails 1.1 Web Application Development

October 6, 2009 by Krishna Srinivasan Leave a Comment

Grails 1.1 Web Application Development

The expectations of our users are increasing, and rightly so. The Internet is no longer the
playground of geeks and nerds. Businesses use it to communicate with and support their
customers; families use it to keep in touch while whole communities share their
experiences with like-minded people. The democratization of the Internet has brought a
new wave of software into the lives of people who would otherwise rarely use computers.
The most successful of the new generation of web applications have not been written for
the expert user, but for the casual user, focusing on ease of use. Web application
development frameworks that focus on developer productivity have improved the ability
of developers to respond to the demands of their users. Simpler and more intuitive
frameworks have allowed the rapid development and refinement of new features.

Java web application development has something of a checkered history; simple isn’t it.
There may be more than one way to skin a cat, but there are almost infinite numbers of
ways to build a Java web application. The options that are available are mind-boggling.
Which database server to use? What about the application server? You also better choose
an MVC framework while you’re at it. Should you use a persistence framework, or hand
code SQL statements? If you use an ORM framework, which one is best? Don’t forget to
choose a logging library. How should the project be laid out? Once you’ve finished
making all these decisions, it’s time to start on the configuration to get all of these
disparate frameworks working together. Now, eventually you are ready to start coding!
No wonder the latest and greatest web applications are built in PHP and Ruby on Rails.

Java still has a lot to offer. It is faster than most other languages that are used for web
application development. It is an extremely mature platform, with lots of high quality
libraries available. Moreover, its static, strong typing gives you less rope to hang yourself
with. However, Java developers need to find technologies that deal with the common
activities of web development. Sometimes we need a few choices taken away to help us
focus on the problem at hand, creating great software that provides value to our users at
less cost to the people paying the bills.

Grails does just this. It removes the need for reams of configuration through a
convention-based approach that constrains developers in a healthy way. The decisions
concerning project layout and which frameworks to use are removed. This leaves the
developers free to use their creative talents for producing great software, rather than
tweaking configuration files.

Throughout this book, you will learn how to build a web application using Grails and a
number of key plug-ins. You will see that it is possible to achieve a great deal with very
little code. Who knows, you may even rediscover your passion for web development on
the Java platform!

What This Book Covers

Chapter 1 presents a short state of the nation of Java web development and makes the
case for a framework like Grails. At the end of the chapter, we will install and create a
Grails project.

Chapter 2 covers the use of Grails scaffolding to generate some simple pages to manage
users and roles for our application.

Chapter 3 shows how to post messages, where we write the first basic functionality for
the application by allowing users to post messages that can be shared with other users.
This chapter introduces a number of basic concepts for Grails development including:
controllers, validation, Groovy Server Pages (GSP), and Grails Object-Relational
Mapping (GORM).

Chapter 4 covers an introduction to Groovy. Here we take a short break from the Grails
framework to get a better understanding of the Groovy programming language. We will
cover just enough of the language to be able to proceed through the rest of the book.

Chapter 5 shows how to use our first external plug-in to add authentication and
authorization to the application.

Chapter 6 covers testing, where we introduce the different levels of automated testing
that are available in the Grails framework. We see how to write, unit tests with new
support for testing in Grails 1.1. We also cover integration tests, and install a functional
testing plug-in.

Chapter 7 covers file sharing, where we allow users to share files through the application
by introducing file uploads.

Chapter 8 covers some advanced querying techniques, using Hibernate criteria support in
GORM, to implement file version history.

Chapter 9 introduces Grails services in more depth. We see how to extract logic from our
controllers into services to keep the application maintainable.

Chapter 10 introduces more advanced GORM techniques, such as: persisting inheritance
and performing polymorphic queries to enable tagging. We also delve into GSP a bit
more by using templates to encapsulate view components.

Chapter 11 covers AJAX and RIA Frameworks—Where we improve the user experience
with AJAX to allow users to edit tags in-line and use the RichUI plug-in to create tag
clouds and perform auto suggestion when editing tags.

Chapter 12 shows us how to use the Searchable plug-in to add a search feature to our site
in a matter of minutes. We also provide an RSS feed and a REST based API for
managing messages.

Chapter 13 show us how to build our own plug-in, where we follow the example of the
Grails plug-in community and extract our tagging code into a plug-in that we can use on
future projects.

Chapter 14 shows how to package and deploy the application to a production ready for
use in a production environment. We then discuss some next steps that may be worth
investigating to handle real world situations.

Managing Content through Tagging

Over the last few chapters, we added the ability for our users to upload and share files
with their teammates. As with messages, files are displayed on the home page in the
order they are added to the system. Currently all messages and files are displayed
on the home page. Over time, our home page is going to become rather large and
unwieldy. We need a user’s home page to show only the files and messages that they
are interested in. To do this, users need to be able to tag their content.

We will implement a simple tagging solution, restructure the home page and then
add some new pages to the application for viewing all of the messages and files.

The new Grails concepts that will be introduced in this chapter are:

  • Working with inheritance in the domain classes, and looking at which
    strategies GORM supports for persistence
  • Using polymorphic queries over a domain inheritance hierarchy
  • Encapsulating view-rendering logic in GSP templates
  • Manipulating collections with the Groovy collect and sort methods

Add basic tagging

Tagging is a loose, community-based way of categorizing content. It allows a
group of people to categorize by consensus. Anyone is able to tag a piece of
content. The more a tag is used, the more meaning it takes on and the more widely
used it becomes. This categorization by consensus has been dubbed as folksonomy
(http://en.wikipedia.org/wiki/Folksonomy) in recent times.

So let’s get started by building our tagging support.

Tagging domain model

When implementing tagging in our system, we need to consider the following:

  • We must be able to have many tags in our system
  • We must be able to associate a single tag with many different files
    and messages
  • We need to make sure that new domain objects can be easily tagged without
    having to change the tagging logic
  • We want to know when a domain object was tagged

To satisfy these requirements, we need to create the following new domain classes:

  • Tag—to store the name of the tag. There is one instance of this class per
    unique tag name in the application.
  • Tagger—to store the relationship from domain objects to a tag. This allows
    us to store the date a tag was added to a domain object.

Let’s create these domain classes and then write a test to prove that we can tag a
message using this tagging structure.

The Tag class

We are going to separate the tagging classes out from our application domain classes.
Create a folder under grails-app/domain called tagging. This is where we will put
the domain model to implement tagging.

Our Tag class is extremely simple and holds only a name property:


	package tagging
	class Tag {
		String name
		static constrains = {
			name( blank: false )
		}
	}

The Tagger class

The next class that we are going to create is the Tagger class. In relational terms,
this object represents a link table between a Tag and any other domain class. It is
important that the relationship between tagged domain classes and the Tagger
relationship class is unidirectional. By this, we mean the domain classes are allowed
to know that they can be tagged, but tags do not know which domain classes can be
tagged, otherwise every tagged domain class would need a special relationship class.

Create the Tagger class as a domain class in the tagging package as follows:


	package tagging
	class Tagger {
		Tag tag
		static constraints = {
			tag( nullable: false )
		}
	}

The basics of our tagging model are complete! We now need some logic to allow
tags to be created. Create a new service class called TagService under grails-app/
services/tagging, as shown below:


	package tagging
		class TagService {
			boolean transactional = true
			def createTagRelationships(String spaceDelimitedTags) {
				return spaceDelimitedTags?.split(' ')?.collect { tagName ->
					createTagRelationship( tagName )
				}
			}
			def createTagRelationship(String tagName) {
				def tag = Tag.findByName(tagName)?:
				new Tag(name: tagName).save()
				return new Tagger( tag: tag )
			}

This service provides two utility methods to create new relationships by tag name
or by a space delimited string of tag names. The important behavior of these two
methods is that they do not allow duplicate tags to be created in the application. If a
tag name already exists, the tag will be retrieved from the database and used as the
tag in the relationship.

Notice that the createTagRelationships method is using the collect method
to simplify what would normally take a few more lines of code to achieve. We did
briefl y cover the collect method back in our introduction to Groovy in Chapter 4,
but to reiterate: the collect method is dynamically added to any object that can be
iterated over. For example, collections, arrays, strings and so on. It takes a closure
as its argument and executes this closure for each item in the collection. The return
value from each execution of the closure is added to a new collection that the collect
method builds up and then returns once it has finished iterating the original collection.

In createTagRelationship, we are using another neat language feature of Groovy
called the “Elvis operator”. It is named so, as it looks like Elvis’ hair style. This is a
shorter version of the normal Java ternary operator. If the operand being checked
is true then the checked operand will be returned as the default, otherwise the
alternative operand will be used. So in our example:


	def tag = Tag.findByName(tagName) ?: new Tag(name: tagName).save()

If a tag can be found from the database then it is used, otherwise a new tag is created.

Tagging a message

The next step is to allow a message to be tagged. Write some integration tests to
make sure the relationships are working before using tagging in the application.

In the folder test/integration/app, create the file TaggableIntegrationTests.
groovy and add the following code:


	package app
	import tagging.Tag
	class TaggableIntegrationTest extends GroovyTestCase {
		User flancelot
		protected void setUp() {
			flancelot = User.findByUsername('flancelot')
			Tag.list().each { it.delete() }
			Message.list().each { it.delete() }
		}
	}

The code above sets up the test data needed to create messages and associate tags to
messages. Remember that the flancelot user already exists because it was created by
the BootStrap class.

The first test will determine that we can add tags to a message and then retrieve
messages by tag. Add the following test method to your test class:


	void testCanRetrieveMessagesByTags() {
		Message message = new Message(user: flancelot, title: 'tagged',
			detail: "I've been tagged.").save(flush: true)
		Message secondMessage = new Message(user: flancelot,
			title: 'other tagged',
			detail: "I've been tagged.").save(flush: true)
		message.addTag('urgent')
		message.addTag('late')
		secondMessage.addTag('urgent')
		def taggedMessages = Message.withTag( 'urgent' )
		assertEquals(2, taggedMessages.size())
		assertEquals(2, Tag.list().size())
		def secondMessages = Message.withTag( 'late' )
		assertEquals(1, secondMessages.size())
		assertEquals(2, Tag.list().size())
	}

The test above does the following:

  • Creates two new messages
  • Adds the urgent tag to both messages
  • Adds the late tag to one message
  • Checks if we can retrieve both messages by using the urgent tag
  • Checks if only one message is returned for the late tag

Notice that the highlighted lines of code have not been implemented yet. To allow
this test to pass, we need to add the following methods to the Message domain class:

  • addTag—instance method to allow a message to be tagged
  • withTag— class method to retrieve all messages with a particular tag

Add the following method to the Message class (don’t forget to import
tagging.Tagger):


	def addTag(String tagName) {
		tags = (tags)?:[]
		tags << tagService.createTagRelationship( tagName )
	}

This method simply delegates the creation of the tag relationship off to the
TagService class, and then stores the relationship in the tags list.

Add the following method to the Message class that retrieves all messages with a
given tag name:


	def static withTag(String tagName) {
		return Message.withCriteria {
			tags {
				tag {
					eq('name', tagName )
				}
			}
		}
	}

This method must be static on the Message class, as it is used to load message
instances for a given tag. We do not want to have to instantiate a message before we
can perform the search.

Before running the test, you will notice both of these new methods assume that there
is a property on the Message class called tags. This has not yet been created. We
need to create a one-to-many relationship from Message to Tagger that will allow
messages to be tagged. We also need to inject the TagService into new instances of
the Message class so the work for creating a new tag relationship can be delegated.
Add the relationship to the Message class and inject TagService as shown below:


	class Message {
		def tagService
		static hasMany = [tags:Tagger]
		…
	}

Now we can run our tests by entering the following on the command line:


grails test-app

We should see some output in the command line similar to:


Running test app.TaggableTest...
			testCanRetrieveMessagesByTags...SUCCESS

Tagging a file

Now that we have implemented tagging for messages, we need to make tagging
available for files.

Currently the logic for creating and fetching tags is in the Message domain class. We
need to extract this logic so the File domain class can reuse it. It's time to look at
how GORM supports inheritance.

Pages: 1 2 3 4

Filed Under: Grails

Follow Us

  • Facebook
  • Pinterest

As a participant in the Amazon Services LLC Associates Program, this site may earn from qualifying purchases. We may also earn commissions on purchases from other retail websites.

JavaBeat

FEATURED TUTORIALS

Answered: Using Java to Convert Int to String

What is new in Java 6.0 Collections API?

The Java 6.0 Compiler API

Copyright © by JavaBeat · All rights reserved