This is a simple tutorial explaining how to set up your Web Application Project With Maven and then how it can be converted to the eclipse project. If you have earlier used ANT tool for building the Java projects, it is little difficult to understand the working method for the Maven at first. Maven is not just for the building, it is used for managing the dependencies used in our projects.
In the current scenario, almost every project is moved to the Maven style plugin. Spring Framework is not distributing the binaries to download from their website, they are recommending to use the Maven repositories to get the latest packages. It becomes important for everyone understand how to set up maven project.
1. Install Maven
As a first step, you have to install the Maven tool in your system and set all the environment variables. You can find simple tutorials on setting up maven tools and Ubuntu and Windows. I personally write this tutorial on Ubuntu environment, all my examples are mostly tested in the Ubuntu environment. If you have issues on setting up the environment, please post your questions on comments section.
2. Create Web Project Using Maven
Once you have installed the Maven, it is time to create web project using the console. This tutorial is based on creating the projects in console, not using the eclipse IDE. If you become familiar with this idea, it is very easy for to understand how Maven works. Follow these steps:
- Open the console and enter the command “mvn archetype:generate -DgroupId=javabeat.net -DartifactId=MavenTestWebProject -DarchetypeArtifactId=maven-archetype-webapp -DinteractiveMode=false”.
- DgroupId – This parameter specifying the package path
- DartifactId – This parameter specifies actual project name
- DarchetypeArtifactId – This parameter specifies the type of project. maven-archetype-webapp is a standard command for creating the web projects. If you want to create simple Java project, then use the parameter maven-archetype-quickstart.
- Note that you have the write permission for the current folder when executing the command.
- If you don’t have the proper right permission, you may get the error org.apache.maven.BuildFailureException: Error merging velocity templates. This error mostly occurs in the Linux environment. You have to change the write permission to 777 to make it work. Just execute the command sudo chmode 777 / in the current directory.
- You should see the console with BUILD SUCCESS message to confirm that set up is right.
You would see the below messages if the build is success.
krishna@krishna-desktop:~/workspace$ mvn archetype:generate -DgroupId=javabeat.net -DartifactId=MavenTestWebProject -DarchetypeArtifactId=maven-archetype-webapp -DinteractiveMode=false
[INFO] Scanning for projects...
[INFO]
[INFO] ------------------------------------------------------------------------
[INFO] Building Maven Stub Project (No POM) 1
[INFO] ------------------------------------------------------------------------
[INFO]
[INFO] >>> maven-archetype-plugin:2.2:generate (default-cli) @ standalone-pom >>>
[INFO]
[INFO] <<< maven-archetype-plugin:2.2:generate (default-cli) @ standalone-pom <<<
[INFO]
[INFO] --- maven-archetype-plugin:2.2:generate (default-cli) @ standalone-pom ---
[INFO] Generating project in Batch mode
[INFO] ----------------------------------------------------------------------------
[INFO] Using following parameters for creating project from Old (1.x) Archetype: maven-archetype-webapp:1.0
[INFO] ----------------------------------------------------------------------------
[INFO] Parameter: groupId, Value: javabeat.net
[INFO] Parameter: packageName, Value: javabeat.net
[INFO] Parameter: package, Value: javabeat.net
[INFO] Parameter: artifactId, Value: MavenTestWebProject
[INFO] Parameter: basedir, Value: /home/krishna/workspace
[INFO] Parameter: version, Value: 1.0-SNAPSHOT
[INFO] project created from Old (1.x) Archetype in dir: /home/krishna/workspace/MavenTestWebProject
[INFO] ------------------------------------------------------------------------
[INFO] BUILD SUCCESS
[INFO] ------------------------------------------------------------------------
[INFO] Total time: 28.279s
[INFO] Finished at: Sun Oct 13 07:56:57 IST 2013
[INFO] Final Memory: 9M/70M
[INFO] ------------------------------------------------------------------------
3. Migrate To Eclipse Project
The above steps are only for creating the project in Maven. But, most of the developers are using Eclipse IDE to maintain the Java projects. It is necessary to make the Maven project compatible to Eclipse IDE. It is easily accomplished by executing a command as follows:
mvn eclipse:eclipse -Dwtpversion=2.0
-Dwtpversion=2.0 is extra parameter to tell the Maven that it is a web project.
4. Project Structure in Maven
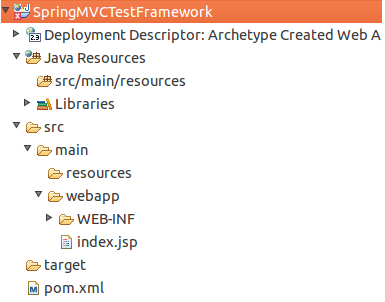
When you create Java projects in maven or want to work with Maven, the project structures has to be followed. Look at the figure below to know the typical project structure you would see once build is success.

5. POM.xml
pom.xml is the build script for the Maven enabled projects. For our example, initially created file would look like this:
<pre><project xmlns="http://maven.apache.org/POM/4.0.0" xmlns:xsi="http://www.w3.org/2001/XMLSchema-instance"
  xsi:schemaLocation="http://maven.apache.org/POM/4.0.0 http://maven.apache.org/maven-v4_0_0.xsd">
  <modelVersion>4.0.0</modelVersion>
  <groupId>javabeat.net</groupId>
  <artifactId>SpringMVCTestFramework</artifactId>
  <packaging>war</packaging>
  <version>1.0-SNAPSHOT</version>
  <name>SpringMVCTestFramework Maven Webapp</name>
  <url>http://maven.apache.org</url>
  <dependencies>
    <dependency>
      <groupId>junit</groupId>
      <artifactId>junit</artifactId>
      <version>3.8.1</version>
      <scope>test</scope>
    </dependency>
  </dependencies>
  <build>
    <finalName>SpringMVCTestFramework</finalName>
  </build>
</project>
It is done. You have successfully created the maven project in Eclipse. This tutorial explains only how to setup the project, not to run the projects. I would write few more articles about how to build and run the applications using Maven tools. Hope this article helped you to configure Maven in your system. If you have any questions, please write it in the comments section.

