
Chat and Instant Messaging
In the intranet website book.com of “Palm Tree Publications”, as an administrator, you are required to provide an environment for employees to enjoy chatting, instant messaging, mailing, and SMS text messaging with others. This chapter will introduce to us, how to enjoy instant messaging. Then, it will discuss how to manage emails. Finally, it will focus on SMS text messenger.
By the end of this chapter, you will have learnt how to:
- Add a participant for chatting.
- Manage (view and delete) participants in the chat portlet.
- Start chatting.
- Set up chat portlet.
- Manage (check, delete, forward, reply, search) mails.
- Set up mail portlet.
- Manage SMS text messenger portlet.
Working with Chat Portlet
In order to let employees enjoy chatting and instant messaging with others, we should use the Liferay Chat portlet. Let’s experience how to enjoy chatting and instant messaging first.
As an administrator of “Palm Tree Publications”, you need to create a Page called “Instant Messaging” under the Page, “Community”, at the Book Lovers Community
Adding a Participant
First of all, log in as “Palm Tree” and do the following:
- Add a Page called “Instant Messaging” under the Page, “Community” at the Book Lovers Community Public Pages, if the Page is not already present.
- Add the Chat portlet in the Page, “Instant Messaging” of the Book Lovers Community where you want to set up chatting and an instant messaging environment, if Chat portlet is not already present.
After adding the Chat portlet, you can view it as shown in the following figure.
 Then, we need to add a participant in the Chat portlet. As an editor at the Editorial department, “Lotti Stein” wants to ping the manager, “David Berger”, online and further share some comments about Liferay books. Let’s do it as follows:
- Login as “Lotti Stein” first.
- Go to the Page, “Instant Messaging”, ” under the Page, “Community”, at the Book Lovers Community Public Pages.
- Click on the Add icon.
- Input a participant’s email address, such as “[email protected]”.
- Press the Enter key.
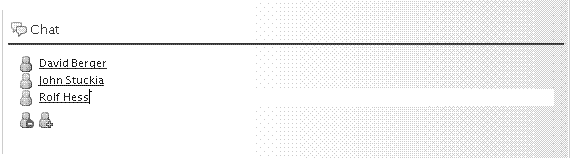
You will see the participant’s full name appear, such as “David Berger”. After adding more participants, such as “John Stuckia” and “Rolf Hess”, you can view all participants as shown in the following figure.

Managing Participants
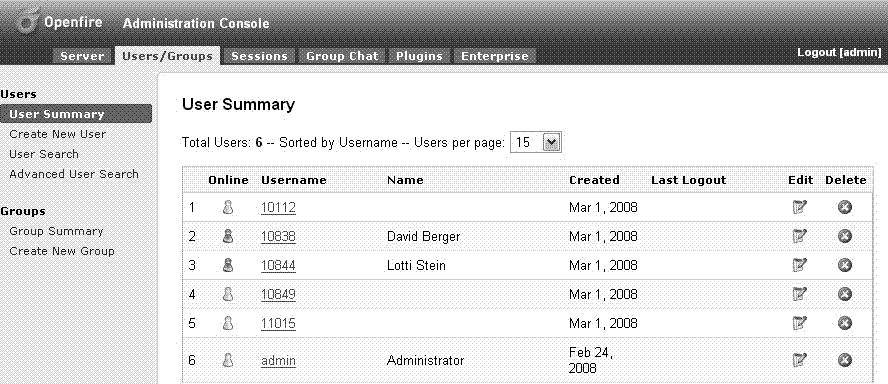
All the Users you’ve invited will appear as a list of participants. If the User “David Berger” is online ,then the icon to the left of the User name becomes light blue. Otherwise, it remains light gray; for example, User “John Stuckia”. As shown in the following figure, only two Users (“David Berger” and “Lotti Stein”) are online in the server. For details about OpenFire, refer to the forthcoming section.
 The participants are removable. For example, “Lotti Stein” wants to remove a participant “Rolf Hess”, from the list of participants. Let’s do it as follows:
- Locate the participant, such as “Rolf Hess”.
- Click on the icon to the left of the User name, such as “Rolf Hess”. You will see that the participant “Rolf Hess” is highlighted.
- Click the Remove icon. This participant will be removed from the list of participants.
In short, to remove a User from the list of participants, simply locate the User you want to remove by clicking on the icon to the left of the User name. Then, click the Remove icon. The selected User name will be removed from the list of participants.
Starting Chatting
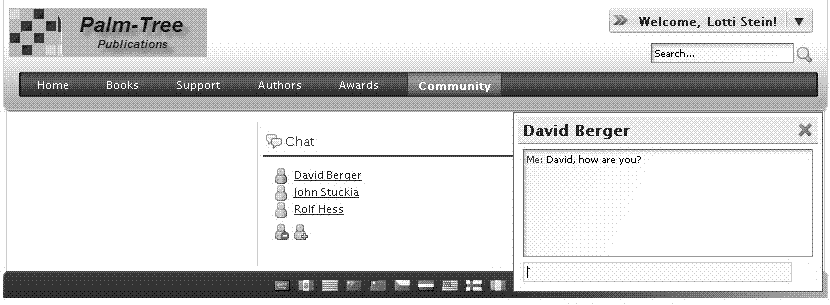
Irrespective of whether the participants are online or not, you can begin to Chat with them. For example, as an editor of editorial department, “Lotti Stein” wants to start chatting with the manager, “David Berger”. Let’s do it as follows:
- Locate the participant, “David Berger”.
- Click the User name, ,”David Berger”.
- A Chat box will appear.
- Input the message, “David, how are you?”
- Press the Enter key. Your messages will appear starting with the keyword, Me, in the message box (as shown in the following figure).
 As a manager of the editorial department, “David Berger” will have to do the following, to receive the messages from “Lotti Stein”:
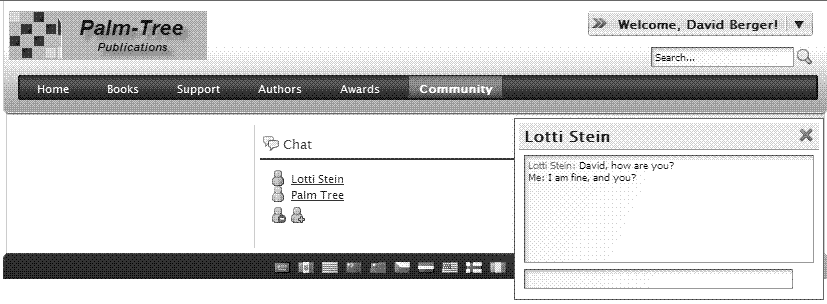
- Login as “David Berger” in new browser.
- Go to the Page, “Instant Messaging” under the Page, “Community” at the Book Lovers Community Public Pages.
- Locate the participant, “Lotti Stein”.
- Click the User name, “Lotti Stein”.
- 5. A chat box will appear with the messages from “Lotti Stein”.
- Input the message, “I am fi ne, and you?”
- Press the Enter key. Your messages will appear starting with the keyword “Me:” in the message box and the messages sent by the other User, Lotti Stein” here, will appear starting with the User’s name as shown in the following figure:
 Generally, to start chat, locate the User you want to chat with, by the User name first. Click on the User name link. A Chat box will appear. You can chat with many Users at the same time. To do this, just click on the Users’ name link. Each Chat box is only for one unique User.
The Chat box contains the User’s name on the upper left. You can close the current Chat box by clicking on the mark X to the upper right.
Note that the Chat box is hidden in your current Page initiatively. Whenever a new message comes from the User, you are chatting with, the Chat box will pop up with the new message and possible previous messages.
To send messages, simply input your messages in the message input box fi rst, and then press the Enter key. Your messages will appear starting with the keyword, Me, in the message box, and the messages sent by the other Users will appear starting
with their User names.
How Does It Work?
Liferay Chat portlet (AJAX Instant Messaging) allows Users to automatically chat over XMPP (Jabber) protocol with other Users. Instant Messaging lets members interact with other members in real time. A private room may exists for customers which could give them access to others.
Liferay Chat portlet integrates with a Jabber server, that is, OpenFire. This session will introduce Instant Messaging, AJAX, and Jabber (OpenFire).
OpenFire (previously known as Wildfire Server) is a real-time collaboration (RTC) server, adopted open protocol for instant messaging, XMPP (also called Jabber). URL: http://www.jivesoftware.com/products/openfire/.
Use Instant Messaging
Instant messaging (IM) acts as a form of real-time communication among Users, based on typed text. It allows easy collaboration. In contrast to email, the participants know whether the peer is available. Conversations by instant messaging can be saved for later reference.
One of the Instant Messaging protocols is Extensible Messaging and Presence Protocol (XMPP).
XMPP is an open, XML-inspired protocol for near-real-time, extensible instant messaging (IM) and presence information. It is the core protocol of the Jabber Instant Messaging and Presence technology. URL:http://www.xmpp.org/.
On the one hand, XMPP is based on open standards, different from other instant messaging protocols. Similar to email, XMPP is an open system where a User having a domain name and a suitable Internet connection can run a Jabber server, and talk to others on other servers.
On the other hand, another useful feature of the XMPP system is, transports, also called gateways. Through this, Users can access networks using other protocols. These protocols can be other instant messaging protocols, such as SMS or Email. The case is different from multi-protocol clients, as Users can access XMPP server at the server level. That is, it communicates with other servers through gateway services, which are running on a remote server.
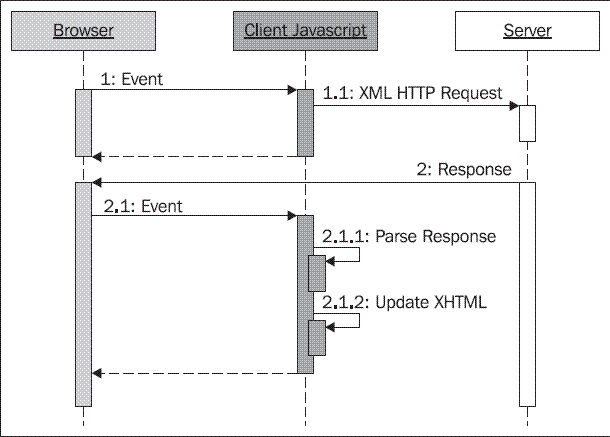
Another interesting feature of XMPP is the HTTP binding behind restricted fi rewalls. For instance, Community A User wants to chat with Community B User.
Community A User and Community B User have accounts on the Jabber Server and the Third Part Server respectively. When Community A User types in and sends his/her message, a sequence of events is set in action, as shown in the following figure:
- Community A User’s client sends his/her message to the Jabber Server. If Third Part Server is blocked on Jabber Server, the message is dropped.
- The Jabber Server opens a connection to the Third Part Server. The Jabber server delivers the message to Community B User.
- If Jabber Server is blocked on Third Part Server, the message is dropped.
- If Community B User is not currently connected, the message is stored for later delivery.
Jabber is the Linux of instant messaging—an open, secure, ad-free alternative to consumer IM services. URL: http://www.jabber.org/
Employ AJAX
AJAX is Asynchronous JavaScript and XML. In short, AJAX makes portal Pages feel more responsive, by exchanging minimum amounts of data with the server. Thus, the entire portal Page does not have to be reloaded, when the User requests a change. You can use AJAX to increase the portal Page’s interactivity, usability, functionality and speed.
In other words, AJAX acts as an asynchronous data transfer mechanism, that is, HTTP requests, between the browser and the portal server, allowing portal Pages to request a few bits of information from the server, instead of whole portal Pages. The AJAX makes portal applications smaller, faster and more user-friendly as shown in the following figure:
 In general, AJAX is based on the following standards:
- JavaS cript—Scripting language of the Web
- XML—Extensible Markup Language
- XHTML (or HTML)—Extensible Hypertext Markup Language
- CSS—Cascading Style Sheets
AJAX follows web standards supported by all major browsers. Thus, AJAX applications are browser and platform independent. The main advantage of AJAX is the separation of data, format, style, and function.
Using Chat Portlet Effectively
The Chat portlet allows Users to chat over XMPP protocol with other logged-in Users automatically. In order to use the Chat portlet effectively, let’s set up an XMPP server and configure Liferay.
Set up XMPP Server
First, we have to set up a XMPP (Jabber) server. Suppose that we use OpenFire as an XMPP (Jabber) server. Here are the steps to set up OpenFire as follows:
- Create a folder, and name it OpenFire.
- Download the OpenFire.
- Extract the fi le to the OpenFire folder.
- Open the OpenFire folder and furthermore, bin.
- Click on openfire_x_x_x.exe or unzip openfire_x_x_x.tar.gz.
- Click Launch Admin.
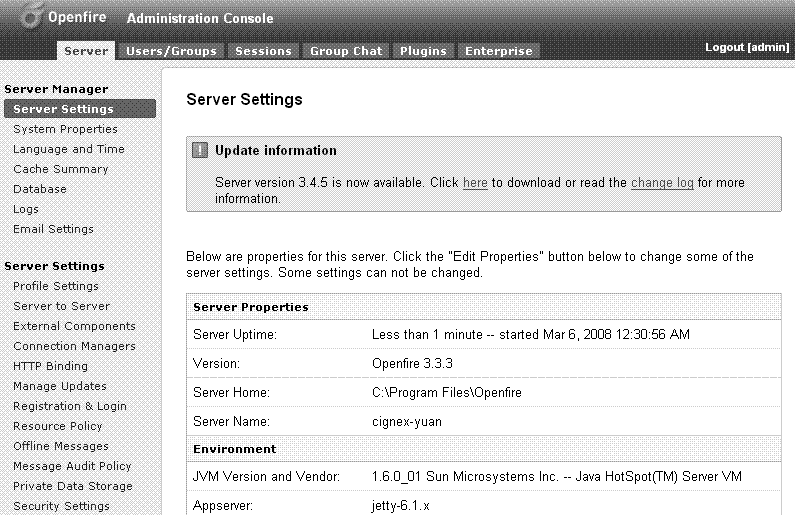
- Proceed with configuring OpenFire based on your requirements, as shown in the following figure.
Configure Liferay
Then, you need to configure the XMPP server (such as OpenFire) with Liferay. You can simply open portal-ext.properties at $LIFERAY_ROOT/webapps/Root/WEBINF/classes.
You just enter the following lines (Suppose that OpenFire and Liferay are on the same server):
jabber.xmpp.server.enabled=true
reverse.ajax.enabled=true
If you want to configure the integration by default settings, here are some options.
The following is the complete set of properties related to the setup of XMPP server.
jabber.xmpp.server.enabled=false

jabber.xmpp.server.address=localhost

jabber.xmpp.server.name=localhost

jabber.xmpp.server.port=5222

jabber.xmpp.user.password=admin
You can also configure the Chat portlet when XMPP server is on a separate server.
The following lines are a real example.
jabber.xmpp.server.enabled=true

reverse.ajax.enabled=true

jabber.xmpp.server.address=liferay.cignex.com

jabber.xmpp.server.name=liferay-cignex

jabber.xmpp.server.port=5222

jabber.xmpp.user.password=admin
Note that you have to turn firewall off in Windows for the Chat Portlet to run properly.
Working with Mail Portlet
In order to let employees manage their emails, we can use the Liferay Mail portlet. As an administrator of “Palm Tree Publications”, you need to create a Page called “Mail” under the Page, “Community” at the Book Lovers Community Public Pages and also add the Mail portlet in the Page, “Mail”.
Experiencing Mail Management
First of all, login as “Palm Tree”. Then, let’s do the above as follows:
- Add a Page called “Mail” under the Page “Community” at the Book Lovers Community Public Pages, if the Page is not already present.
- If the Mail portlet is not already present, add it in the Page, “Mail” of the Book Lovers Community where you want to manage mails. You will see the Mail portlet as shown in the following figure.
Let’s assume that we set up the mail domain as “cignex.com” in the Enterprise Admin portlet for testing purposes, as we have a mail engine with this mail domain already. Of course, you could set up the mail domain as “book.com”, or something else, if you had a mail engine with this mail domain in your hand.
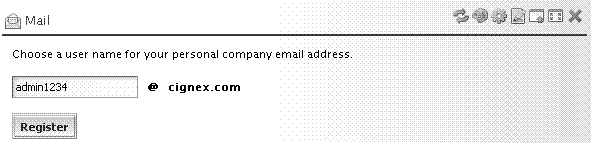
As an edit or of the editorial department, “Lotti Stein”, you may want to manage your mails in the mail domain, “cignex.com”. You can first choose a user name for your personal company the email address, say “admin1234” and register. Let’s do it as follows:
- Login as “Lotti Stein”.
- Go to the Page “Mail” under the Page, “Community”, at the Book Lovers
community Public Pages. - Locate the Mail portlet.
- Input the value for User name as “admin1234”.
- Click the Register button.
Your new email address is “[email protected]”. This email address will also serve as your login, as shown in the following figure.
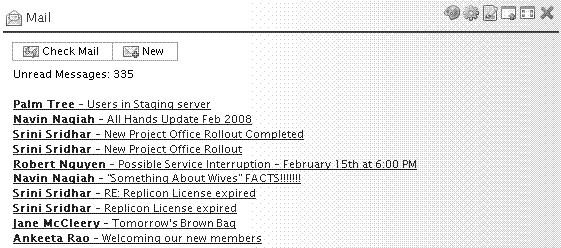
 You can now check for new messages in your inbox, by clicking the Inbox link first. Then, you can view the Unread messages, and either Check Mail or create a New mail, as shown in the following figure:
 You can go to the Page of Mail management by clicking on any link of Unread Messages, or Check Mail button or New button. Further, you can manage emails through the Mail portlet of your current account. Email management includes the following features (as shown in the following figure):
- Create a New email.
- Check Mail.
- Reply to an email.
- Reply All emails.
- Forward emails.
- Delete emails.
- Print emails, and
- Search.
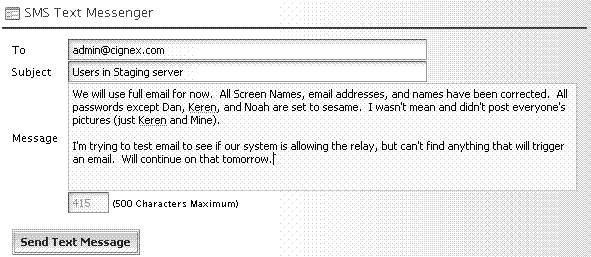
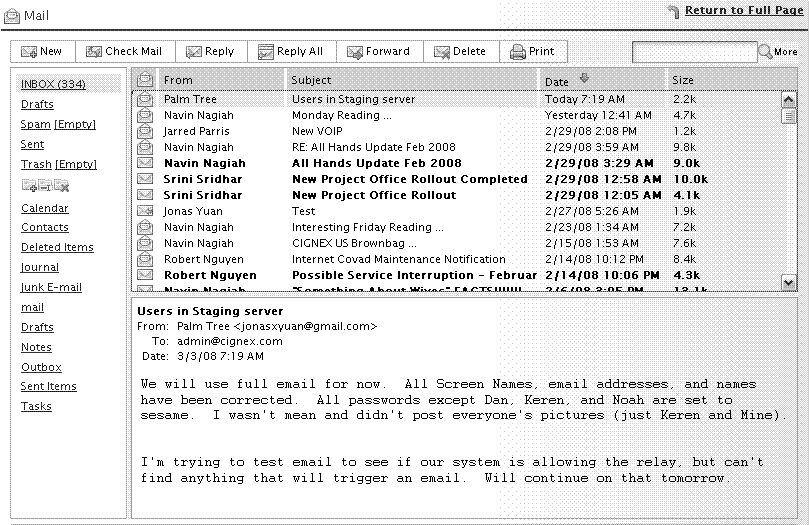 Note that the first email with the subject, “Users in Staging server”, is sent through the SMS Text Messenger portlet. For more details, refer to the forthcoming section.
How to Set up Mail Server?
In order to make the Mail portlet work, we have to set up a mail server with IMAP, POP and SMTP protocols. Suppose that the Enterprise “Palm Tree Publications” has a mail server with the domain “exg3.exghost.com”, an account “[email protected]/
admin1234”, and protocol IMAP, POP and SMTP. As an administrator, you need to integrate this mail server with IMAP, POP and SMTP protocol in Liferay. Let’s do it as follows:
- Find the file ROOT.xml in $TOMCAT_DIR/conf/Catalina/localhost.
- Find the mail configuration first.
- Then configure it as follows:
<! -- Mail -->

< Resource

name="mail/MailSession"

auth="Container"

type="javax.mail.Session"

mail.imap.host="exg3.exghost.com"

mail.imap.port="143"

mail.pop.host="exg3.exghost.com"

mail.pop.port="110"

mail.store.protocol="imap"

mail.transport.protocol="smtp"

mail.smtp.host="exg3.exghost.com"

mail.smtp.port="2525"

mail.smtp.auth="true"

mail.smtp.starttls.enable="true"

mail.smtp.user="[email protected]"

password="admin1234"

mail.smtp.socketFactory.class="javax.net.ssl.SSLSocketFactory"

>
In short, a Mail portlet is an AJAX web-mail client. We can configure it to work with any mail server. It reduces page refreshes, since it displays message previews and message lists in a dual pane window.
How to Set up Mail Portlet?
If you have proper Permissions, you can change the preferences of the Mail portlet. To change the preferences, you can simply click the Preferences icon to the upper right of the Mail portlet.
With the Recipients tab selected, you can find potential recipients from the Directory (Enabled or Disabled) and the Organization (My Organization or All Available).
Click the Save button after making any changes.
Using the Filters tab, you can set the values to filter emails associated with an email address to a Folder. Click the Save button after making any changes.
Note that the maximum number of email addresses is ten. This number is also configurable at the portal-ext.properties
Similarly, the Forward Address tab allows all emails to be forwarded to the email address you want. Enter one email address Per Line. Remove all entries to disable email forwarding. Select Yes to leave, or No to not leave a copy of the forwarded message. Click the Save button after making any changes.
Further, the Signature tab also allows you to set up your signature using HTML text editor. The signature you have set up will be added to each outgoing message. Click the Save button after making any changes.
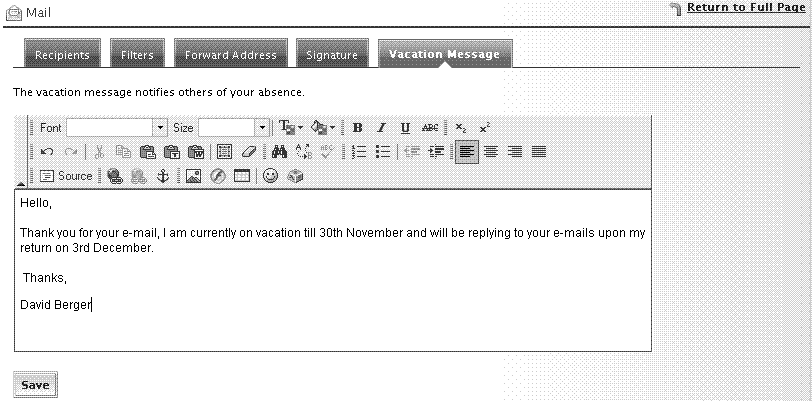
The Vacation Message tab allows you to set up vacation messages using HTML text editor. The vacation message notifies others of your absence (as shown in the following figure). Click the Save button after making any changes.
Using Permissions
The following table shows Permissions for the Mail portlet. A Community User can set up all Permissions (marked ‘X’) while a Guest User has the View, Configuration and Preferences Permissions. By default, a Community (marked ‘*’) as well as a Guest User has View action.
ViewViews this portletX, *X, *ConfigurationConfigures Permissions of this portletXXPreferencesConfigures mail setting of this portletXX
| Action | Description | Community | Guest |
Obviously, as a User of the Book Lovers Community, “Lotti Stein” has only View Permissions on the Mail portlet, by default. Since the Book Lovers community has no Permission “Preferences”, it follows that “Lotti Stein” too has no “Preferences” Permission.
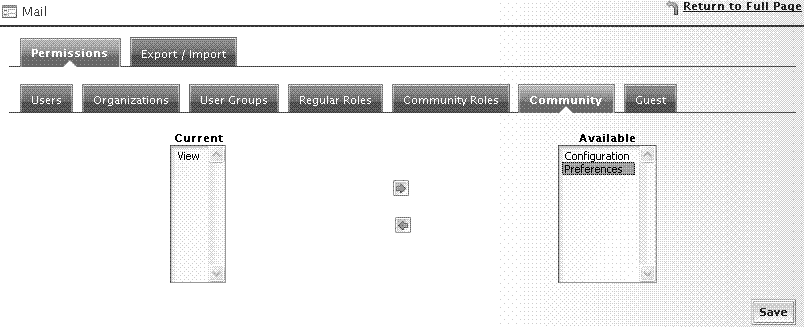
As an administrator, you may need to set up the Community Users having Permissions, Preference as well as View, on the Mail portlet. Thus, the Community User can set up mail settings. That is, you need to add Permissions (Preference) on the Mail portlet at the Book Lovers community. Let’s do it as follows (see the following figure):
- Click on the Configuration icon to the top right of the Mail portlet.
- Then click on the Permissions tab.
- Select the Community tab.
- Select Permission, Preferences, in the Available box.
- Click on the Add arrow, and
- Click on the Save button if you are ready.
Using Mail Portlet effectively
Liferay Portal can integrate with Washington IMAP + Sendmail, Cyrus IMAP + Postfix, and Dovecot + Postfix, as well as with Microsoft Exchange and other IMAP servers. As stated above, the mail server ” exg3.exghost.com” is Microsoft Exchange server.
You can access your email through an IMAP server. If access is on IMAP, the portal does not have to know where to persist the mail.
IMAP stands for Internet Message Access Protocol. URL:http://www.imap.org/.
One of the popular protocols used for email is IMAP, an application layer Internet protocol. IMAP operates on port 143 that allows a local client to access email on a remote server.
IMAP supports both connected and disconnected modes of operation. Until the User explicitly deletes them, email IMAP clients generally leave messages on the server. Moreover, IMAP offers access to the mail store.
IMAP has a lot of advantages. Here, we have listed just some of them:
- Use connected and disconnected modes of operation.
- Users can connect to the same mailbox simultaneously.
- Users have access to MIME message parts and partial fetch.
- Has message state information.
- Supports multiple mailboxes on the server.
- Provides ability for search on the server-side.
- Has a built-in extension mechanism.
Working with SMS Text Messenger
In order to let employees send text message to others, anytime, we can use the Liferay SMS Text Messenger portlet. As an administrator of “Palm Tree Publications”, you need to create a Page called “SMS” under the Page “Community” at the Book Lovers Community and add the SMS Text Messenger portlet in the Page, “SMS”.
Using SMS Text Messenger
First of all, login as “Palm Tree”. Then, let’s do the above action as follows:
- Add a Page called “SMS” under the Page “Community” at the Book Lovers Community Public Pages, if the Page is not already present.
- Add the SMS Text Messenger portlet in the Page, “SMS” of the Book Lovers Community where you want to set up SMS Text Messenger (if this portlet is not already present). You will see the SMS Text Messenger portlet as shown in the following figure:
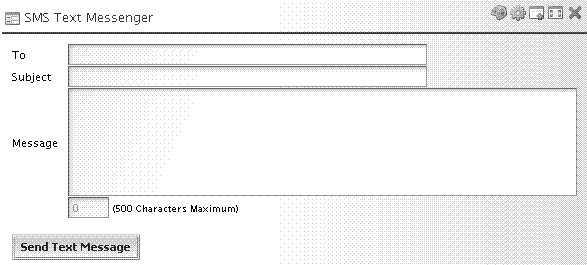
As an editor of the editorial department, “Lotti Stein” wants to send a Message, say “Users in Staging server”, to a person, say”[email protected]”. Let’s do it as follows:
- Login as “Lotti Stein”.
- Go to the Page “SMS” under the Page “Community” at the Book Lovers community Public Page.
- Locate the SMS Text Messenger.
- Input value for To as “[email protected]”, Subject as “Users in Staging server” and a Message.
- Click the Send Text Message button.
The User “[email protected]” will receive this email sooner or later, as we have described in the previous section.
How to Set up SMTP?
In order to make SMS Text Messenger work well, we have to set up the mail server with SMTP protocol. Suppose that the Enterprise “Palm Tree Publications” has a mail server with a domain “smtp.gmail.com”, an account “jonasxyuan/jonas1234”, and a protocol, SMTP. As an administrator, you need to integrate this mail server with SMTP protocol in Liferay. Let’s do it as follows:
- Find the file ROOT.xml in $TOMCAT_DIR/conf/Catalina/localhost.
- Find the mail configuration first.
- Then, configure it as follows:
< Resource

name="mail/MailSession"

auth="Container"

type="javax.mail.Session"

mail.imap.host="smtp.gmail.com"

mail.pop.host="smtp.gmail.com"

mail.store.protocol="imap"

mail.transport.protocol="smtp"

mail.smtp.host="smtp.gmail.com"

mail.smtp.port="465"

mail.smtp.auth="true"

mail.smtp.starttls.enable="true"

mail.smtp.user="jonasxyuan"

password="jonas123456"

mail.smtp.socketFactory.class="javax.net.ssl.SSLSocketFactory"

>
In short, the SMS Text Messenger portlet allows you to send SMS text messages from your portal page anytime.
Using SMS Effectively
The Short Message Service (SMS), called text messaging, is used to send short messages to and from mobile phones. It provides a mechanism for the delivery of short text messages over mobile networks, in order to transmit messages to and from mobiles. The text message from the sender can be stored in a central short message center, which then forwards it to the recipient. If the recipient is not available, the short message is stored temporally and will be sent later. SMS provides return receipts. Thus, the sender gets a brief message notifi cation if the short message is delivered to the recipient.
You may need to read the following part, if you are interested in the organization of network elements for supporting SMS. Otherwise, you can leave it for your future needs. The following fi gure shows a typical organization of network elements in a network supporting SMS (refer to more details at http://www.wirelessdevnet.com/channels/sms/features/sms.html).
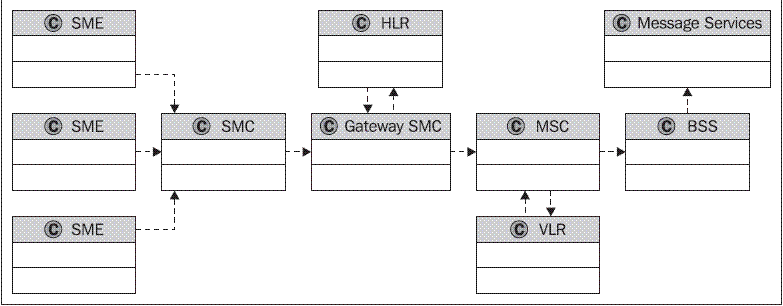 The SMC (Short Message Center) stores and forwards messages, to and from the message station. The SME (Short Message Entity) receives and sends short messages.
The SMS GWMS (SMS gateway MSC), a gateway MSC, can receive short messages. After receiving the short message from the message center, GMSC employs the SS7 (Signaling System #7) network to interrogate the current position of the mobile station from the HLR (home location register).
HLR, as a main database, holds information about the subscription profi le of the mobile. It also maintains the routing information for the subscriber where the mobile is currently situated. The GMSC thus passes on the short message to the correct MSC.
MSC (Mobile Switching Center) switches connections between mobile stations.
A VLR (Visitor Location Register) communicates with each MSC and contains temporary information about the mobile. MSC switches the short message to the corresponding BSS (Base Station System), which transmits the short message to the mobile. The BSS is made up of transceivers, which send and receive information over the air interface, to and from the mobile station. The short message is passed over signaling channels, so that the recipient (for example, mobile) can receive this short piece of information, even if a data call or a voice call is going on.
Summary
This chapter discussed how to add a participant for chatting, how to manage (view and delete) participants in the Chat portlet, how to start chatting, and how to set up the Chat portlet fi rst. Then it discussed how to manage (check, delete, add, reply, forward, search) emails and also to set up the Mail portlet properly. Finally, it discussed how to manage the SMS Text Messenger portlet and send SMS
text messages.
 Display error messages in JSF [ h:messages ] – part 1