@EnableAutoConfiguration annotation auto-configures the beans that are present in the classpath. This simplifies the developers work by guessing the required beans from the classpath and configure it to run the application. This annotation is part of the spring boot project.
For example, if you have tomcat-embedded.jar in the classpath, then you will need a TomcatEmbeddedServletContainerFactory bean to configure the tomcat server. This will be searched and configured without any manual XML configurations.

With the spring boot 1.2.0 release, the need for this annotation has been reduced because there is an alternative annotation @SpringBootApplication which combines the three annotations @Configuration,@EnableAutoConfiguration and code>@ComponentScan.
The package of the class that is annotated with @EnableAutoConfiguration has specific significance and is often used as a ‘default’. For example, it will be used when scanning for @Entity classes. It is generally recommended that you place @EnableAutoConfiguration in a root package so that all sub-packages and classes can be searched.
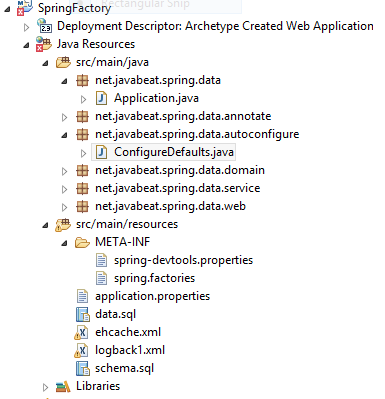
Auto-configuration classes are normal @Configuration annotated classes only. These are mentioned in the spring.factories file. Spring checks the spring.factories files under the folder META-INF in your project or JAR file to auto-configure the configuration classes.
@EnableAutoConfiguration Parameters
The following are the parameters that can be passed inside this annotation:
- exclude – Exclude the list of classes from the auto configuration.
- excludeNames – Exclude the list of fully qualified class names from the auto configuration. This parameter added since spring boot 1.3.0.
The above parameters helps you to exclude the list of configuration classes that are not required to be auto-configured.
Here is the sample snippet for how to use the parameters:
@EnableAutoConfiguration(exclude={Book.class})
Write Custom Auto-Configuration
I have written a very simple auto-configuration module for spring boot application. Note that you can write auto-configuration as part of the current application or you can import the JAR file. The important point is to add the spring.factories file under the META-INF folder. This is the default behavior of spring application to search for that file.
Here is the steps to write your own auto-configuration class:
1. Create a @Configuration class as one below:
import org.slf4j.Logger;
import org.slf4j.LoggerFactory;
import org.springframework.boot.autoconfigure.condition.ConditionalOnClass;
import org.springframework.context.annotation.Bean;
import org.springframework.context.annotation.Configuration;

@Configuration
@ConditionalOnClass({ String.class })
public class ConfigureDefaults {
	Logger logger = LoggerFactory.getLogger(ConfigureDefaults.class);
	@Bean
	public String cacheManager() {
		logger.info("Configure Defaults");
		return new String("test");
	}
}
2. Create spring.factories file as below and put it under the META-INF folder:
org.springframework.boot.autoconfigure.EnableAutoConfiguration=\
net.javabeat.spring.data.autoconfigure.ConfigureDefaults
3. Run your spring boot application.
You can notice that ConfigureDefaults will be invoked and the beans defined in that classes will be configured for the application use. Look at the below project structure I have used for testing my spring boot application with the custom auto-configuration module.


 @EnableCaching Annotation in Spring