There are many automated build tools used for building, testing, publishing deployment, and packaging software these days. Apache Ant, Maven, and Gradle are the most popular automated build tools.
Gradle is a build automation tool that helps developers by eliminating the need for unnecessary efforts. Standard directory preparation, compilation, packaging, generating the required artifacts, and other tasks would otherwise waste a lot of time.
The understanding of a concept, determining the lifecycle and phases of Gradle tool, and managing the required libraries and dependencies are the most essential skills that developers look for in a build tool. The video tutorial at the end of this article will help you learn Gradle using audio-visual explanation. The text portion of this tutorial will explain the following concepts:
- What is Gradle?
- How to Install Gradle?
- Basic Example using Gradle Script
- Dependency management using Gradle
- Gradle Tasks
1. What is Gradle?
Gradle is a build automation tool that combines the power and flexibility of Ant with the dependency management and conventions of Maven. This new build tool has become popular among developers. Powered by a Groovy DSL, Gradle provides a declarative way of describing builds through sensible defaults. For example, Spring IO and Maven tool both support the new build. Important points:
- A very general flexible purpose build tool like Ant
- Very powerful support for multi-project builds
- Very powerful dependency management
- Full support for your existing Maven infrastructure
- Support for Ant tasks and builds
- Groovy-based build script
- A rich domain model for describing your build
2. How to install:
- Download the latest Gradle 2.0 binaries.
- Copy the downloaded file and import it to your local directory. For this tutorial, we have used D:\Gradle\gradle-2.0.
- Add Gradle into environment variables as illustrated below.
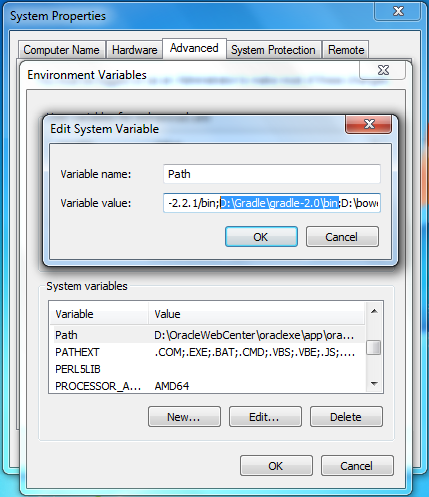
- Open your command line and type gradle -version to get the version installed on your system.

At this time, you should be ready to use it. Gradle 2.0 was the latest available release when this article was written.
3. Scripts, Basics, and Hello World
Let us make the simplest Gradle build file that can help us understand the basics. You can print a hello, world message using one task or using two different tasks.
- Create an empty file called build.gradle and define the first task you want to execute. Put these files inside an empty folder.
- Define a task to print out the message.
build.gradle
task helloWorld << {
println 'hello, world'}
build.gradle
[code]
task hello << {
println 'hello, '}
task world(dependsOn:hello) << {
println 'world'}
[/code]- Navigate to the folder that contains the build.gradle file and execute gradle -q <<taskName>>.


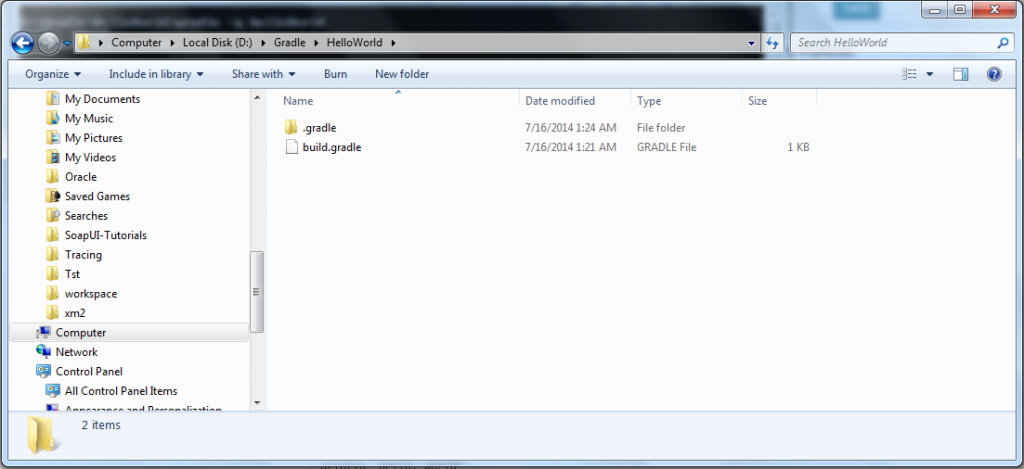
Illustration explanation:
- The build file is not required to include anything and does not rely on external dependencies.
- The execution of two build files causes a “hello world” message to be displayed into your console.
- The second file defines the “world” task as a dependent one. The execution will directly cause the task “hello” to execute. This is a simple example of how to use “dependsOn” for executing the tasks.

Now, build a Java program using the Gradle build. Create a project structure that looks like this:
- Type apply plugin: ‘java’ inside your build.gradle file, located at the same level as your src directory.
- Create your own HelloWorld.java file that contains a simple main method to get the Hello World! message to be displayed.
- From your command console, run Gradle build.
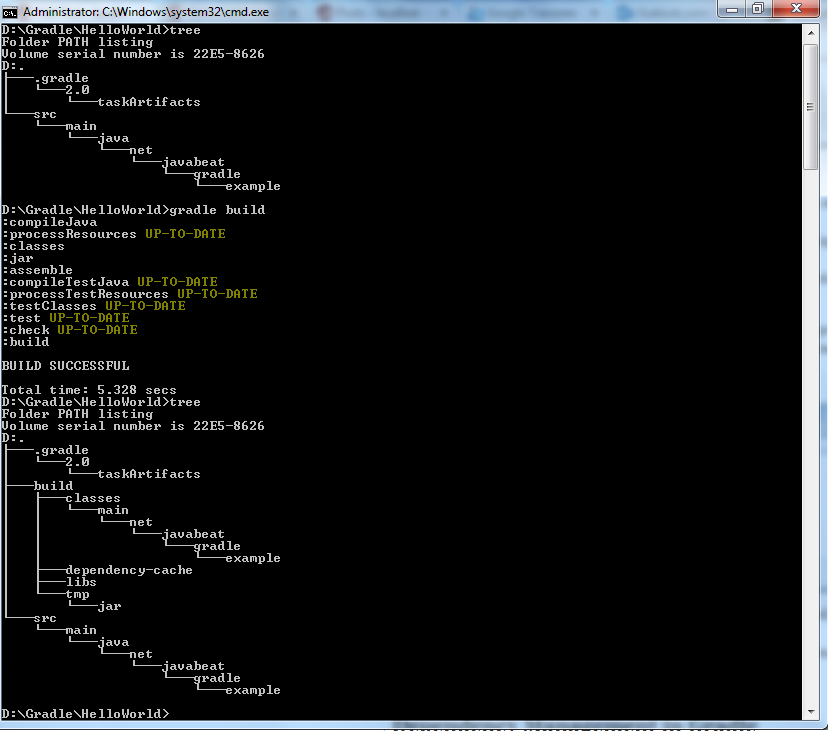
- The new build directory automatically generates after running the command “gradle build”. The build directory contains classes followed by your package, dependency cache, and other directories. This is the result of the conventions of Gradle’s Java plugin. There was no need to make a single entry or write a line of configuration.
- Navigate to your package to see your compiled HelloWorld.class. Type java -cp build/classes/main/ net.javabeat.gradle.example.HelloWorld.

4. Dependency Management
Dependencies are classes, files, and JARs required for building your project and deploying it successfully. Typically, there are two types of dependencies. Your project needs incoming dependencies to build and run. Publications are the outgoings your project produces.
- Dependency Resolution:
- Tell Gradle what dependencies your project needs so it can find and make them available in your build. Dependency resolution finds dependencies, downloads them from different repositories, locates them in the local directories, and brings them from another building project in the same multi-project build.
- Transitive Dependencies:
- In general, dependencies need other dependencies. Gradle finds these transitive dependencies and makes them available.
- Publication:
- Gradle also maintains publication processes.
- Once you declare your publications, Gradle publishes them to your desired location. The desired location can be a local directory, remote repository (Maven and ivy), or direct consuming through multi-project build procedure.
HelloWorld class is supposed to use Apache POI 3.10-FINAL version for creating an excel document. Create a build.gradle file: build.gradle
[code]
apply plugin : 'java'
repositories {
mavenLocal()
mavenCentral()
}
dependencies {
compile 'org.apache.poi:poi:3.10-FINAL'}
[/code]- Gradle provides numerous plugins for you to use. Plugin Java defines a set of tasks from compileJava—which compiles your sources. Java plugin needs a defined set of configurations.
- Repositories should be defined for referencing dependencies. For example, Maven Local repository refers to your local repository defined beneath your home directory/.m2/repository. The dependencies that are not located inside will be downloaded from the maven central one.
- Dependencies closure defines your dependencies. Java plugins define various standard configurations. Compile, runtime, testCompile, and testRuntime define the scopes of your dependencies. Compile specifies the dependencies required to compile project source. Runtime lists what dependencies are required at runtime.
- Executing gradle build causes the program to search mentioned dependencies inside your local repository. Gradle will download them if they are not found. Java plugin executes after Apache Poi downloads the tasks.


- Gradle maintains each downloaded dependency inside its local cache. The dependency downloads from the maven central repository or fetches from a local one.

- HelloWorld class has been changed to contain the Excel workbook.
HelloWorld.java
[code lang="java"]
package net.javabeat.gradle.example;
import org.apache.poi.hssf.usermodel.HSSFWorkbook;

public class HelloWorld {
	public static final void main(String [] args) throws Exception{
		System.out.println("Hello World !");
		HSSFWorkbook book = new HSSFWorkbook();
		System.out.println("Excel Book Created :: "+book);
	}
}
[/code]- Use the plugin “application” to execute your application.
- “gradle tasks” provides a list of the plugin’s tasks.
build.gradle
[code]
apply plugin : 'java'
apply plugin:'application'

mainClassName = "net.javabeat.gradle.example.HelloWorld"

repositories {
	mavenLocal()
	mavenCentral()
}

dependencies {
	compile 'org.apache.poi:poi:3.10-FINAL'
}
[/code]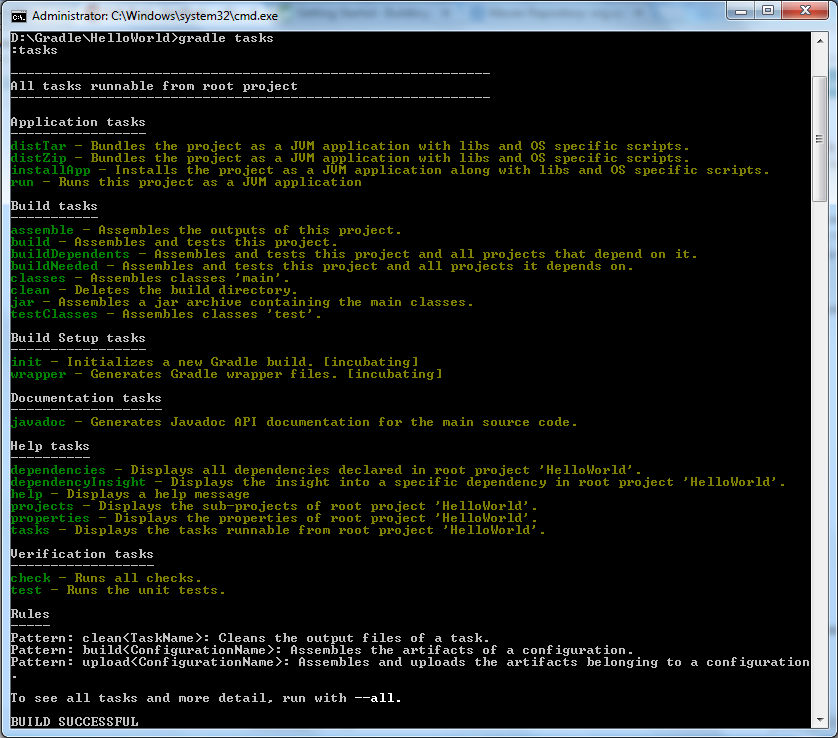
- Gradle command uses the Java and Application tasks listed directly.
- Type gradle run to execute your Java application.

5. Tasks
Tasks are a fundamental unit of build activity. Tasks are named collections of build instructions Gradle uses to perform a build. Above, we used a direct task definition with HelloWorld task and a pre-defined task with compileJava. You need a task name to declare it. build.gradle
[code]
apply plugin : 'java'
apply plugin:'application'

mainClassName = "net.javabeat.gradle.example.HelloWorld"

task hello

repositories {
	mavenLocal()
	mavenCentral()
}

dependencies {
	compile 'org.apache.poi:poi:3.10-FINAL'
}
[/code]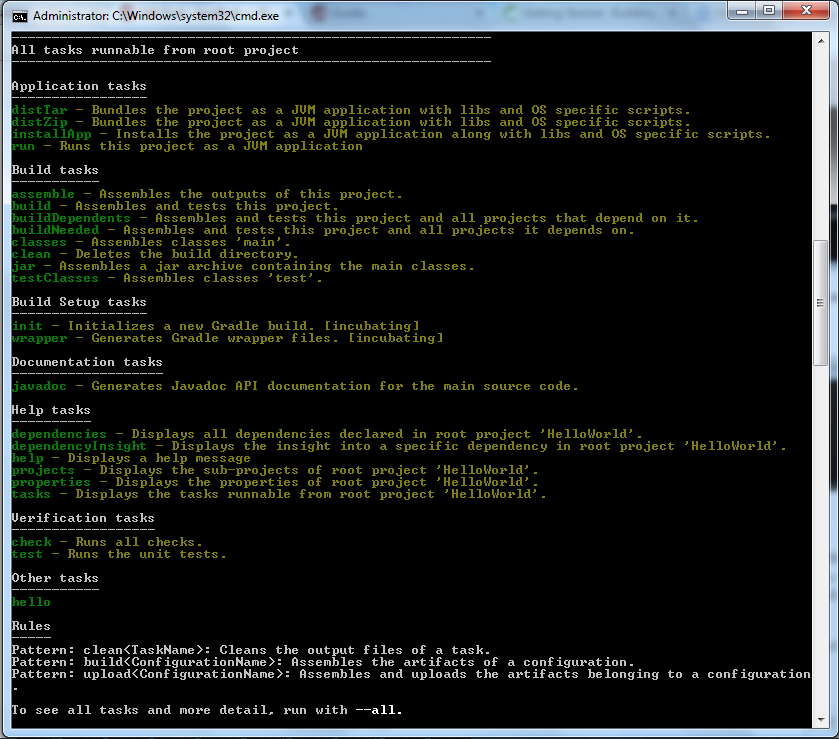
- To define a hello task, type the keyword followed by the task name.
- Executing gradle tasks prints out all tasks your build file contains, including those defined by the plugins used. Your custom tasks are listed under Other tasks.
If you are executing your hello task using gradle hello command, you will not see any results because it does not define any action. Use left-shift << operator to assign the action into a certain task. It will make your task able to execute specific actions, like the print message.
build.gradle
[code lang="xml"]
apply plugin : 'java'
apply plugin:'application'
mainClassName = "net.javabeat.gradle.example.HelloWorld"
task hello &amp;amp;amp;amp;amp;amp;amp;amp;amp;amp;amp;amp;amp;amp;amp;amp;amp;amp;amp;amp;amp;amp;amp;amp;amp;amp;amp;amp;amp;amp;amp;amp;amp;amp;amp;amp;amp;amp;amp;amp;amp;amp;amp;amp;amp;amp;amp;amp;amp;amp;amp;amp;amp;amp;amp;amp;amp;amp;amp;amp;amp;amp;amp;lt;&amp;amp;amp;amp;amp;amp;amp;amp;amp;amp;amp;amp;amp;amp;amp;amp;amp;amp;amp;amp;amp;amp;amp;amp;amp;amp;amp;amp;amp;amp;amp;amp;amp;amp;amp;amp;amp;amp;amp;amp;amp;amp;amp;amp;amp;amp;amp;amp;amp;amp;amp;amp;amp;amp;amp;amp;amp;amp;amp;amp;amp;amp;amp;lt; {
println 'Hello World !'
}
repositories {
mavenLocal()
mavenCentral()
}
dependencies {
compile 'org.apache.poi:poi:3.10-FINAL'
}
[/code]
- By using the left shift operator, you can define your desired action.
- Executing “hello task” will print out the message you have provided.
- Your desired action is enclosed with two curly brackets, often called Task Closure.
Gradle defines two phases. Configuration and execution mainly initiate configuration task and action task respectively. The following simple example that provides you a mix between action and configuration tasks. build.gradle
[code]
apply plugin : 'java'
apply plugin:'application'
mainClassName = "net.javabeat.gradle.example.HelloWorld"
task hello
hello &amp;amp;amp;amp;amp;amp;amp;amp;amp;amp;amp;amp;amp;amp;amp;amp;amp;amp;amp;amp;amp;amp;amp;amp;amp;amp;amp;amp;amp;amp;amp;amp;amp;amp;amp;amp;amp;amp;amp;amp;amp;amp;amp;amp;amp;amp;amp;amp;amp;amp;amp;amp;amp;amp;amp;amp;amp;amp;amp;amp;amp;amp;amp;lt;&amp;amp;amp;amp;amp;amp;amp;amp;amp;amp;amp;amp;amp;amp;amp;amp;amp;amp;amp;amp;amp;amp;amp;amp;amp;amp;amp;amp;amp;amp;amp;amp;amp;amp;amp;amp;amp;amp;amp;amp;amp;amp;amp;amp;amp;amp;amp;amp;amp;amp;amp;amp;amp;amp;amp;amp;amp;amp;amp;amp;amp;amp;amp;lt; {
println 'Action Time'
print 'Hello'
}
hello &amp;amp;amp;amp;amp;amp;amp;amp;amp;amp;amp;amp;amp;amp;amp;amp;amp;amp;amp;amp;amp;amp;amp;amp;amp;amp;amp;amp;amp;amp;amp;amp;amp;amp;amp;amp;amp;amp;amp;amp;amp;amp;amp;amp;amp;amp;amp;amp;amp;amp;amp;amp;amp;amp;amp;amp;amp;amp;amp;amp;amp;amp;amp;lt;&amp;amp;amp;amp;amp;amp;amp;amp;amp;amp;amp;amp;amp;amp;amp;amp;amp;amp;amp;amp;amp;amp;amp;amp;amp;amp;amp;amp;amp;amp;amp;amp;amp;amp;amp;amp;amp;amp;amp;amp;amp;amp;amp;amp;amp;amp;amp;amp;amp;amp;amp;amp;amp;amp;amp;amp;amp;amp;amp;amp;amp;amp;amp;lt; {
println ' World !'
}
hello {
println 'Configuration Time !'
}
repositories {
mavenLocal()
mavenCentral()
}
dependencies {
compile 'org.apache.poi:poi:3.10-FINAL'
}
[/code]How to work with action and configuration tasks:
- The output of the action task is appended in the Hello World! message.
- Configuration tasks are the same as action tasks. One major difference here is the configuration task has eliminated the left shift operator.
- Configuration block is the place you set up variables and data structures that will be needed by task action when it runs.
Gradle creates an internal object model of your build before it executes. Every task that you declare is a task object within the overall project. By default, each new task receives the type DefaultTask. The main methods Default Task provides are as followed:
- dependsOn(task): adds a task as a dependency of the calling task.
- doFirst(closure): adds a block of executable code to the beginning of a task’s action.
- doLast(closure): adds a block of executable code to the end of a task’s action.
- onlyIf(closure): allows you to express a predicate which determines if a task should be executed. The value of the predicate is the value of the closure.
Below is a simple example of how you can leverage all the inherited methods in your build. build.gradle
[code]
apply plugin : 'java'
apply plugin:'application'
mainClassName = "net.javabeat.gradle.example.HelloWorld"
task preHello
task hello (dependsOn:preHello)
preHello &amp;amp;amp;amp;amp;amp;amp;amp;amp;amp;amp;amp;amp;amp;amp;amp;amp;amp;amp;amp;amp;amp;amp;amp;amp;amp;amp;amp;amp;amp;amp;amp;amp;amp;amp;amp;amp;amp;amp;amp;amp;amp;amp;amp;amp;amp;amp;amp;amp;amp;amp;amp;amp;amp;amp;amp;amp;amp;amp;amp;amp;amp;amp;lt;&amp;amp;amp;amp;amp;amp;amp;amp;amp;amp;amp;amp;amp;amp;amp;amp;amp;amp;amp;amp;amp;amp;amp;amp;amp;amp;amp;amp;amp;amp;amp;amp;amp;amp;amp;amp;amp;amp;amp;amp;amp;amp;amp;amp;amp;amp;amp;amp;amp;amp;amp;amp;amp;amp;amp;amp;amp;amp;amp;amp;amp;amp;amp;lt; {
println 'Action Time'
}
preHello.doFirst{
println 'Do First'
}
preHello.doLast {
println 'Do Last'
}
hello &amp;amp;amp;amp;amp;amp;amp;amp;amp;amp;amp;amp;amp;amp;amp;amp;amp;amp;amp;amp;amp;amp;amp;amp;amp;amp;amp;amp;amp;amp;amp;amp;amp;amp;amp;amp;amp;amp;amp;amp;amp;amp;amp;amp;amp;amp;amp;amp;amp;amp;amp;amp;amp;amp;amp;amp;amp;amp;amp;amp;amp;amp;amp;lt;&amp;amp;amp;amp;amp;amp;amp;amp;amp;amp;amp;amp;amp;amp;amp;amp;amp;amp;amp;amp;amp;amp;amp;amp;amp;amp;amp;amp;amp;amp;amp;amp;amp;amp;amp;amp;amp;amp;amp;amp;amp;amp;amp;amp;amp;amp;amp;amp;amp;amp;amp;amp;amp;amp;amp;amp;amp;amp;amp;amp;amp;amp;amp;lt; {
print 'Hello'
}
hello &amp;amp;amp;amp;amp;amp;amp;amp;amp;amp;amp;amp;amp;amp;amp;amp;amp;amp;amp;amp;amp;amp;amp;amp;amp;amp;amp;amp;amp;amp;amp;amp;amp;amp;amp;amp;amp;amp;amp;amp;amp;amp;amp;amp;amp;amp;amp;amp;amp;amp;amp;amp;amp;amp;amp;amp;amp;amp;amp;amp;amp;amp;amp;lt;&amp;amp;amp;amp;amp;amp;amp;amp;amp;amp;amp;amp;amp;amp;amp;amp;amp;amp;amp;amp;amp;amp;amp;amp;amp;amp;amp;amp;amp;amp;amp;amp;amp;amp;amp;amp;amp;amp;amp;amp;amp;amp;amp;amp;amp;amp;amp;amp;amp;amp;amp;amp;amp;amp;amp;amp;amp;amp;amp;amp;amp;amp;amp;lt; {
println ' World !'
}
hello {
println 'Configuration Time !'
}
repositories {
mavenLocal()
mavenCentral()
}
dependencies {
compile 'org.apache.poi:poi:3.10-FINAL'
}
[/code] DefaultTask has a defined set of properties that your own custom tasks can use. Here are the provided properties:
- didWork: a boolean property that provides an indicator if a certain task has been completed successfully. didWork property can be accessed by using tasks.<<task-name>>.didWork expression.
- enabled: a boolean property that provides an indicator of when a certain task will be executing. Accessing the enabled indicator can be done using tasks.<<task-name>>.enabled expression.
- path: a string property containing the fully qualified path of a task. If you have written tasks.<<task-name>>.path inside your build file, you will get a colon followed by your written task name, like :task-name which gives you an indicator for this task defined in the top-level build file. Since Gradle supports dependent sub-projects or nested builds, and in case your typed task existed in a nested build called nested.gradle, then the path of it will be :nested:task-name.
- logger: a reference of an implicit logger object. Logging is a common requirement for various types of frameworks and platforms. DEBUG, INFO, LIFECYCLE, WARN, QUIET, and ERROR are levels supported by Gradle. For logging messages, you should use logger.<<LOGGING-LEVEL>> ‘<<Messages>>’ expression.
- logging: a property that gives you access to the log level setting where you can specify all of the logging messages shown. Following the example, a debug logging level has been specified before using logger.debug expression.
- description: a meta-data human-readable property used to describe the purpose of a certain task. The description property is defined at the declaration of a task. Following expression task <<Your-Task>>(description:'<<Your-Description>>’) <<{ … } used to leverage description property.
- temporaryDir: a property used for reference Temporal File Object points to a temporary directory that corresponds to the build file. If you’ve typed expression like println tasks.compileJava.temporaryDir As an example, D:\Gradle\HelloWorld\build\tmp\compileJava path will be shown.
Example of leveraging the above properties inside your build file: build.gradle
[code]
apply plugin : 'java'
apply plugin:'application'
mainClassName = "net.javabeat.gradle.example.HelloWorld"
task preHello
task hello (dependsOn:preHello)
task notifyMe(dependsOn:compileJava) &amp;amp;amp;amp;amp;amp;amp;amp;amp;amp;amp;amp;amp;amp;amp;amp;amp;amp;amp;amp;amp;amp;amp;amp;amp;amp;amp;amp;amp;amp;amp;amp;amp;amp;amp;amp;amp;amp;amp;amp;amp;amp;amp;amp;amp;amp;amp;amp;amp;amp;amp;amp;amp;amp;amp;amp;amp;amp;amp;amp;amp;amp;amp;lt;&amp;amp;amp;amp;amp;amp;amp;amp;amp;amp;amp;amp;amp;amp;amp;amp;amp;amp;amp;amp;amp;amp;amp;amp;amp;amp;amp;amp;amp;amp;amp;amp;amp;amp;amp;amp;amp;amp;amp;amp;amp;amp;amp;amp;amp;amp;amp;amp;amp;amp;amp;amp;amp;amp;amp;amp;amp;amp;amp;amp;amp;amp;amp;lt; {
logging.level = 'DEBUG'
if(tasks.compileJava.didWork){
logger.debug 'Compilation finsihed sucessfully'
}
}
preHello &amp;amp;amp;amp;amp;amp;amp;amp;amp;amp;amp;amp;amp;amp;amp;amp;amp;amp;amp;amp;amp;amp;amp;amp;amp;amp;amp;amp;amp;amp;amp;amp;amp;amp;amp;amp;amp;amp;amp;amp;amp;amp;amp;amp;amp;amp;amp;amp;amp;amp;amp;amp;amp;amp;amp;amp;amp;amp;amp;amp;amp;amp;amp;lt;&amp;amp;amp;amp;amp;amp;amp;amp;amp;amp;amp;amp;amp;amp;amp;amp;amp;amp;amp;amp;amp;amp;amp;amp;amp;amp;amp;amp;amp;amp;amp;amp;amp;amp;amp;amp;amp;amp;amp;amp;amp;amp;amp;amp;amp;amp;amp;amp;amp;amp;amp;amp;amp;amp;amp;amp;amp;amp;amp;amp;amp;amp;amp;lt; {
println 'Action Time'
}
preHello.doFirst{
println 'Do First'
}
preHello.doLast {
println 'Do Last'
}
hello &amp;amp;amp;amp;amp;amp;amp;amp;amp;amp;amp;amp;amp;amp;amp;amp;amp;amp;amp;amp;amp;amp;amp;amp;amp;amp;amp;amp;amp;amp;amp;amp;amp;amp;amp;amp;amp;amp;amp;amp;amp;amp;amp;amp;amp;amp;amp;amp;amp;amp;amp;amp;amp;amp;amp;amp;amp;amp;amp;amp;amp;amp;amp;lt;&amp;amp;amp;amp;amp;amp;amp;amp;amp;amp;amp;amp;amp;amp;amp;amp;amp;amp;amp;amp;amp;amp;amp;amp;amp;amp;amp;amp;amp;amp;amp;amp;amp;amp;amp;amp;amp;amp;amp;amp;amp;amp;amp;amp;amp;amp;amp;amp;amp;amp;amp;amp;amp;amp;amp;amp;amp;amp;amp;amp;amp;amp;amp;lt; {
print 'Hello'
}
hello &amp;amp;amp;amp;amp;amp;amp;amp;amp;amp;amp;amp;amp;amp;amp;amp;amp;amp;amp;amp;amp;amp;amp;amp;amp;amp;amp;amp;amp;amp;amp;amp;amp;amp;amp;amp;amp;amp;amp;amp;amp;amp;amp;amp;amp;amp;amp;amp;amp;amp;amp;amp;amp;amp;amp;amp;amp;amp;amp;amp;amp;amp;amp;lt;&amp;amp;amp;amp;amp;amp;amp;amp;amp;amp;amp;amp;amp;amp;amp;amp;amp;amp;amp;amp;amp;amp;amp;amp;amp;amp;amp;amp;amp;amp;amp;amp;amp;amp;amp;amp;amp;amp;amp;amp;amp;amp;amp;amp;amp;amp;amp;amp;amp;amp;amp;amp;amp;amp;amp;amp;amp;amp;amp;amp;amp;amp;amp;lt; {
println ' World !'
}
hello {
println 'Configuration Time !'
}
repositories {
mavenLocal()
mavenCentral()
}
dependencies {
compile 'org.apache.poi:poi:3.10-FINAL'
}
[/code] Be sure to remember:
- The compileJava didWork flag will never be flagged true if your classes are compiled before. Execute gradle clean to clean all of your compiled classes.
- NotifyMe task uses didWork flag upon compileJava to determine if the task has accomplished.
- Once compileJava task is done, the didWork flag will be set to true. The logger will then log your desired message.
- Configuration phase is implemented before the phase of execution. It enables you to configure some variables, resources, and so on.
Besides the DefaultTask we explored, there a set of different task types you may need to be aware of:
- Copy: copies files from one place into another.
- Jar: creates a Jar file from your sources. Java Plugin already provides one.
- JavaExec: runs Java class with main() method. Application Plugin already provides one.
6. Build Phases
Gradle executes a build by running through three distinct phases:
- Initialization The first executed phase where Gradle determines the projects that will be participating in the build. Settings.gradle build file is used for initialization phase configuration.
- The configuration The second executed phase in which the build file’s tasks are assembled into an internal object model—usually called DAG (Directed Acyclic Graph). All tasks tagged as Configuration Tasks (Refer above) usually get executed at this phase.
- Execution The last phase executes build tasks in the order arranged by their dependencies relationship. Tasks tagged as Execution Tasks (Refer above) are executed at this phase.
We explored the execution and configuration phases earlier. Now we will take a look at the Initialization phase. The settings file defines all user-defined actions. The following sample shows you the impact of defining a file. settings.gradle
[code]
println 'This message will be printed out as a part of initialization phase'
[/code]
- Initialization phase associates with the settings.gradle file.
- build.gradle script file has not changed from the last one provided.
7. More Information:
Gradle is a build tool. This tutorial provides excellent guidance for you on how to use Gradle and what you need to use it. We explored the phases, tasks, methods, and properties throughout the sections of this tutorial. For more information on these concepts, refer to the Gradle official documentation/reference tutorials that provide more insights.

 Spring Annotations [Quick Reference]