
This tutorial is the continuation of the previous tutorial for building the standalone application using spring boot. This guide walks you through the process of converting a runnable JAR application that was built with Spring Boot into a WAR file that you can run in any standard servlet container. You’ll take a simple Spring MVC web app and build a WAR file using Spring Boot.
Also read:
1. Java Beans
It’s the entities that will be used for representing the persisted nodes.
Address.java
package net.javabeat.springdata.data;

import org.springframework.data.neo4j.annotation.GraphId;
import org.springframework.data.neo4j.annotation.NodeEntity;

@NodeEntity
public class Address{

	@GraphId
	private Long id;

	private String addressCountry;

	private String addressCity;

	public Long getId() {
		return id;
	}

	public void setId(Long id) {
		this.id = id;
	}

	public String getAddressCountry() {
		return addressCountry;
	}

	public void setAddressCountry(String addressCountry) {
		this.addressCountry = addressCountry;
	}

	public String getAddressCity() {
		return addressCity;
	}

	public void setAddressCity(String addressCity) {
		this.addressCity = addressCity;
	}
}
Employee.java
package net.javabeat.springdata.data;

import org.springframework.data.neo4j.annotation.Fetch;
import org.springframework.data.neo4j.annotation.GraphId;
import org.springframework.data.neo4j.annotation.NodeEntity;
import org.springframework.data.neo4j.annotation.RelatedTo;

@NodeEntity
public class Employee{
	@GraphId
	private Long id;

	private String employeeName;

	@Fetch
	@RelatedTo(type="Address")
	private Address address = new Address();

	public Long getId() {
		return id;
	}

	public void setId(Long id) {
		this.id = id;
	}

	public String getEmployeeName() {
		return employeeName;
	}

	public void setEmployeeName(String employeeName) {
		this.employeeName = employeeName;
	}

	public Address getAddress() {
		return address;
	}

	public void setAddress(Address address) {
		this.address = address;
	}
}
2. Spring Data Neo4j Repositories
It’s the repositories that will be used for operating against the graph database through different operations.
EmployeeRepository.java
package net.javabeat.springdata.repo;

import net.javabeat.springdata.data.Employee;

import org.springframework.data.neo4j.repository.GraphRepository;
import org.springframework.data.rest.core.annotation.RepositoryRestResource;

@RepositoryRestResource(collectionResourceRel = "employee", path = "employee")
public interface EmployeeRepository extends GraphRepository<Employee>{

}
AddressRepository.java
package net.javabeat.springdata.repo;

import net.javabeat.springdata.data.Address;

import org.springframework.data.neo4j.repository.GraphRepository;
import org.springframework.data.rest.core.annotation.RepositoryRestResource;

@RepositoryRestResource(collectionResourceRel = "address", path = "address")
public interface AddressRepository extends GraphRepository<Address>{

}
3. Spring Controller
It’s Spring MVC controller that allows you to quickly build controllers for your web site. The controller is very simple, in that the @Controller annotation tells the container that this class contains web application paths. @RequestMapping annotation ensures that HTTP request to /query mapped to the query method and /execute mapped to the execute one.
DataController.java
package net.javabeat.springdata.controller;

import java.io.BufferedReader;
import java.io.IOException;
import java.io.InputStreamReader;
import java.net.HttpURLConnection;
import java.net.MalformedURLException;
import java.net.URL;

import javax.servlet.http.HttpServletRequest;
import javax.servlet.http.HttpServletResponse;

import org.springframework.stereotype.Controller;
import org.springframework.web.bind.annotation.RequestMapping;
import org.springframework.web.bind.annotation.RequestMethod;
import org.springframework.web.bind.annotation.RequestParam;

@Controller
public class DataController {

    @RequestMapping(value="/execute", method=RequestMethod.GET,params="query")
    public String execute(@RequestParam ("query")String query,HttpServletRequest request, HttpServletResponse response) {
    	try {
    		response.getWriter().write("<h1>JavaBeat Tutorials</h1>");
    		response.getWriter().write("<h2>Neo4j + REST + Spring Boot WAR Application</h2>");
			URL url = new URL("http", "localhost",8080,"/JavaBeat-Neo4j-REST/"+request.getParameter("query"));
			HttpURLConnection c = (HttpURLConnection)url.openConnection();
		        c.setRequestProperty("Content-length", "0");
		        c.setUseCaches(false);
		        c.setAllowUserInteraction(false);
		        c.connect();
		        int status = c.getResponseCode();

		        switch (status) {
		            case 200:
		            case 201:
		                BufferedReader br = new BufferedReader(new InputStreamReader(c.getInputStream()));
		                String line;
		                while ((line = br.readLine()) != null) {
		                    response.getWriter().append(line+"\n");
		                }
		                br.close();
		                response.flushBuffer();
		                return "resultTemplate";
		        }

		} catch (MalformedURLException e) {
			e.printStackTrace();
		} catch (IOException e) {
			e.printStackTrace();
		}
        return "resultTemplate";
    }

    @RequestMapping(value="/query", method=RequestMethod.GET)
    public String query(HttpServletRequest request, HttpServletResponse response) {
		try {
			response.getWriter().write("<h1>JavaBeat Tutorials</h1>");
			response.getWriter().write("<h2>Neo4j + REST + Spring Boot WAR Application</h2>");
		} catch (IOException e) {
			e.printStackTrace();
		}
    	return "queryTemplate";
    }
}
4. Thymeleaf Templates
Spring Boot automatically added Thymeleaf beans to the application context to convert a request for the Thymeleaf template located at
- src/main/resource/templates/queryTemplate.html, which responsible for gathering the query from the user.
- src/main/resource/templates/resultTemplate.html, which responsible for displaying the result of the queries.
Those templates has very basic HTML elements and no actual Thymeleaf code.
queryTemplate.html
<html>
<body>
	<form id="form" action="execute" method="GET">
		<p>Enter Query You Want To Be Executed Right Below:</p>
		<br />
		<input id="query" name="query" type="text" value=""/>
		<input type="submit" value="Query !"/>
	</form>
</body>
</html>
resultTemplate.html
<!-- It's filled by using the controller response.getWriter() -->
4. Executable Application
Already, you have made the application an executable JAR file in the first part of this tutorial. You package everything in a single, executable JAR driven by main() method. Along the way, you use Spring’s support for embedding the Tomcat servlet container as the HTTP runtime, instead of deploying to an external instance. In this part of tutorial, you will see how to build WAR file to run it on a standard container.
Executable.java
package net.javabeat.springdata.executable;

import org.neo4j.graphdb.GraphDatabaseService;
import org.springframework.boot.SpringApplication;
import org.springframework.boot.autoconfigure.EnableAutoConfiguration;
import org.springframework.context.annotation.Bean;
import org.springframework.context.annotation.ComponentScan;
import org.springframework.context.annotation.Configuration;
import org.springframework.context.annotation.Import;
import org.springframework.data.neo4j.config.EnableNeo4jRepositories;
import org.springframework.data.neo4j.config.Neo4jConfiguration;
import org.springframework.data.neo4j.rest.SpringRestGraphDatabase;
import org.springframework.data.rest.webmvc.config.RepositoryRestMvcConfiguration;
@ComponentScan("net.javabeat")
@Configuration
@EnableNeo4jRepositories("net.javabeat.springdata.repo")
@Import(RepositoryRestMvcConfiguration.class)
@EnableAutoConfiguration
public class Executable extends Neo4jConfiguration {

	public Executable() {
	}

	@Bean(destroyMethod = "shutdown")
	public GraphDatabaseService graphDatabaseService() {
		SpringRestGraphDatabase service = new SpringRestGraphDatabase("http://localhost:7474/db/data/");
		this.setBasePackage("net.javabeat");
		return service;
	}

	public static void main(String[] args) {
		SpringApplication.run(Executable.class, args);
	}
}
5. Run the Service
If you’ve ran the service by using the java -jar or by using the Eclipse IDE running Java application, you will be able to display the templates contents using a resource identifier started with http://localhost:8080/query.
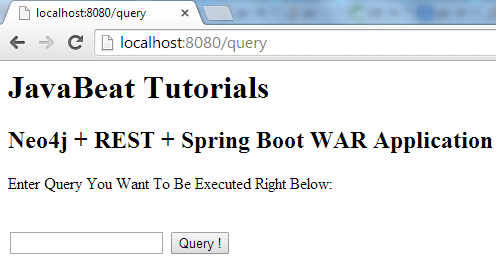
But even if you have provided the input shown a query like employee, you will not be able to see the result, cause the remaining functionality needs the remaining configuration for web application.
6. Build WAR File
The application you built up to this point is configured to generate a JAR artifcat. To switch it to WAR file, you need change the packaging attribute in the pom.xml into war. Also, if you want to deploy the WAR file into external container, you also need to mark the embedded container dependencies as provided.
7. Initialize the Servlet
Previously, the application contained a public static void main() method which consider a Spring Boot configuration was used when using the java -jar command. By converting this into WAR file with no XML files, you need a different message to the servlet container on how to launch the application. So that you have to provide your own WebXML Java class.
WebXML.java
package net.javabeat.springdata.webXML;

import net.javabeat.springdata.executable.Executable;

import org.springframework.boot.builder.SpringApplicationBuilder;
import org.springframework.boot.context.web.SpringBootServletInitializer;

public class WepXML extends SpringBootServletInitializer {

    @Override
    protected SpringApplicationBuilder configure(SpringApplicationBuilder application) {
        return application.sources(Executable.class);
    }
}
WebXML is a pure Java class that provides an alternative to creating a web.xml. It extends the SpringServletInitializer class. This extension offers many configurable options by overriding methods. But one required method is configure().
Configure() provides the means to register the classes that are needed to launch the application. This is where you supply a handle to your Executable configuration. Even though public static void main() is no longer needed, you can leave that code in place.
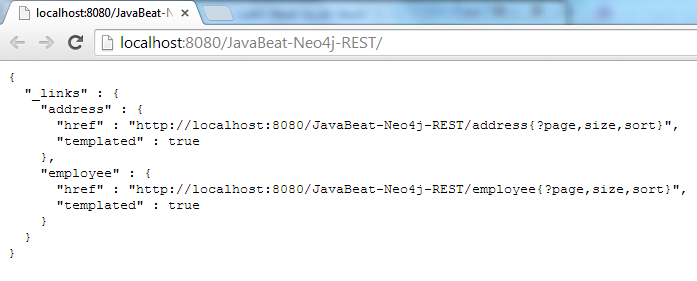
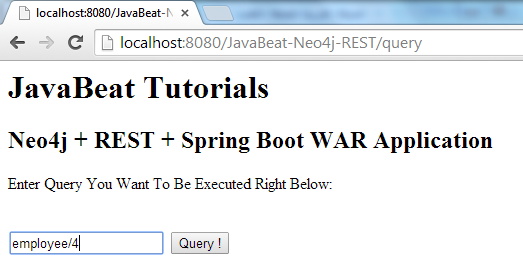
8. Run the WAR file
It’s the demonstration that we would provide you for making everything clear for you. Just build your application and make sure maven has created your WAR. Put your WAR into the tomcat 8 webapp folder and starting the tomcat up. Another way you would follow by integrating your Eclipse IDE with your Tomcat 8 and Right Click on the project folder and use Run As.


 Spring Data Neo4j 3 REST Exporter (Java Application)