In our earlier posts, we have written about Spring Security 3.0, Spring Security Login Example and How to get current username in spring security?. Those are quite old posts and there is lot of changes in the latest version of spring security. Another reason for this post is to write most comprehensive tutorial on spring security that would help developers who want to understand the internals of spring security.
Spring Security Tutorial
This spring security tutorial focuses more about the core module of spring security and one simple example that demonstrates the core functionality. I will be using spring boot for packaging and running the application. If you are facing any issues with spring security, please post your questions in the comments section of this tutorial. I have used Spring Security 4.0.2. for this tutorial.
Note: Though I have used Spring Boot for running this application, I mostly used Java configurations to show more clarity on the configurations required for this application. Since most of the web application still using the traditional XML configurations and Java configurations.

Table of Contents
- Technology Stack
- Spring Security Overview
- Artifacts Download
- Core Components
- SecurityContext
- SecurityContextHolder
- Authentication
- UserDetailsService
- GrantedAuthority
- Spring Security Example Application
- Download Source Code
- Exceptions
- Conclusion
Technology Stack
The following are the list of technologies used for writing this tutorial. Prior knowledge on these frameworks would be helpful to understand the concepts.
- Java 1.8
- Maven 3.0
- Spring Framework 4.2.1
- Spring Boot 1.2.5
- Spring Security
- Spring Data JPA
- Spring MVC
- HSSQL DB
- Tomcat 7.0
Spring Security Overview
Spring security is the highly customizable authentication and access-control framework. This is the security module for securing spring applications. But, this can also be used for non-spring based application with few extra configurations to enable the security features.
The main focus of spring security is on Authentication and Authorization:
- Where authentication is the process of establishing a principal (user) who claim to be
- Where authorization is the process of deciding whether the logged in principal (user) allowed to perform a certain actions.
When it comes to authentication, spring security supports wide variety of the authentication models like LDAP, OpenID, ESB, JAAS, etc. to authenticate your application into your company’s user database.
Spring Security Modules
Since spring security 3.0, entire code has been divided and modules have been introduced to separate the different functionalities and third party dependencies to different modules. The following are the list of modules currently shipped by spring security framework. You will not include all the modules for your application, it depends on your requirement.
- Core – This module contains the APIs for basic authentication and access-control related mechanism. This is mandatory for ant spring security applications.
- Remoting – This module provides integration to the Spring Remoting. You don’t need to include this module unless you are writing a remote client applications.
- Web – This module contains APIs for servlet filters and any web based authentication like access restriction for URLs. Any web application would require this module.
- Config – You need it if you are using the Spring Security XML namespace for configuration. If you are not using XML configurations, you can ignore this module.
- LDAP – Required if you need to use LDAP authentication or manage LDAP user entries.
- ACL – Specialized domain object ACL implementation.
- CAS – Spring Security’s CAS client integration.
- OpenID – OpenID web authentication support.
Artifacts Download
The first step towards writing your spring security application is to get the required artifacts for spring security. Here is the dependency requirements for Maven and Gradle build scripts.
pom.xml for Maven
<dependencies>
<!-- ... other dependency elements ... -->
<dependency>
	<groupId>org.springframework.security</groupId>
	<artifactId>spring-security-web</artifactId>
	<version>4.0.2.RELEASE</version>
</dependency>
<dependency>
	<groupId>org.springframework.security</groupId>
	<artifactId>spring-security-config</artifactId>
	<version>4.0.2.RELEASE</version>
</dependency>
</dependencies>
build.gradle for Gradle
dependencies {
	compile 'org.springframework.security:spring-security-web:4.0.2.RELEASE'
	compile 'org.springframework.security:spring-security-config:4.0.2.RELEASE'
}
If you are using the third party authentication models, then you have to include those dependencies in your build file.
Core Components
This section explains the building blocks of spring security and what are the core components that are actually used while user is authenticating to your application. If you are a developer, you would not make any changes to these components, but understanding this concepts would be helpful.
SecurityContext
As the name implies, this interface is the corner stone of storing all the security related details for your application. When you enable spring security for your application, a SecurityContext will enable for each application and stores the details of authenticated user, etc. It uses Authentication object for storing the details related to authentications.
SecurityContextHolder
This class is important for accessing any value from the SecurityContext. You would never directly access the security context, you have to use SecurityContextHolder to get the context and then access the details. In simple terms, it is an interface between client and context.By default, this SecurityContextHolder uses ThreadLocal for storing the details.
If you want to know the currently authenticated user, the below snippet would help you:
Object principal = SecurityContextHolder.getContext().getAuthentication().getPrincipal();
if (principal instanceof UserDetails) {
    String username = ((UserDetails)principal).getUsername();
} else {
    String username = principal.toString();
}
Authentication
Let’s look at the process involved on authentication in the spring security:
- A user is prompted to log in with a username and password.
- The system verifies that the password is correct for the username.
- The context information for that user is obtained and list of roles. etc.
The above three steps constitute a successful authentication process and spring security authentication exactly does that for your application.
The following are the steps to acceive the authentication:
- Authentication is an interface which has several implementations for different authentication models. For a simple user name and password authentication, spring security would use
UsernamePasswordAuthenticationToken. When user enters username and password, system creates a new instance ofUsernamePasswordAuthenticationToken. - The above token will be passed to
AuthenticationManagerfor the validation. Internally whatAuthenticationManagerwill do is to iterate the list of configuredAuthenticationProviderto validate the request. There should be atleast one provider to be configured for the valid authentication. - If the above step is success, the
AuthenticationManagerreturns a populatedAuthenticationinstance. - The final step is to establish a security context by invoking
SecurityContextHolder.getContext().setAuthentication(…), passing in the returned authentication object.
The above steps are internal process of spring security framework and developer need not write any code to perform the above actions. I have explained only for better understanding of spring security architecture and its implementations.
UserDetailsService
It is a core interface in spring security to load user specific data. This interface is considered as user DAO and will be implemented by specific DAO implementations. For example, for a basic in memory authentication, there is a InMemoryUserDetailsManager. This interface declares only one method loadUserByUsername(String username) which simplifies the implementation classes to write other specific methods.
In simple words, if you want to use your existing DAO classes to load the user details from the database, just implement the UserDetailsService and override the method loadUserByUsername(String username). An example of this implementation would look like this:
@Service
public class CurrentUserDetailsService implements UserDetailsService {

    private final UserService userService;

    @Autowired
    public CurrentUserDetailsService(UserService userService) {
        this.userService = userService;
    }

    public CurrentUser loadUserByUsername(String username) throws UsernameNotFoundException {
        User user = userService.getUserByUsername(username);
        return new CurrentUser(user);
    }
}
In the above code, the model CurrentUser must of of type org.springframework.security.userdetails.UserDetails. In the below example application, I have extended the org.springframework.security.userdetails.UserDetails class and written the custom user class. This will have the advantage of not exposing our domain class.
GrantedAuthority
Apart from authenticating to the application, another important component is to get the list of granted authorities for the logged in user. This comes as part of the authorization process. This is retrieved by calling the getAuthorities() in Authentication object. This returns the list of GrantedAuthority which denotes roles for the users.
Spring Security Example Application
In this section we will go through a simple spring security example.
HelloController.java
This is the controller class which defines three URLs : /hello, /admin and /super.
@Controller
public class HelloController {

	@Autowired
	UserDetailsService userService;

	@RequestMapping(value = { "/", "/hello**" }, method = RequestMethod.GET)
	public ModelAndView welcomePage() {
		ModelAndView model = new ModelAndView();
		model.addObject("title", "Spring Security Example");
		model.addObject("message", "This is Hello World!");
		model.setViewName("hello");
		return model;

	}

	@RequestMapping(value = "/admin**", method = RequestMethod.GET)
	public ModelAndView adminPage() {
		UserDetails userDetails = userService.loadUserByUsername("admin");
		System.out.println(userDetails.getUsername());
		Authentication auth = SecurityContextHolder.getContext().getAuthentication();
		String name = auth.getName();
		ModelAndView model = new ModelAndView();
		model.addObject("title", "Spring Security Example");
		model.addObject("message", "Logged In as  " + name + "!");
		model.setViewName("admin");
		return model;
	}

	@RequestMapping(value = "/super**", method = RequestMethod.GET)
	public ModelAndView dbaPage() {
		Authentication auth = SecurityContextHolder.getContext().getAuthentication();
		String name = auth.getName();
		ModelAndView model = new ModelAndView();
		model.addObject("title", "Spring Security Example");
		model.addObject("message", "Logged In as  " + name + "!");
		model.setViewName("admin");
		return model;
	}

}
WebSecurityConfigurerAdapter
This is the Java configuration class for writing the web based security configurations. You can override the methods in this class to configure the following things:
- Enforce the user to be authenticated prior to accessing any URL in your application
- Create a user with the username “user”, password “password”, and role of “ROLE_USER”
- Enables HTTP Basic and Form based authentication
- Spring Security will automatically render a login page and logout success page for you
A basic configuration would look like this:
@Configuration
@EnableGlobalMethodSecurity(prePostEnabled = true)
@Order(SecurityProperties.ACCESS_OVERRIDE_ORDER)
public class SecurityConfig extends WebSecurityConfigurerAdapter {

	@Autowired
    private UserDetailsService userDetailsService;

	@Autowired
	public void configure(AuthenticationManagerBuilder auth) throws Exception {
		auth
        .userDetailsService(userDetailsService);
	}
	@Override
	protected void configure(HttpSecurity http) throws Exception {

	  http.authorizeRequests()
		.antMatchers("/admin/**").access("hasRole('ROLE_ADMIN')")
		.antMatchers("/super/**").access("hasRole('ROLE_ADMIN') or hasRole('ROLE_SUPER')")
		.and().formLogin();
	}
}
Domain Classes
CurrentUser.java
public class CurrentUser extends org.springframework.security.core.userdetails.User {
	private User user;

	public CurrentUser(User user) {
		super(user.getUsername(), user.getPassword(), AuthorityUtils.createAuthorityList(user.getRole().toString()));
		this.user = user;
	}

	public User getUser() {
		return user;
	}

	public Role getRole() {
		return user.getRole();
	}
}
Role.java
public enum Role {
    ROLE_USER, ROLE_ADMIN,ROLE_SUPER
}
User.java
@Entity
@Table(name = "users")
public class User {

	@Id
	@Column(name = "username", nullable = false, unique = true)
	private String username;
	@Column(name = "password", nullable = false)
	@NotNull
	private String password;
	@Column(name = "enabled", nullable = false)
    @NotNull
    private Boolean enabled;

	@Column(name = "role", nullable = false)
    @Enumerated(EnumType.STRING)
    private Role role;
	//getters and setters
}
Spring Data Repository
This section explains the service classes and spring data repository implementation.
CurrentUserDetailsService.java
@Service
public class CurrentUserDetailsService implements UserDetailsService {

    private final UserService userService;

    @Autowired
    public CurrentUserDetailsService(UserService userService) {
        this.userService = userService;
    }

    public CurrentUser loadUserByUsername(String username) throws UsernameNotFoundException {
        User user = userService.getUserByUsername(username);
        return new CurrentUser(user);
    }
}
UserService.java
public interface UserService {
    User getUserByUsername(String username);
}
UserServiceImpl.java
@Service
public class UserServiceImpl implements UserService {
    private final UserRepository userRepository;

    @Autowired
    public UserServiceImpl(UserRepository userRepository) {
        this.userRepository = userRepository;
    }
    @Override
    public User getUserByUsername(String username) {
        return (User)userRepository.findByUsername(username);
    }

}
UserRepository.java
public interface UserRepository extends JpaRepository<User, Long> {
    User findByUsername(String username);
}
Spring MVC Configurations
This is the MVC configurations required to run this application.
@EnableWebMvc
@Configuration
@EnableJpaRepositories
@Import({ SecurityConfig.class })
public class AppConfig extends WebMvcConfigurerAdapter{

	@Bean
	public InternalResourceViewResolver viewResolver() {
		InternalResourceViewResolver viewResolver
                          = new InternalResourceViewResolver();
		viewResolver.setViewClass(JstlView.class);
		viewResolver.setPrefix("/WEB-INF/JSP/");
		viewResolver.setSuffix(".jsp");
		return viewResolver;
	}

	@Override
    public void configureDefaultServletHandling(DefaultServletHandlerConfigurer configurer) {
        configurer.enable();
    }
}
Resource Files
Here is the files used under the resources section of this project. I have loaded the user details at the start of the application as I am using the in-memory database for the demo purpose.
data.sql
INSERT INTO users(username,password,role,enabled) VALUES ('admin','pass','ROLE_ADMIN', true);
INSERT INTO users(username,password,role,enabled) VALUES ('super','pass','ROLE_SUPER', true);
INSERT INTO users(username,password,role,enabled) VALUES ('krishna','pass','ROLE_USER', true);
INSERT INTO users(username,password,role,enabled)VALUES ('sanaulla','pass','ROLE_USER', true);
schema.sql
create table users(
      username varchar_ignorecase(50) not null primary key,
      password varchar_ignorecase(50) not null,
      role varchar_ignorecase(50) not null,
      enabled boolean not null);
application.properties
spring.jpa.show-sql = true
logging.level.org.springframework.data=DEBUG
spring.jpa.hibernate.ddl-auto=
Spring Boot Application
I am using Spring Boot for running this spring security example application. If you want to learn more about how to run the spring boot applications, please our previous article on spring boot.
pom.xml
 <parent>
		<groupId>org.springframework.boot</groupId>
		<artifactId>spring-boot-starter-parent</artifactId>
		<version>1.2.5.RELEASE</version>
	</parent>
	<properties>
		<java.version>1.8</java.version>
	</properties>
	<dependencies>
		<dependency>
			<groupId>org.slf4j</groupId>
			<artifactId>slf4j-api</artifactId>
			<version>1.7.12</version>
		</dependency>
		<dependency>
			<groupId>org.springframework.boot</groupId>
			<artifactId>spring-boot-starter-test</artifactId>
			<scope>test</scope>
			<exclusions>
				<exclusion>
					<groupId>org.springframework</groupId>
					<artifactId>spring-test</artifactId>
				</exclusion>
			</exclusions>
		</dependency>
		<dependency>
			<groupId>org.springframework.boot</groupId>
			<artifactId>spring-boot-starter-web</artifactId>
		</dependency>
		<dependency>
			<groupId>org.springframework.boot</groupId>
			<artifactId>spring-boot-starter-security</artifactId>
		</dependency>
		<dependency>
			<groupId>jstl</groupId>
			<artifactId>jstl</artifactId>
			<version>1.2</version>
		</dependency>
		<dependency>
			<groupId>org.apache.tomcat.embed</groupId>
			<artifactId>tomcat-embed-jasper</artifactId>
			<scope>provided</scope>
		</dependency>
		<dependency>
			<groupId>org.springframework.boot</groupId>
			<artifactId>spring-boot-starter-data-jpa</artifactId>
		</dependency>
		<dependency>
			<groupId>hsqldb</groupId>
			<artifactId>hsqldb</artifactId>
			<version>1.8.0.7</version>
		</dependency>

	</dependencies>
	<build>
		<finalName>spring-boot-security-example</finalName>
	</build>
Application.java
@SpringBootApplication
public class Application {
	public static void main(String[] args) {
		SpringApplication.run(Application.class, args);
	}
}
Run Application
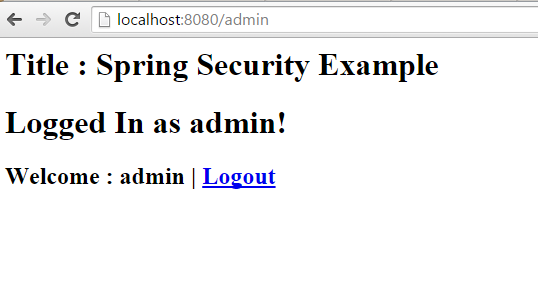
When you run the application, it will be accessible at http://localhost:8080. I have not configured for any context root, so spring boot will run the application in the default port for tomcat.
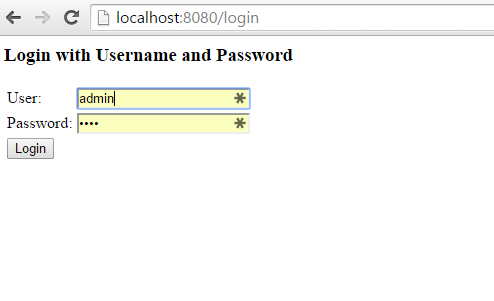
When you try to access the URL http://localhost:8080/admin, you will be asked for the login details.

If you look at the above example, spring security automatically redirect to the /login page for the authentication. We have not configured that context path in our application, that is implemented by spring security’e web based authentication. We can override that configuration. I will show that in my next tutorials.

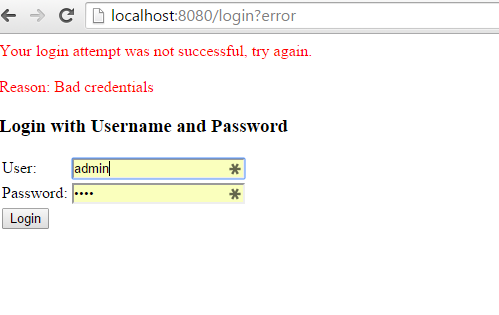
When you enter the wrong credentials, you would get the following error page.

This is the basic example of configuring your spring security applications.
Download Source Code
You can download the working code example in the below link:
Exceptions
When you are working with purely Java based configurations and Spring Boot, there is a chance that you may get some exception which may take a while to figure out the root cause. I have captured few issues that may pop-up and list down in this section. It may save your time if you are new to this world :).
No mapping found for HTTP request with : If you are frequently getting this exception, it says that you have not done the mapping to your views. But, if you think that you have configured everything perfect, check if you have this configurations added to your Spring MVC config file:
@Override
    public void configureDefaultServletHandling(DefaultServletHandlerConfigurer configurer) {
        configurer.enable();
    }
The above configuration may solve your request mapping issues.
JSPs are not being rendered : If JSPs are not being rendered as such, and instead print out the contents, you have to add the jasper parser dependency in your pom.xml as below:
<dependency>
    <groupId>org.apache.tomcat.embed</groupId>
    <artifactId>tomcat-embed-jasper</artifactId>
    <scope>provided</scope>
</dependency>
I hope this may solve your problem.
Conclusion
I hope this tutorial helped you to understand the configuration and running a simple spring security application. I focused more on explaining the core concepts like Spring Security Context Holder, UserDetailsServices, SpringContext, Authentication and many other core classes that are used for performing the authentication and authorization behind the scenes.
In my next tutorials, I will actually show lot of different configurations that will be used in your production grade applications.

 Ehcache Example