In this article I shall discuss about using themes in Spring application. A theme is a collection of static resources, typically style sheets and images, that affect the visual style of the application. We can apply Spring Web MVC framework themes to set the overall look-and-feel of application, thereby enhancing user experience. This would be very useful for customizing the entire look and feel of the website. We can create multiple themes and it is easy to switch to different themes, it reflects the change in the whole website. I hope this post would provide good insight on how to configure themes in spring framework. If you have any questions, please write it in the comments section.
also read: follow us on @twitter and @facebook
- Spring Tutorials ( Collection for Spring reference tutorials)
- Spring Framework Interview Questions
- Introduction to Spring LDAP
- How to write Custom Spring Callback Methods?
Defining themes in Spring Application
To use themes in Spring , you need to do the following:
- First, you need to set up an implementation of the interfaceorg.springframework.ui.context.ThemeSource. By default the control is delegated to org.springframework.ui.context.support.ResourceBundleThemeSource implementation that loads properties files from the root of the classpath. Register a bean in the application context with the reserved name themeSource and class as ResourceBundleThemeSource.
- Next define the theme in the properties file. The properties file lists the resources that make up the theme. For example:
styleSheet=/themes/dark.css
background=/themes/img/coolBg.jpg
The keys of the properties are the names that refer to the themed elements from view code.
- Once the themes are defined, to decide which theme to use, the DispatcherServlet will look for a bean named themeresolver to find out which ThemeResolver implementation to use.
Spring Themes Example
Let see ths usage of themes in the following example:
Let us have working Eclipse IDE in place and follow steps below to create a Spring application:
Step 1: Create Project in Eclipse
Create a Dynamic Web Project with a name SpringThemeExample.
Follow the option File -> New -> Project ->Dynamic Web Projectand finally select Dynamic Web Project wizard from the wizard list. Now name your project as SpringExceptionHandling using the wizard window.
Step 2: Add external libraries
Drag and drop below mentioned Spring and other libraries into the folder WebContent/WEB-INF/lib:
- commons-logging-1.1.1.jar
- org.springframework.web.servlet-3.2.2.RELEASE.jar
- spring-aop-3.2.2.RELEASE.jar
- spring-aspects-3.2.2.RELEASE.jar
- spring-beans-3.2.2.RELEASE.jar
- spring-context-support-3.2.2.RELEASE.jar
- spring-context-3.2.2.RELEASE.jar
- spring-core-3.2.2.RELEASE.jar
- spring-expression-3.2.2.RELEASE.jar
- spring-webmvc-3.2.2.RELEASE.jar
- spring-web-3.2.2.RELEASE.jar
Step 3: Create Controller and theme resolver classes
Create the package com.javabeat.controller under src folder. (Right click onsrc -> New -> Package ->)
Create the Controller HomeController and the theme resolver DarkAndBrightThemeResolver under the package com.javabeat.controller.
Contents of HomeController are as follows:
package com.javabeat.controller;

import org.springframework.stereotype.Controller;
import org.springframework.web.bind.annotation.RequestMapping;
import org.springframework.web.bind.annotation.RequestMethod;

@Controller
@RequestMapping("/home")
public class HomeController {
	@RequestMapping(method = RequestMethod.GET)
    public String showHome()
    {
        return "home";
    }
}
Contents of DarkAndBrightThemeResolver are as follows:
package com.javabeat.controller;

import java.util.Random;

import javax.servlet.http.HttpServletRequest;
import javax.servlet.http.HttpServletResponse;

import org.springframework.web.servlet.theme.AbstractThemeResolver;

public class DarkAndBrightThemeResolver extends AbstractThemeResolver {
	@Override
	public String resolveThemeName(HttpServletRequest arg0) {
		return isNight() ? "dark" : "bright";
	}

	// implementation
	private boolean isNight() {
		return new Random().nextBoolean();
	}

	@Override
	public void setThemeName(HttpServletRequest arg0, HttpServletResponse arg1,
			String arg2) {
	}
}
Step 4: Create the CSS
Lets create the css files (one of the many static resources that a theme can have) associated with each theme. Here are the css files (I placed them under the themes folder under the webcontent directory):
bright.css
body {
        color: blue;
        background-color: white;
}
dark.css
body {
	color: white;
	background-color: black;
}
Step 5: Define themes for Spring MVC
Next define the themes. The default way to do this in Spring MVC is to use one property file (I’ve placed the property files under the src/resources directory) for each theme. Here are the two theme definitions:
bright.properties
#bright theme properties file bright.properties
css=themes/bright.css
page.title=Welcome to Bright Theme
welcome.message=Hello Visitor!! Have a Good day!!
dark.properties
#dark theme properties file dark.properties
css=themes/dark.css
page.title=Welcome to Dark Theme
welcome.message=Hello Visitor!! Have a Good night!!
Step 6: Create view files.
Create a sub-folder with a name jsp under the WebContent/WEB-INF folder. Create view file home.jsp under jsp sub-folder.
Contents of >home.jsp are
 <%@ page language="java" contentType="text/html; charset=ISO-8859-1"
     pageEncoding="ISO-8859-1"%>
 <%@ taglib uri="http://www.springframework.org/tags" prefix="spring"%>

 <!DOCTYPE html PUBLIC "-//W3C//DTD HTML 4.01 Transitional//EN" "http://www.w3.org/TR/html4/loose.dtd">
 <html>
 <head>
 <meta http-equiv="Content-Type" content="text/html; charset=ISO-8859-1">
 <link  rel="stylesheet" href="<spring:theme code='css'/>" type="text/css" />
 <title><spring:theme code="page.title"/></title>
 </head>
 <body>
 <spring:theme code="welcome.message" />
 </body>
</html>
Step 7: Create spring configuration files
Create the configuration files web.xml and HelloWeb-servlet.xml. under the the directory WEB-INF.
The contents of web.xml are:
<?xml version="1.0" encoding="UTF-8"?>
<web-app xmlns:xsi="http://www.w3.org/2001/XMLSchema-instance"
xmlns="http://java.sun.com/xml/ns/javaee"
xmlns:web="http://java.sun.com/xml/ns/javaee/web-app_2_5.xsd"
xsi:schemaLocation="http://java.sun.com/xml/ns/javaee
http://java.sun.com/xml/ns/javaee/web-app_2_5.xsd" id="WebApp_ID" version="2.5">
  <display-name>Spring Themes Example</display-name>
   <servlet>
        <servlet-name>HelloWeb</servlet-name>
        <servlet-class>
           org.springframework.web.servlet.DispatcherServlet
        </servlet-class>
        <load-on-startup>1</load-on-startup>
    </servlet>

    <servlet-mapping>
        <servlet-name>HelloWeb</servlet-name>
        <url-pattern>*.html</url-pattern>
    </servlet-mapping>

</web-app>
The contents of HelloWeb-servlet.xml are:
<?xml version="1.0" encoding="UTF-8"?>
<beans xmlns="http://www.springframework.org/schema/beans"
	xmlns:context="http://www.springframework.org/schema/context"
	xmlns:xsi="http://www.w3.org/2001/XMLSchema-instance"
	xsi:schemaLocation="
http://www.springframework.org/schema/beans
http://www.springframework.org/schema/beans/spring-beans-3.0.xsd
http://www.springframework.org/schema/context
http://www.springframework.org/schema/context/spring-context-3.0.xsd">

	<!-- Scan for controllers -->
	 <context:component-scan base-package="com.javabeat.controller"/>
	 <context:annotation-config />

	<!-- Views are jsp pages defined directly in the root -->
	<bean class="org.springframework.web.servlet.view.InternalResourceViewResolver">
		<property name="prefix" value="/WEB-INF/jsp/" />
		<property name="suffix" value=".jsp" />
	</bean>
<bean id="themeSource" class="org.springframework.ui.context.support.ResourceBundleThemeSource"/>
<bean id="themeResolver" class="com.javabeat.controller.DarkAndBrightThemeResolver"/>
</beans>
Here you will notice that bean with id themeSource is defined which tell Spring where to find themes. The bean named themeResolver, tells Spring what theme to use when a request is made. Spring provides three theme resolvers out of the box: FixedThemeResolver, SessionThemeResolver, CookieThemeResolver that are sufficient for most use cases. However, our site needs to inherit a theme based on the time, we will call our new theme resolver called DarkAndBrightThemeResolver, which we have created in the one of the above steps.
Step8: Deploy and execute the spring themes example
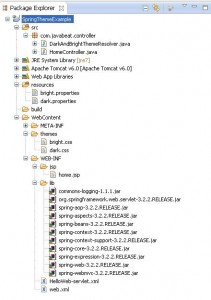
The final directory structure is as follows:

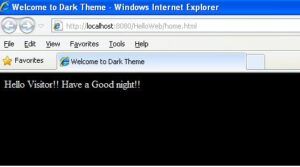
Once all the files are ready export the application. Right click on your application and use Export > WAR File option and save your HelloWeb.war file in Tomcat’s webapps folder. Now start the Tomcat server and try to access the URL http://localhost:8080/HelloWeb/home. You should see the following scree
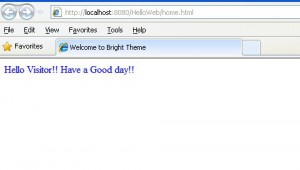
Upon refreshing the page you should see the below page:

We can switch between styles by refreshing the page.
Summary
In this article we saw how we can use themes in Spring. In the next article shall discuss about uploading multipart file using Spring. If you are interested in receiving the future articles, please subscribe here. follow us on @twitter and @facebook


 Exception Handling in Spring with Example