
This tutorial guides you through writing simple REST APIs using Loopback (a Node.js framework) using MySQL as the back end. At the end of this tutorial, you would be able to write your own REST APIs using Loopback framework.
In one of our previous posts here, we wrote about building RESTful APIs using ExpressJS and MongoDB. For every programming language ecosystem we have more than one web framework and the same is true for Node.js as well. One of such popular frameworks is the Loopback. Both ExpressJS and Loopback are sponsored by StrongLoop.
In this post we are going to implement the same example we used in this post but using Loopback and MySQL DB.
Table of Contents
List of sections covered in this tutorial are:
- What is Loopback?
- Installing Loopback
- Create Loopback App
- Creating MySQL Datasource
- Creating Model in Loopback
- Testing CRUD APIs
- Conclusion
Before jump into learning loopback, lets have more idea on what is this new framework in Node.js ecosystem and how this is different from other frameworks like ExpressJS.
What is Loopback?
Loopback is a opensource Node.js API framework for building REST APIs for your client applications (which can be anything like browser, mobile, etc) in most simplest way. While this is another runner in the fast growing Node.js frameworks crowd, but Loopback distinguishes itself from other frameworks like ExpressJS by providing very simple and easy to develop APIs. This is built on top of Express, most popular framework for Node.js.
There are many great advantages of loopback that makes its powerful to choose as a defacto framework for the Node.js. The future is more of JavaScript frameworks that is going to dominate the internet, loopback fits perfectly on the server side language with its easy and simple development to attract more developers.
Installing Loopback
- Loopback is available as a NPM package. As with all the NPM packages, LoopBack can be installed using
npm. - Firstly we will install
slccommand line tool using this commandnpm install -g strongloop.slccommand line tool can be used to create applications and other app artifacts. - Next is to install Loopback which can be done by running the command:
npm install -g loopback. - But to create loopback application using
slccommand line tool, we would have to install two more npm packages namely:cookie-parseranderrorhandler. These packages can be installed using the command:npm install -g cookie-parser, errorhandler.
Note: On windows one would have to run the command prompt as an administrator to be able to install slc.
- Also Read : Packaging and Deploying Node.js Applications
Create loopback app
Strongloop node package comes with a command line tool called slc which can be used to create new application, model classes, add properties to it, define data sources to name a few.
Run this command to start creating new application: slc loopback. You will be prompted for name of your application and the folder (defaults to the name of the application) in which your application would reside. Below is what you would find on your screens:
G:\node>slc loopback

     _-----_
    |       |    .--------------------------.
    |--(o)--|    |  Let's create a LoopBack |
   `---------´   |       application!       |
    ( _´U`_ )    '--------------------------'
    /___A___\
     |  ~  |
   __'.___.'__
 ´   `  |° ´ Y `

? What's the name of your application? loopback-rest
? Enter name of the directory to contain the project: loopback-rest
   create loopback-rest/
     info change the working directory to loopback-rest

Generating .yo-rc.json

I'm all done. Running npm install for you to install the required dependencies. If this fails, try running the command yourself.

   create .editorconfig
   create .jshintignore
   create .jshintrc
   create README.md
   create server\boot\authentication.js
   create server\boot\explorer.js
   create server\boot\rest-api.js
   create server\boot\root.js
   create server\middleware.json
   create server\server.js
   create .gitignore
   create client\README.md

.... npm packages installation output ....

Next steps:

  Change directory to your app
    $ cd loopback-rest

  Create a model in your app
    $ slc loopback:model

  Compose your API, run, deploy, profile, and monitor it with Arc
    $ slc arc

  Run the app
    $ node
You will find the next steps also printed. But for now we have a directory structure created which looks like below:
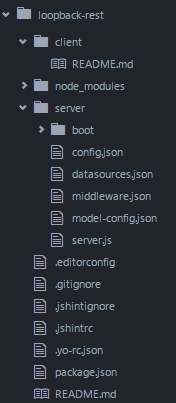
There is lot of auto generated code. Let us not worry about that for now.
We can run the application now to see what all is generated for us. Change to the app directory and run the command: node .. You can see the below output:
G:\node\loopback-rest>node .
Browse your REST API at http://localhost:3000/explorer
Web server listening at: http://localhost:3000/
Opening the URL: http://localhost:3000/explorer in the browser gives us the list of APIs available in the application.
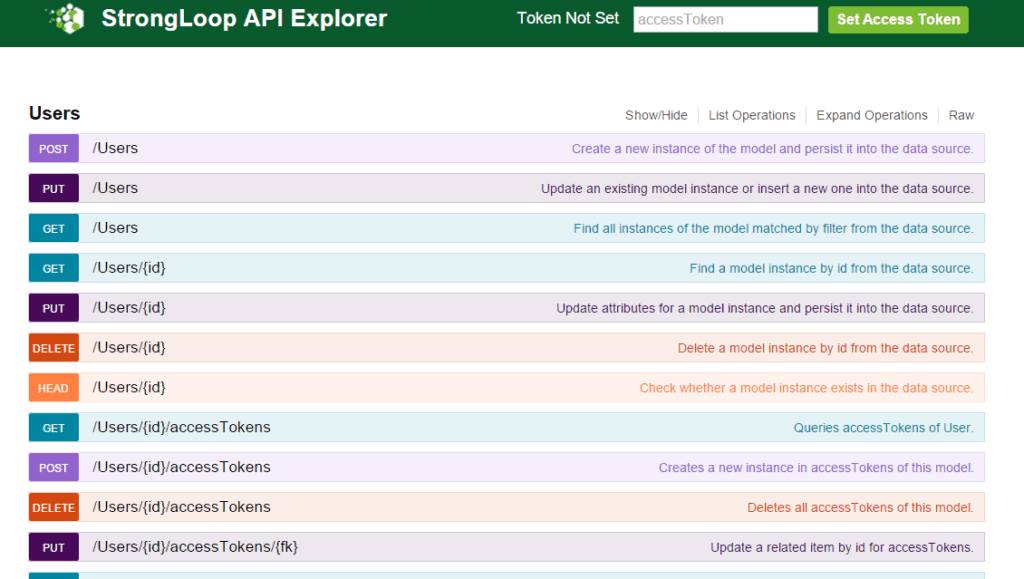 In the above image you can notice a list of APIs exposed just for the User. And all this is shipped by the framework.
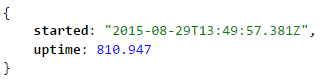
Opening the URL: http://localhost:3000/ in the browser gives us:
Creating MySQL data source
Let us associate a data source with the application. As mentioned we will be using MySQL database. First we have to install the loopback mysql connector which can be done by running the command: npm install loopback-connector-mysql --save.
Next we create a data source for the application which would use mysql connector using the below command:
G:\node\loopback-rest>slc loopback:datasource
? Enter the data-source name: mysql_db
? Select the connector for mysql_db: MySQL (supported by StrongLoop)
It requires the data source name and the connector to be used which in this case is MySQL.
The above command updates the server/datasources.json with the following:
"mysql_db": {
  "name": "mysql_db",
  "connector": "mysql"
}

We would have to update the above datasource to define the database name, hostname, port, username and password. Let us update it with the following data:
[code lang="javascript"]
"mysql_db": {
    "name": "mysql_db",
    "connector": "mysql",
    "database":"test",
    "host":"localhost",
    "port":3306,
    "password":"password",
    "username":"root"
}
Creating Model in Loopback
Let us use slc tool to create a new model in loopback. The new model can be created by using the command: slc loopback:model. It will ask a series of questions starting with the model name, data source, model’s base class and properties and their types in the model class. Below is how we provided the answers to the questions and also the properties:
G:\node\loopback-rest>slc loopback:model
? Enter the model name: book
? Select the data-source to attach book to: mysql_db (mysql)
? Select model's base class: PersistedModel
? Expose book via the REST API? Yes
? Custom plural form (used to build REST URL): books
Let's add some book properties now.

Enter an empty property name when done.
? Property name: name
(!) generator#invoke() is deprecated. Use generator#composeWith() - see http://yeoman.io/authoring/composability.html
   invoke   loopback:property
? Property type: string
? Required? Yes

Let's add another book property.
Enter an empty property name when done.
? Property name: isbn
(!) generator#invoke() is deprecated. Use generator#composeWith() - see http://yeoman.io/authoring/composability.html
   invoke   loopback:property
? Property type: string
? Required? Yes

Let's add another book property.
Enter an empty property name when done.
? Property name: author
(!) generator#invoke() is deprecated. Use generator#composeWith() - see http://yeoman.io/authoring/composability.html
   invoke   loopback:property
? Property type: string
? Required? No

Let's add another book property.
Enter an empty property name when done.
? Property name: pages
(!) generator#invoke() is deprecated. Use generator#composeWith() - see http://yeoman.io/authoring/composability.html
   invoke   loopback:property
? Property type: number
? Required? No

Let's add another book property.
Enter an empty property name when done.
? Property name:
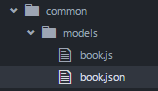
Once completed you will find two files generated: book.js and book.json as shown in the image below:
Apart from the above two files, the new model gets recorded in model-config.json as shown below:
"book": {
    "dataSource": "mysql_db",
    "public": true
  }
When we load the URL http://localhost:3000/explorer/#!/books/ you will find lot of APIs associated with books. Loading any of the books APIs, for example this one: http://localhost:3000/api/books will result in an error stating table test.books was not found. Let us create the table now:
CREATE TABLE `test`.`book` (
  `id` VARCHAR(250) NOT NULL,
  `name` VARCHAR(250) NOT NULL ,
  `isbn` VARCHAR(20) NOT NULL ,
  `author` VARCHAR(500) NULL ,
  `pages` INT NULL
) ENGINE = InnoDB;
Let us now load the same URL http://localhost:3000/api/books and this time we will get an empty JSON array response.
So just creating a model has created a whole set of REST APIs around that model. In the next section let us try out the APIs for CRUD operations.
Testing CRUD APIs
The URL: http://localhost:3000/explorer not only exposes the list of APIs for each model, but also provides a tool for testing out the APIs.
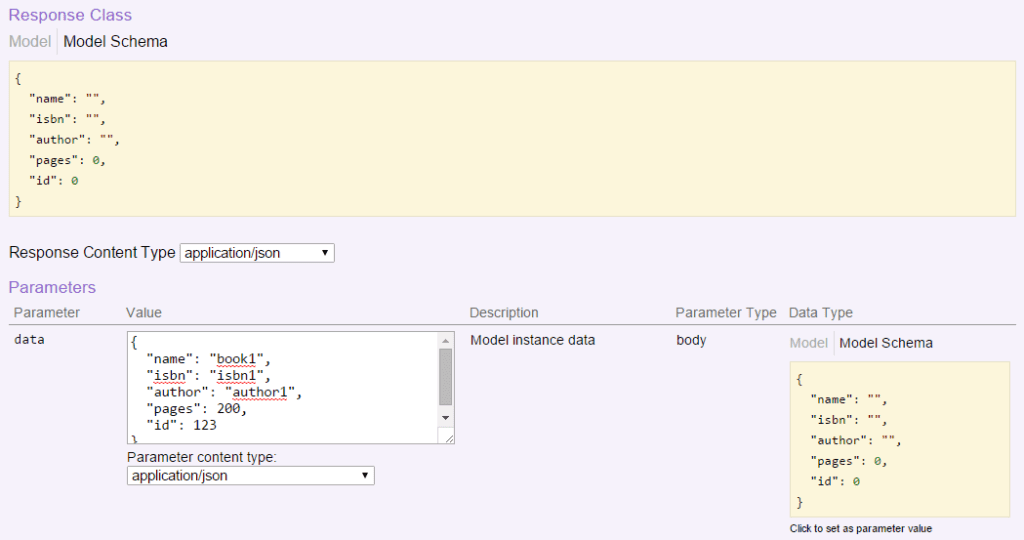
Adding a new book
The request to add a book is made using the explorer url as shown in the image below:
The response after adding the book is as shown in the image below: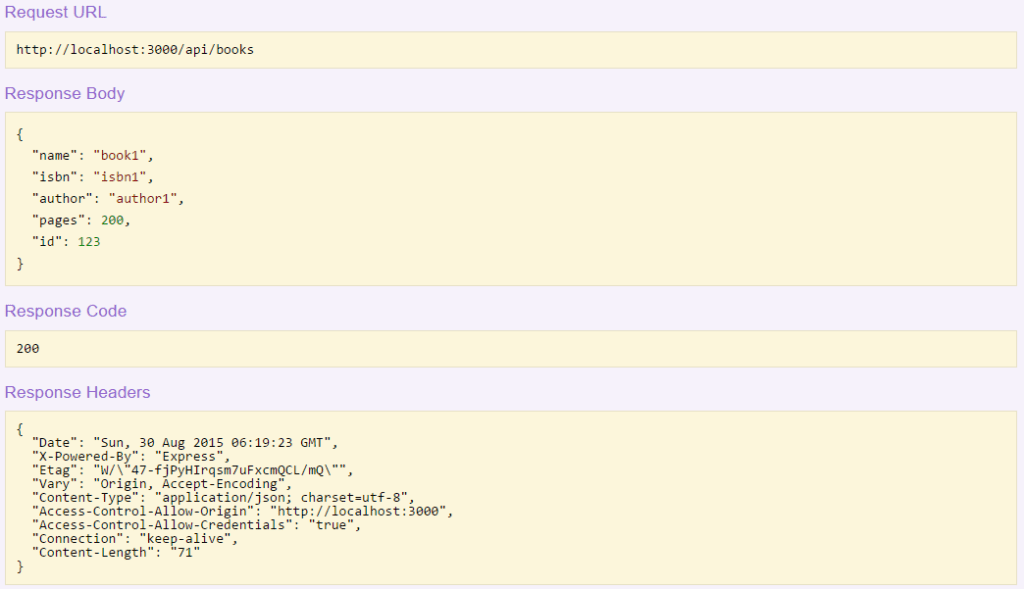 Getting a given book details
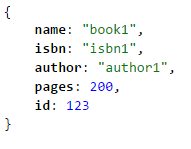
The URL: http://localhost:3000/api/books/{id} is used for getting the book details where the book is identified by the id parameter. Let us get the details of the book added above by using the URL: http://localhost:3000/api/books/123. This gives us the response as shown in the image below:
Updating book details
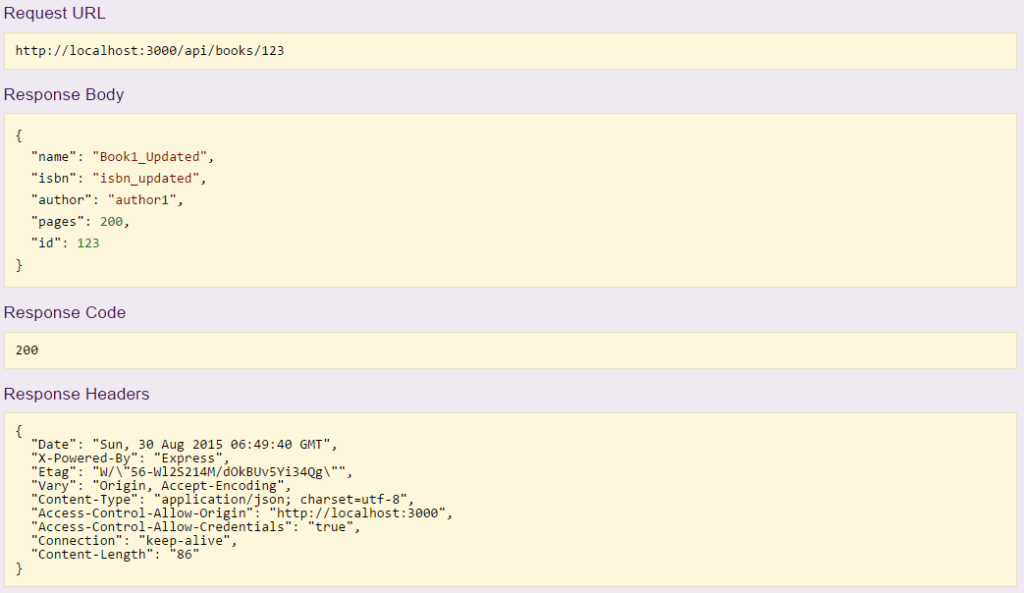
The request to update book details is made using the tool as shown below:
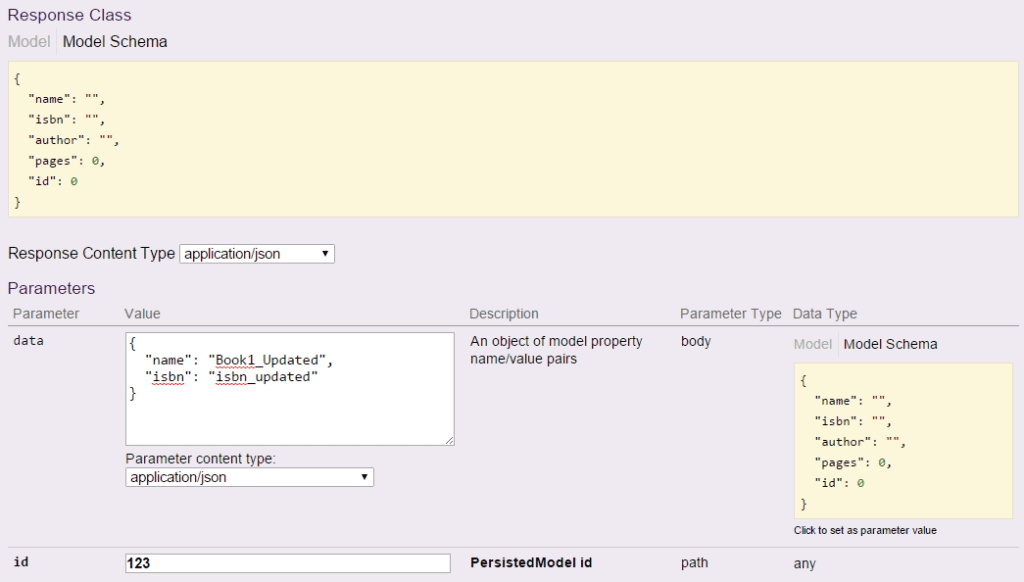
You can see in the above image that I am updating just the name and isbn and keeping rest of the same. The response from the API is as shown in the image below:
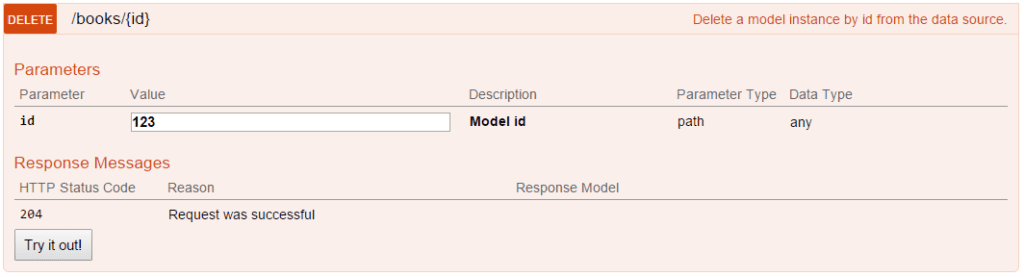
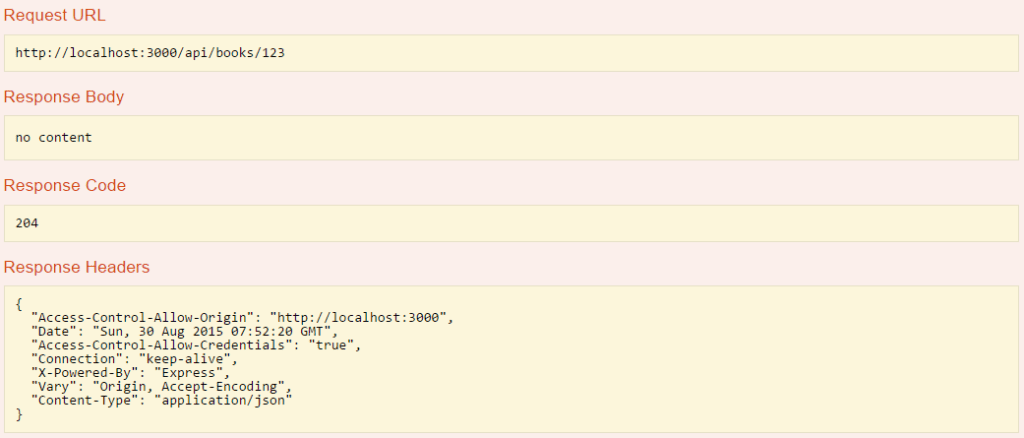
Deleting Book
The request to delete the book is made as shown below:
 The response is as shown below:
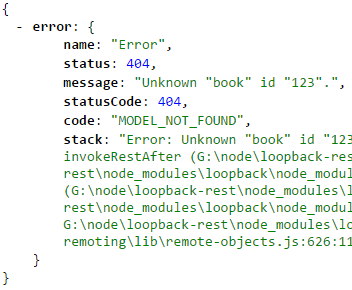
 Now trying to get the details of the book with id 123 will result in an error as shown below:
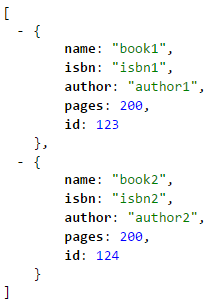
Getting list of books
Lets add few new books. Then load the URL http://localhost:3000/api/books to get the list of books as shown below:
Conclusion
So with this we have completed demonstration of CRUD operations using the APIs of Loopback and we didn’t write even a single line of code. All of the functionality above was provided by Loopback framework. In the coming posts we will explore more of this framework and see how we can build APIs using it. I have published my next article on how to use SpringLoop ARC tool for developing REST APIs using GUI.
 Complete Guide for Spring Boot Actuator